
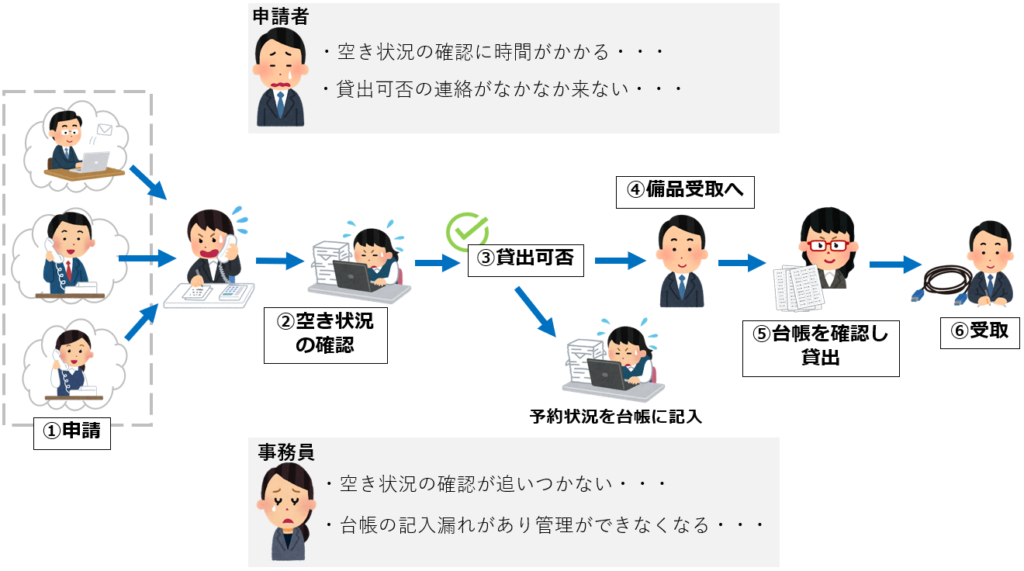
<従来の備品予約システム>
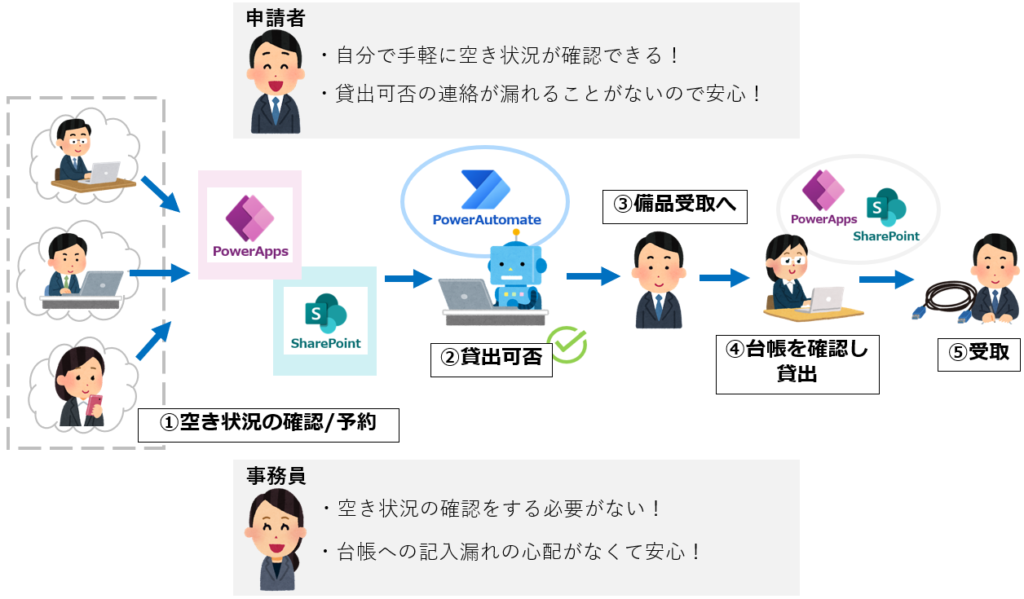
<アプリで自動化にすると・・・>
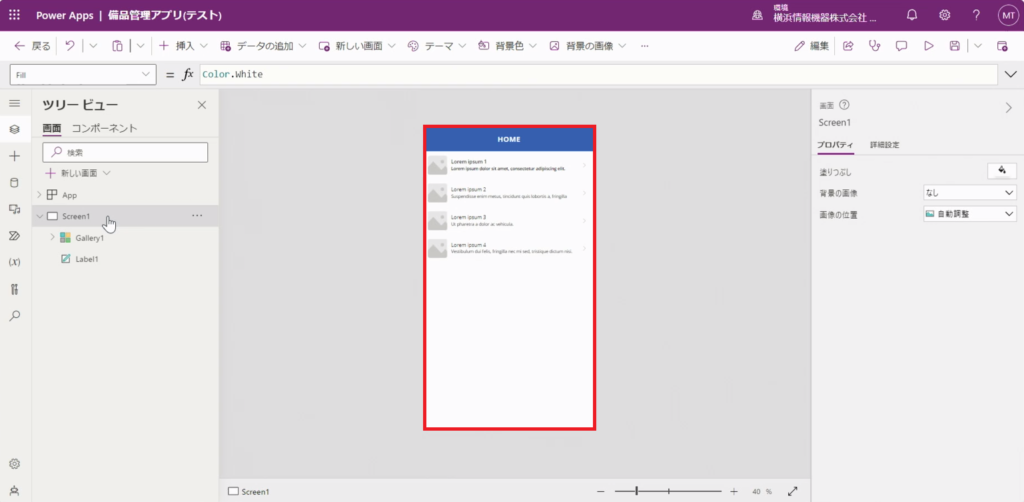
今回作成した備品管理アプリの完成版がこちらです。
Power Appsとは、Power Platformというローコード開発ツールの中の1つであり、
出来る限りソースコードを使用せず簡単にアプリ開発ができるサービスです。
今回は、SharePoint・Power Automateと連携させ、実際に備品管理アプリを作成しPower Appsがどのようなものなのか?実践してみました。
実際にアプリを作成するにあたって、つまずいた部分やその解決方法含め、細かく掲載しておりますので是非ご参考いただければと思います。
今回使用している、SharePoint内のデータソースの作成方法は「SharePointでリストを作成する方法」に掲載していますので、是非ご覧ください。
目次
- 1.アプリの画面・レイアウト作成
- ・ホーム画面
- ・備品選択画面
- ・予約状況画面
- ・予約画面
- ・予約完了画面
- 2.機能の追加
- 手順1.ホーム画面
- 手順2.備品選択画面
- 手順3.予約状況画面
- 手順4.予約画面
- 手順5.予約完了画面
- *委任エラーについて*
- 3.Power Automateによる予約状況の整理、承認フローの自動化
- 手順1.Power Automateでフローを作成する
- 手順2.フローの実行結果
- 手順3.エラーが出た場合
1.アプリの画面・レイアウト作成
・ホーム画面
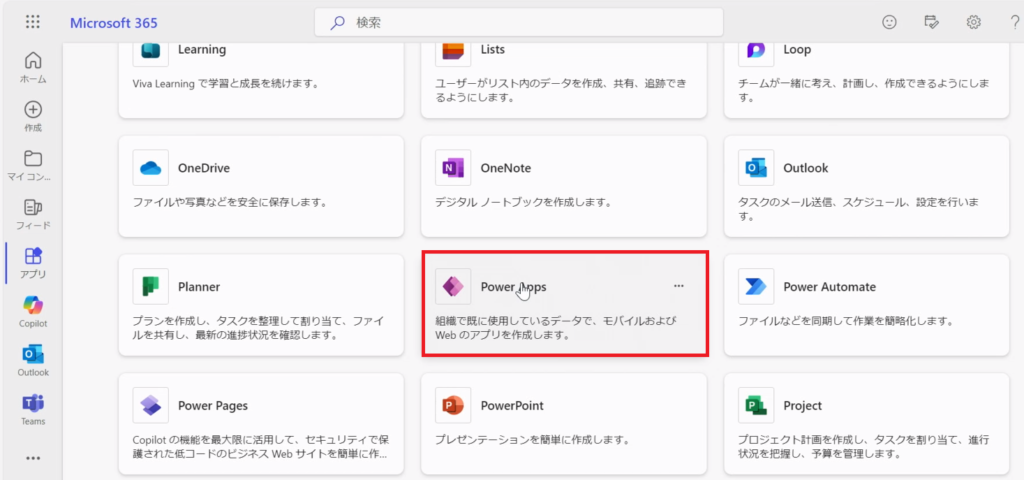
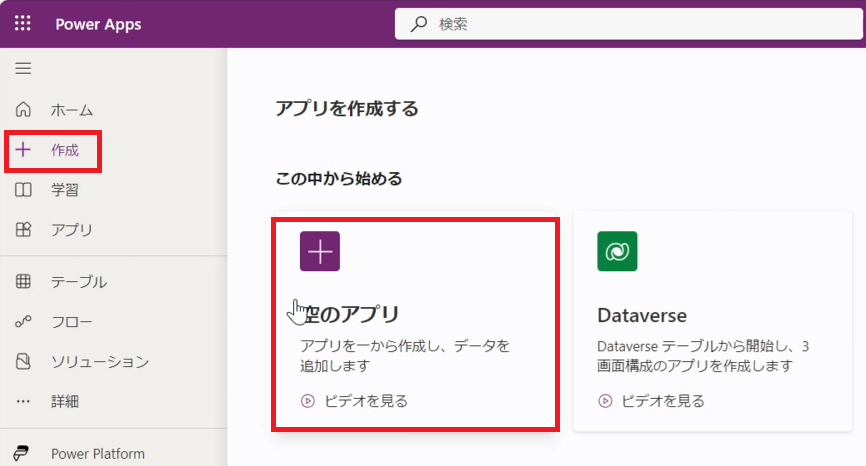
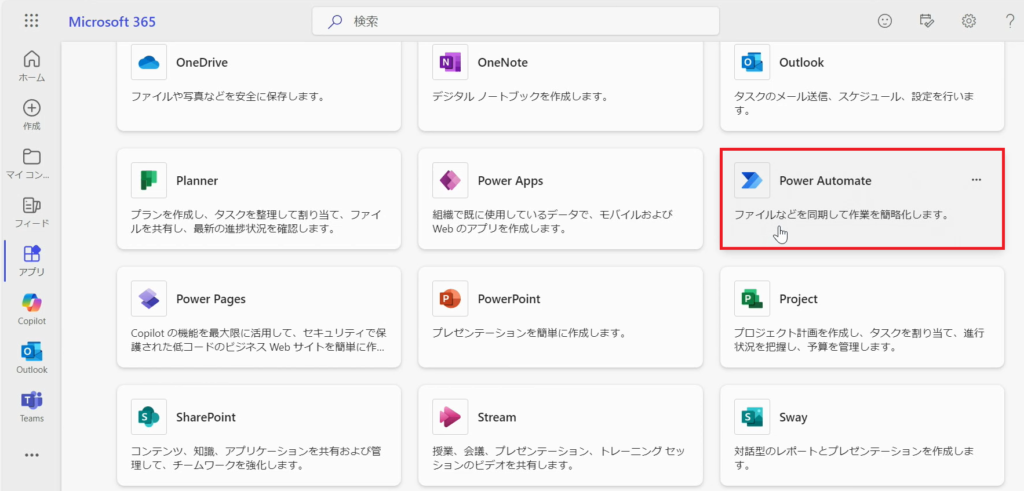
1.「Power Apps」を開きます。
2.「作成」から「空のアプリ」をクリックします。
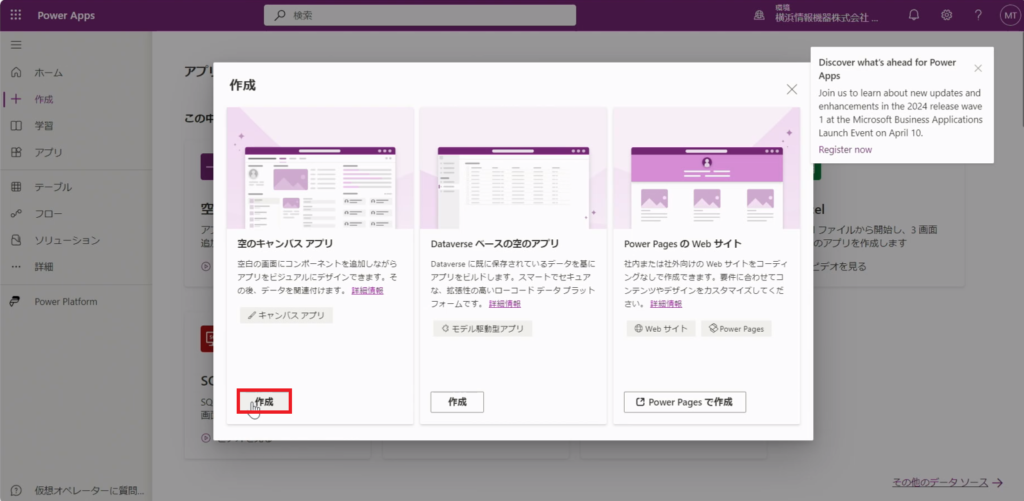
3.「空のキャンパス アプリ」の「作成」をクリックします。
Point!どれを選べばいいのだろう…他の二つは何??
→Power Appsで作成できるアプリのタイプは以下の三種類があります。
| アプリの種類 | 特徴 |
| キャンバスアプリ | 直感的な操作が可能。 デザイン→データソースの追加 という流れで作成する。 最初に箱を作り、そこに入れたいデータを入れるイメージ。 |
| モデル駆動型アプリ | データベースをモデルに作成されるため、カスタマイズ性は低いがデータの管理や操作に特化している。 最初にデータを作り、それをもとに箱を作っていくイメージ。 |
| ポータルアプリ(現PowerPages) ※機能が独立したので厳密には仲間ではない…? | 組織外のユーザーと情報を共有するためのWebサイトやページを作成できるアプリ。認証やコンテンツ管理、フォームやダッシュボードなどの機能を簡単に実装できる。 |
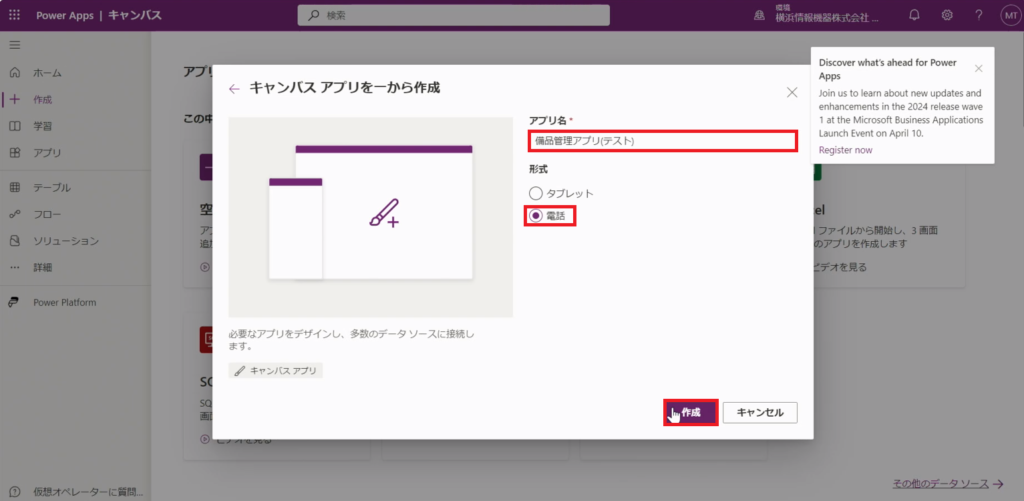
4.「アプリ名」に任意の名前を入力し、「電話」にチェックを入れて「作成」をクリックします。 ※ここでは、「備品管理アプリ(テスト)」とします。
Point!なんでどっちか選ばないといけないの?アプリの表示はどっちで開いたとしても良い感じにならないのかな??
→なりません。(なってほしいですよね…)
キャンバスアプリで作成する場合、レスポンシブデザインに対応していないので「タブレット」か「電話」の選択が必要となるのです。
| 標準でのレスポンシブデザイン対応有無 | |
| キャンバス アプリ | × |
| モデル駆動型アプリ | ○ |
| ポータル | ○ |
レスポンシブデザインとは…PCなのかスマホなのか、アプリを利用する機器によってディスプレイの大きさが変わるため、どんな画面サイズでもわかりやすい画面表示に切り替える機能・考え方のこと。
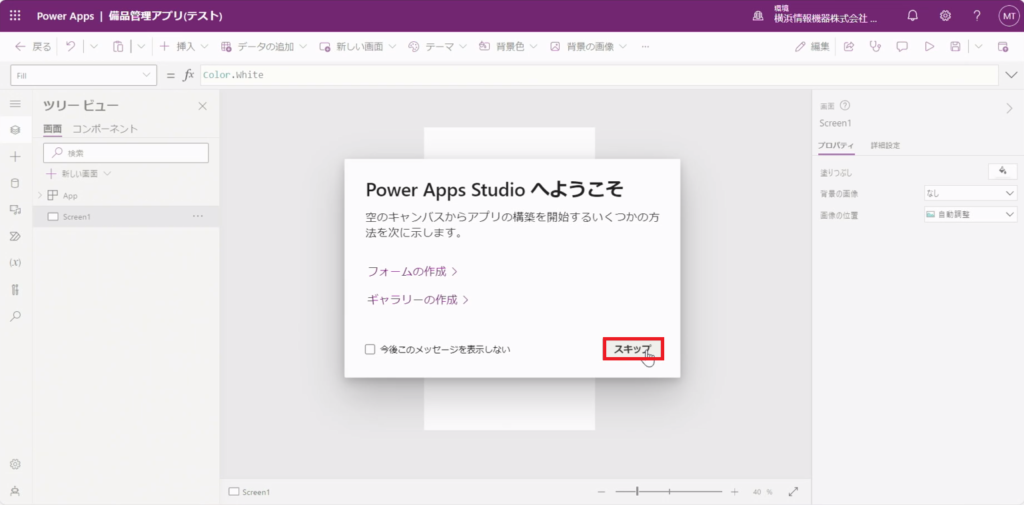
5.「スキップ」をクリックします。
Point!ギャラリー (Gallery)とフォーム(Form)とは??
→ギャラリー(Gallery)は、データソースのレコードを垂直方向または水平方向に一覧表示するコントロールです。
フォーム(form)は、データソースの指定されたレコードの情報を表示させるために利用します。
※レコードとは… 一行分のデータ、つまりリストなどの行のこと。データベース内のテーブルを構成する単位。
「詳しくはこちらで解説!」
6.「挿入」をクリックします。
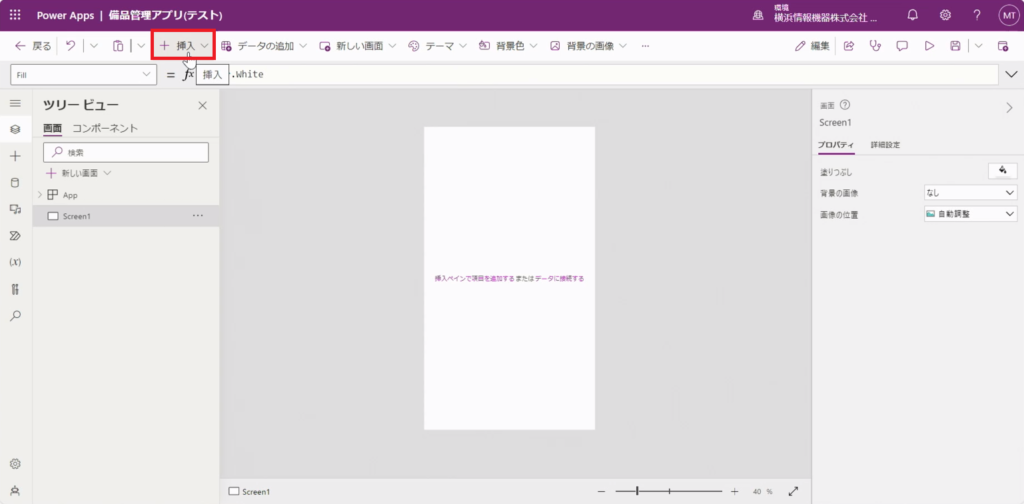
Point!コントロールは基本、この「挿入」から追加が可能です!
・そもそもコントロールとは? 「詳しくはこちらで解説!」
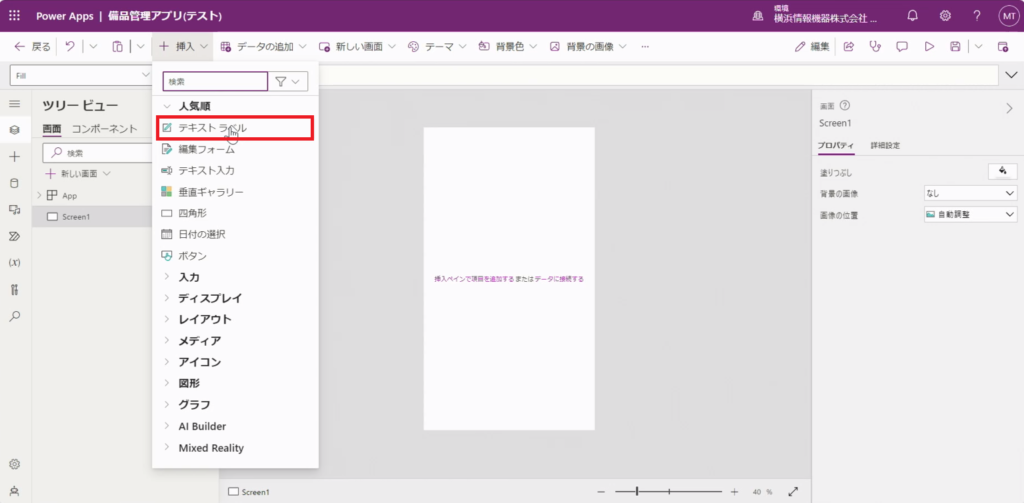
7.「テキストラベル」を選択します。
8.画面左のツリービューに「Label1」が追加されました。テキストラベルのサイズと位置を決めます。
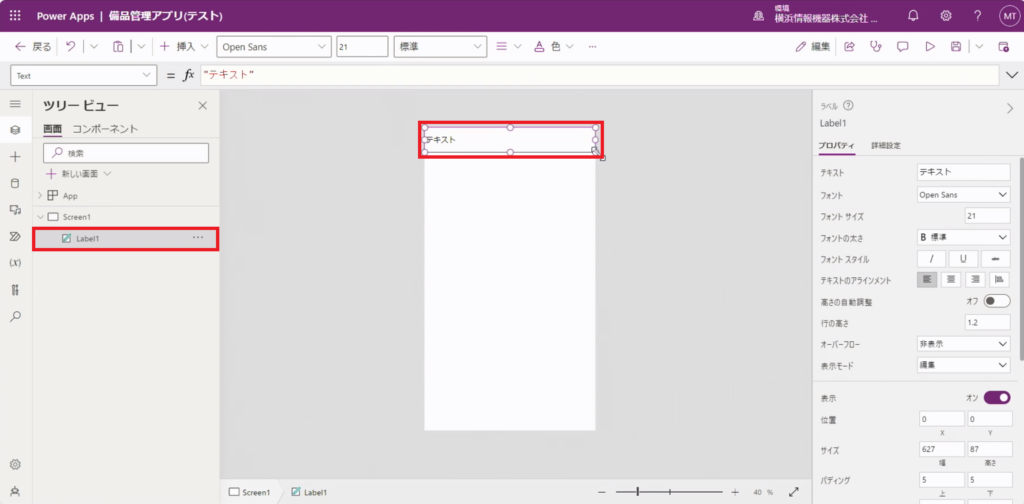
Point!テキストラベルや図、ギャラリーなど、画面上にあるものは全て画面左の「ツリービュー」に表示されます。
9.「挿入」のプルダウンから「垂直ギャラリー」を選択します。
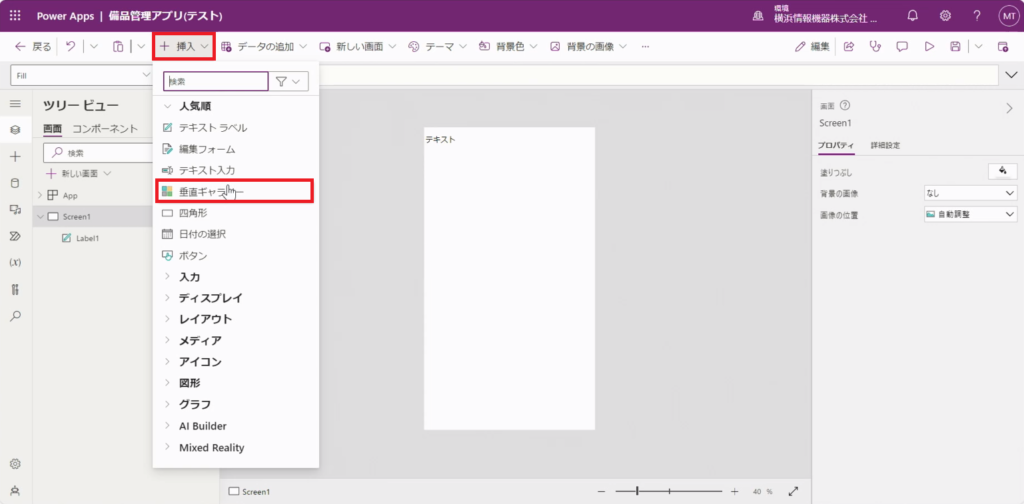
【復習】ギャラリーとは…データソースのレコードを垂直方向または水平方向に一覧表示するコントロール。今回は垂直です。
10.垂直ギャラリーのサイズと位置を決めます。
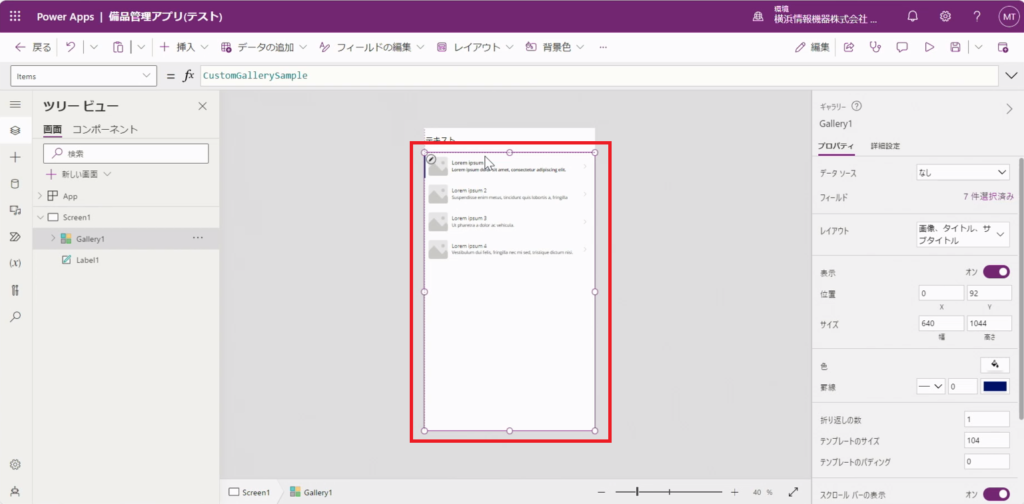
Point!直感的に表示サイズの変更や配置を決めることが可能です。
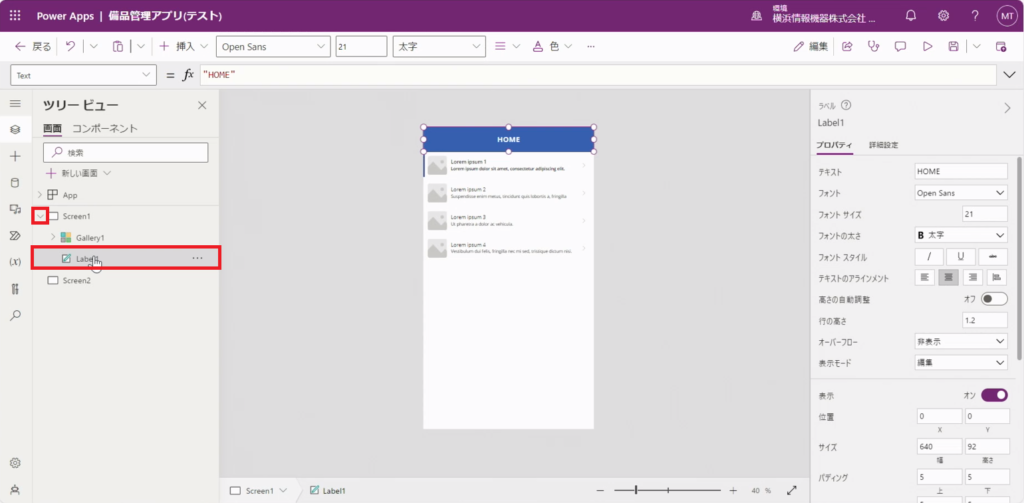
11.テキストラベルにデフォルトで表示されている、「テキスト」という文字をダブルクリックします。

12.画面右の「プロパティ」から文字サイズや文字の配置を設定できます。
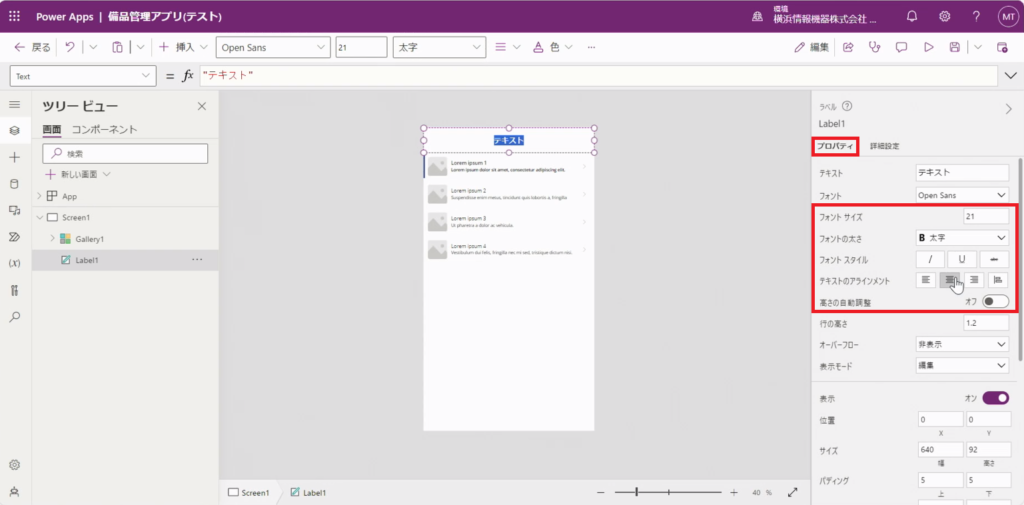
Point!画面上で選択されている箇所の詳細が右側に表示されます。
この欄で詳細を設定することができます。
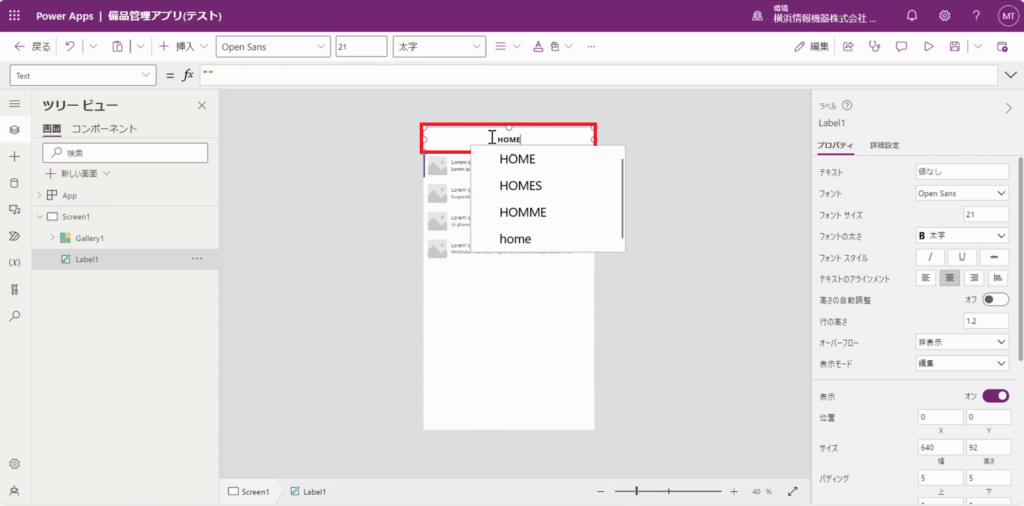
13.テキストラベルに「HOME」と入力します。
14.「プロパティ」で文字の色や、背景の色を設定します。
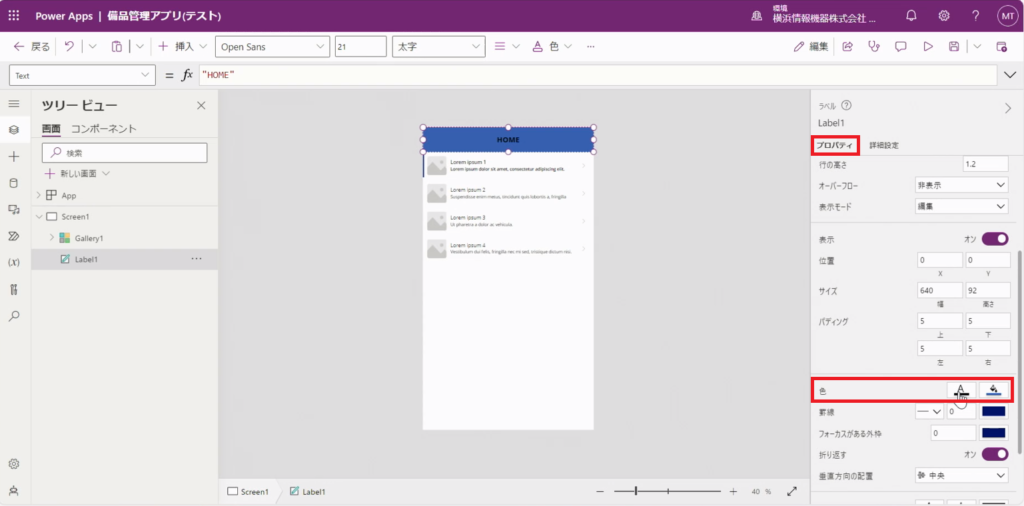
15.ホーム画面が完成しました。
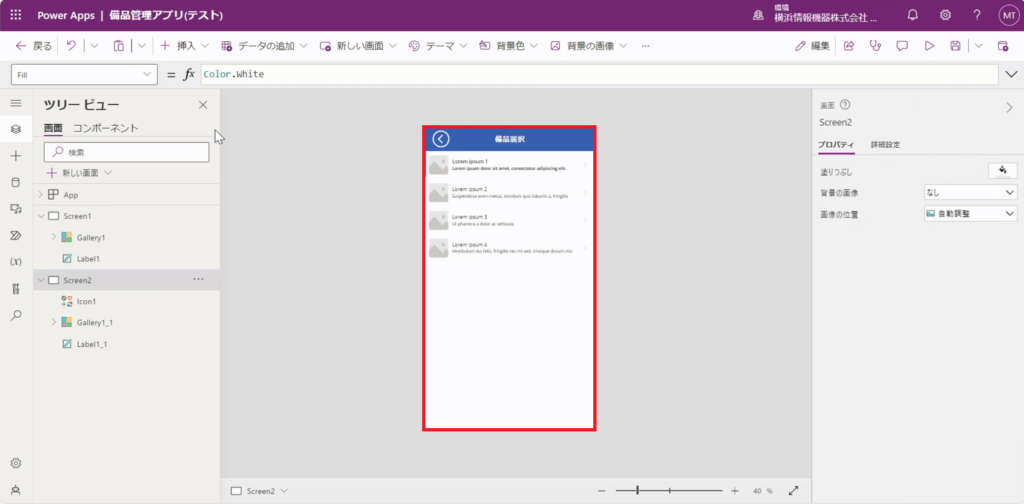
・備品選択画面
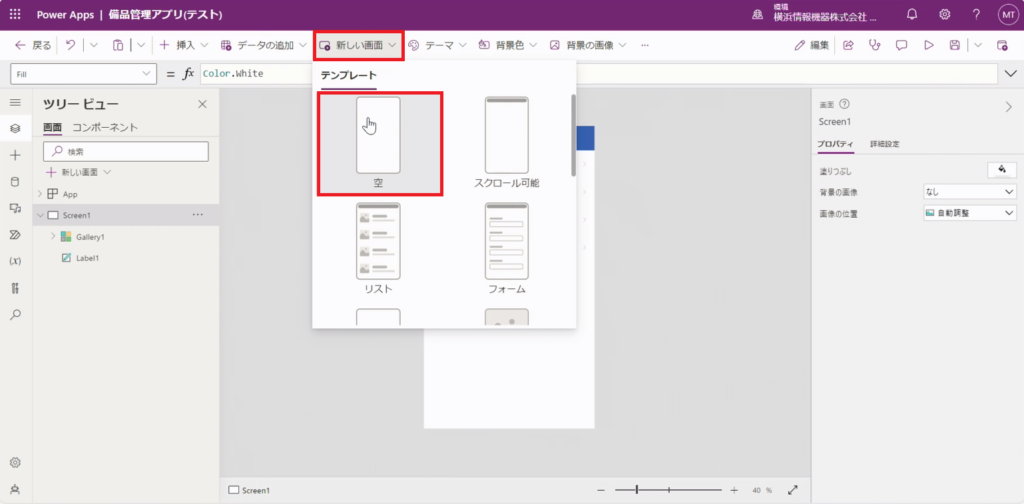
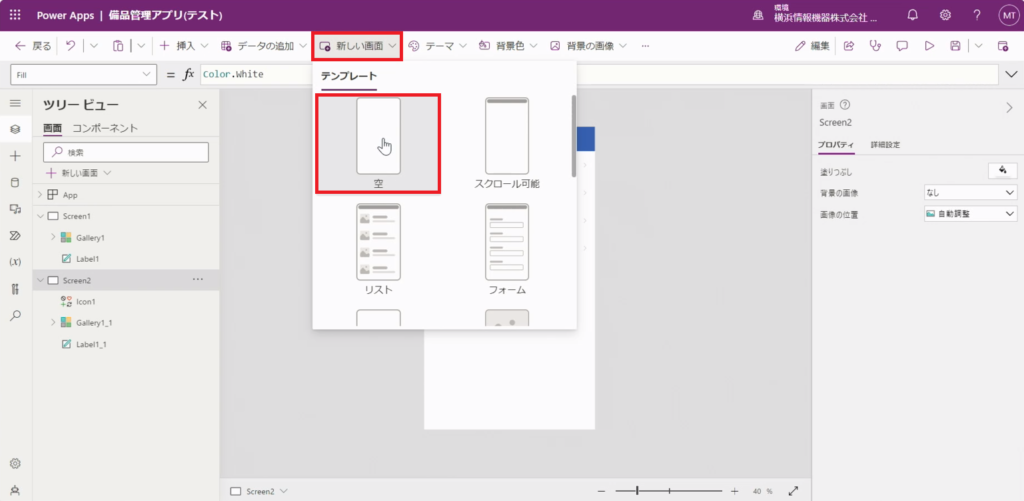
1.「新しい画面」をクリックし、「空」の画面を選択します。
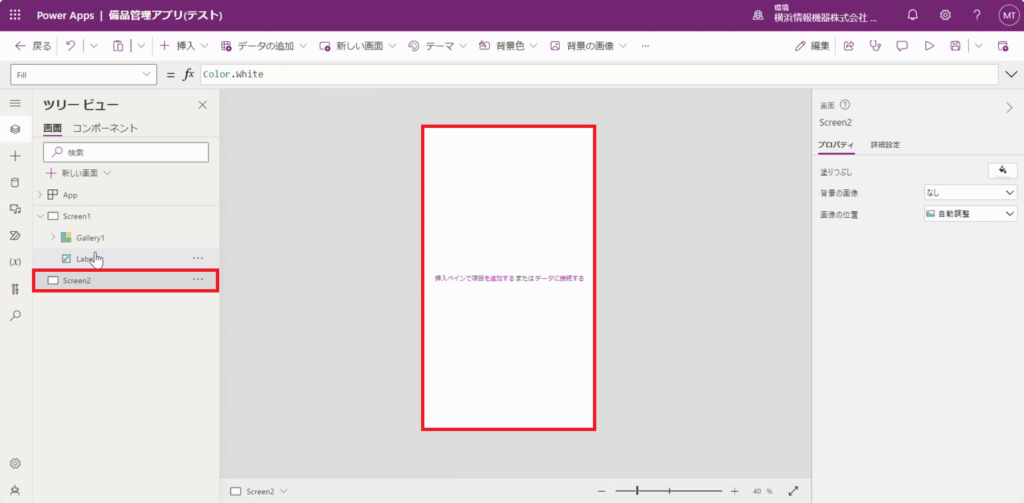
2.新しくScreen2が追加されました。
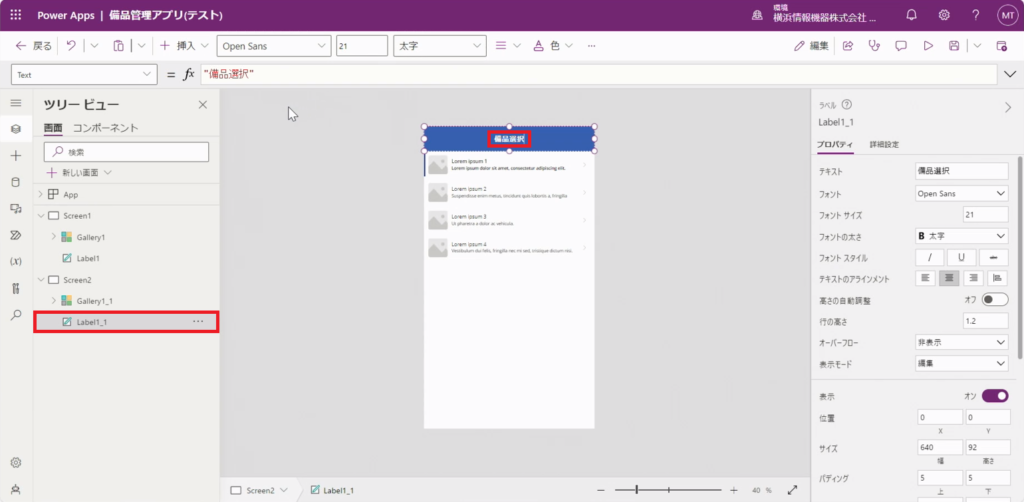
3. Screen1で初めに挿入したテキストラベルを、新しい画面にも対応させていきます。
4.「Screen1 」のプルダウンから「Label1」を選択します。
5.「右クリック」または「三点リーダー」をクリックし、「コピー」を選択します。
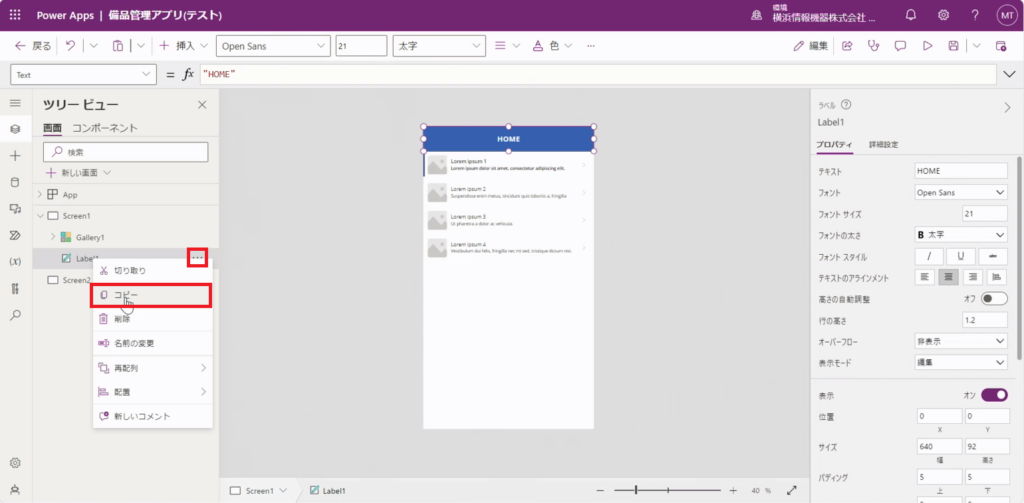
6.「Screen2」を選択します。
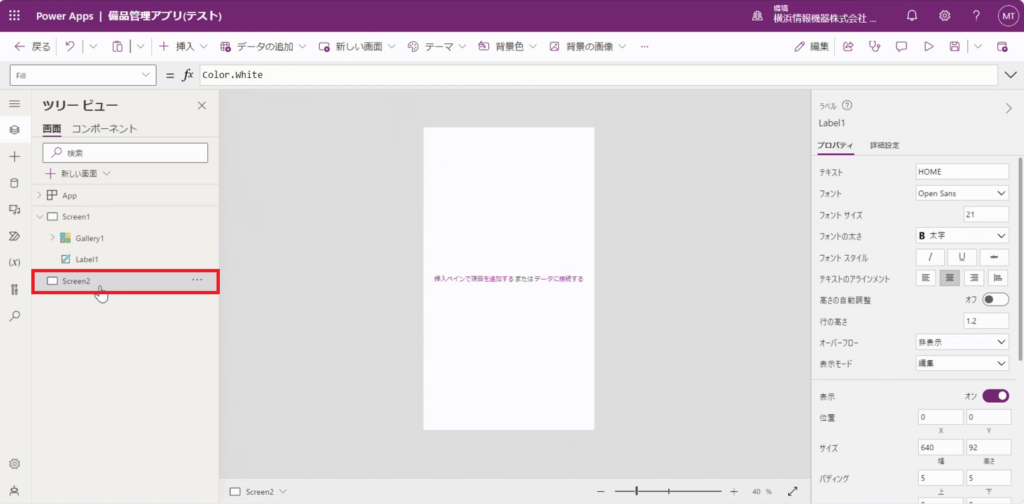
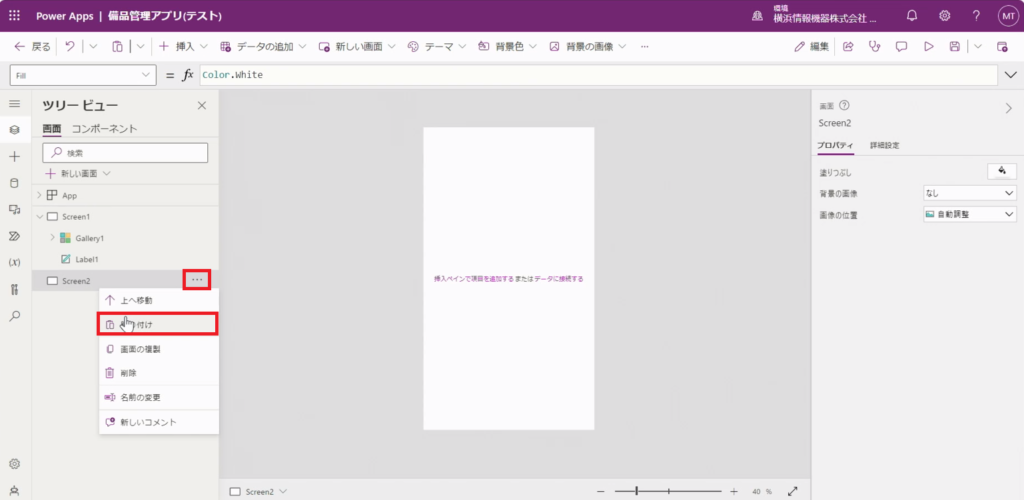
7.「右クリック」または「三点リーダー」をクリックし、「貼り付け」を選択します。
Point!コピーして使うことで、画面ごとでサイズが変わることを回避できます。 他にもっと良い方法がありそうな気もします…
8.同じように「Screen1」のプルダウンから「Gallery1」をコピーし、「Screen2」に貼り付けます。
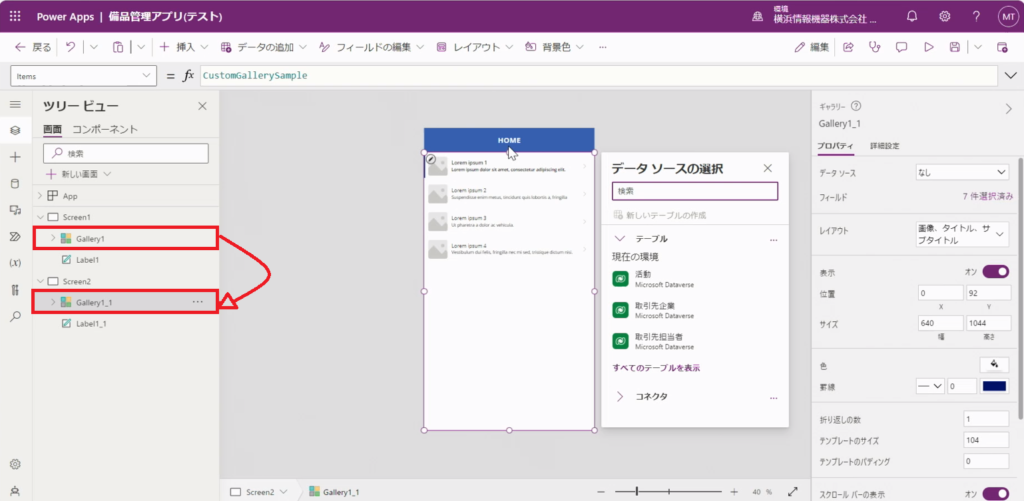
9.手順7で貼り付けたテキストラベル「 Label1_1」に、「備品選択」と入力します。
10.「挿入」をクリックし、「アイコン」を選択します。
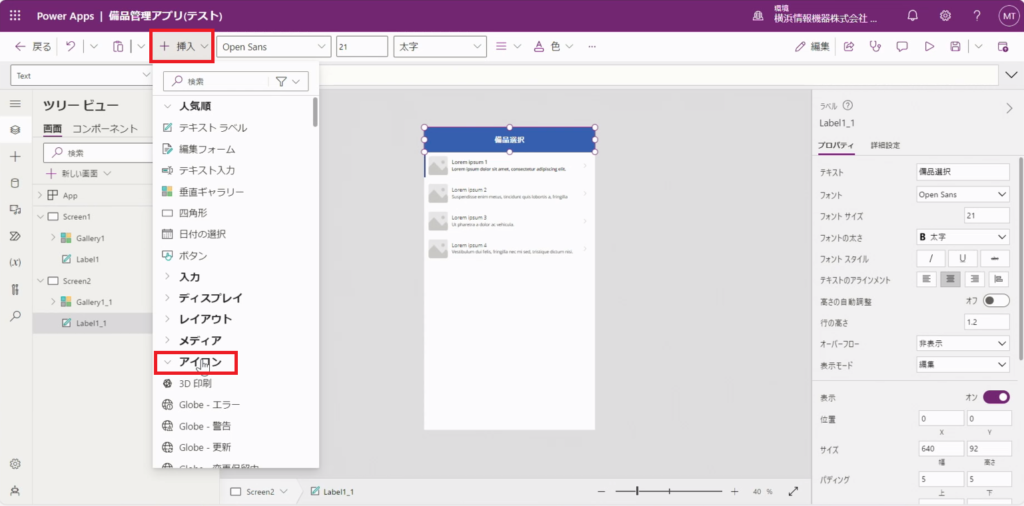
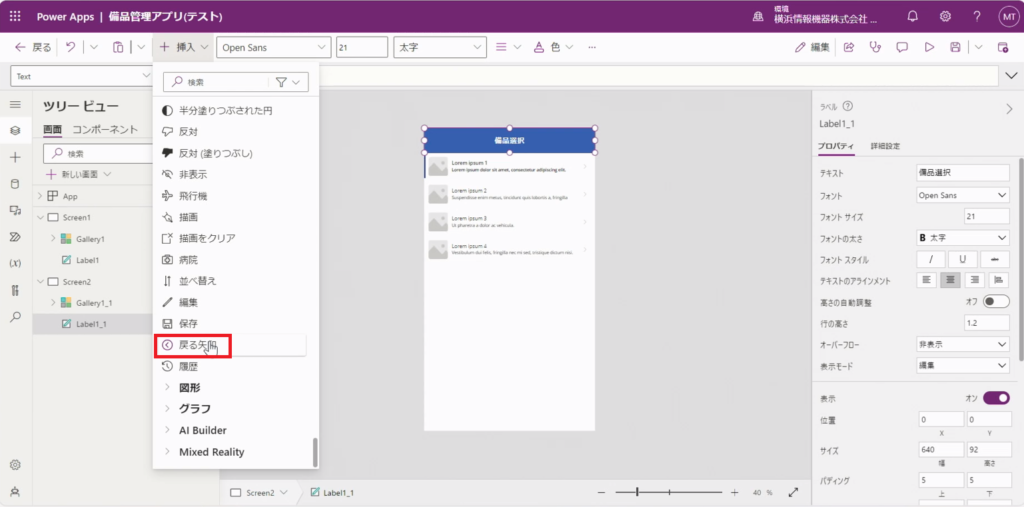
11.「アイコン」のプルダウンから「戻る矢印」をクリックします。
12.「戻る矢印」のサイズを調節し、配置します。
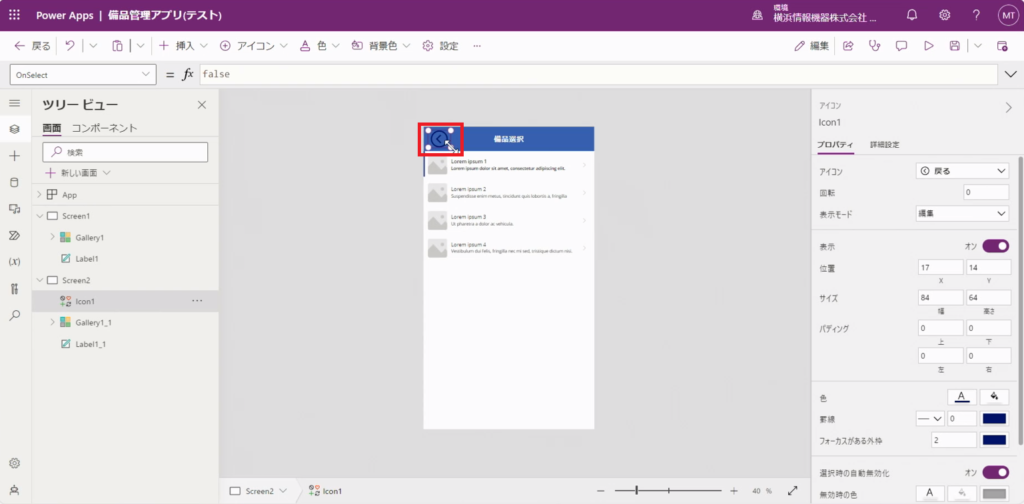
13.「プロパティ」で色を変更します。

14.備品選択画面が完成しました。
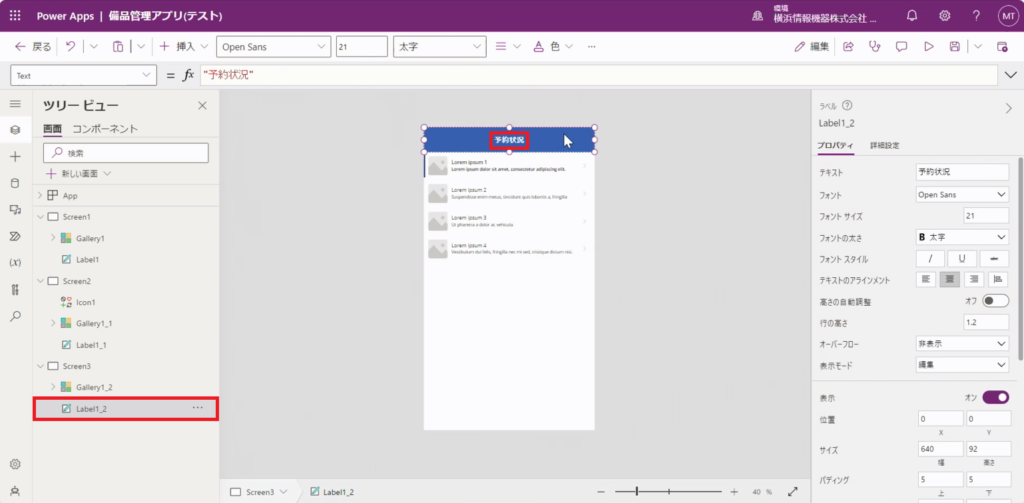
・予約状況画面
1.「新しい画面」をクリックし、「空」の画面を選択します。
2.新しくScreen3が追加されました。
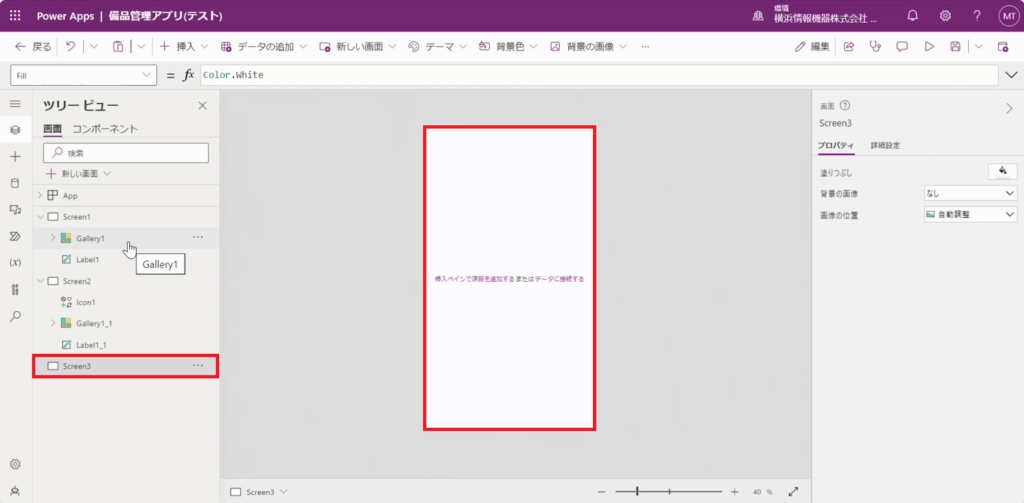
3.「備品選択画面-手順4~8」と同様、Screen3にも「Label1」と「Gallery1」を貼り付けます。
4.貼り付けたテキストラベル「 Label1_2」に、 「予約状況」と入力します。
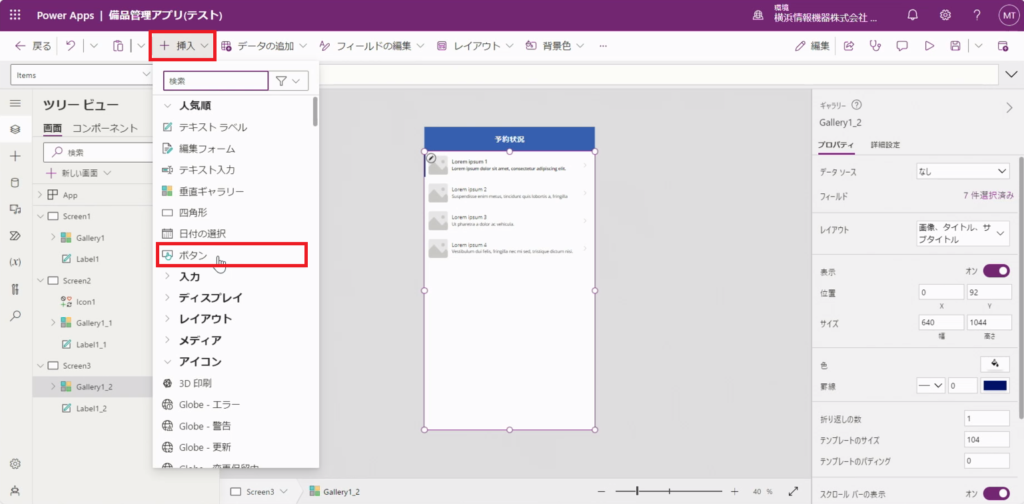
5.次に、予約画面へ画面が切り替わる際、クリックで飛べるように「ボタン」を付けていきます。
6.「挿入」のプルダウンから「ボタン」を選択します。
6.追加された「Button1」の位置を決めます。ボタンの角を赤のラインに合わせるように広げます。
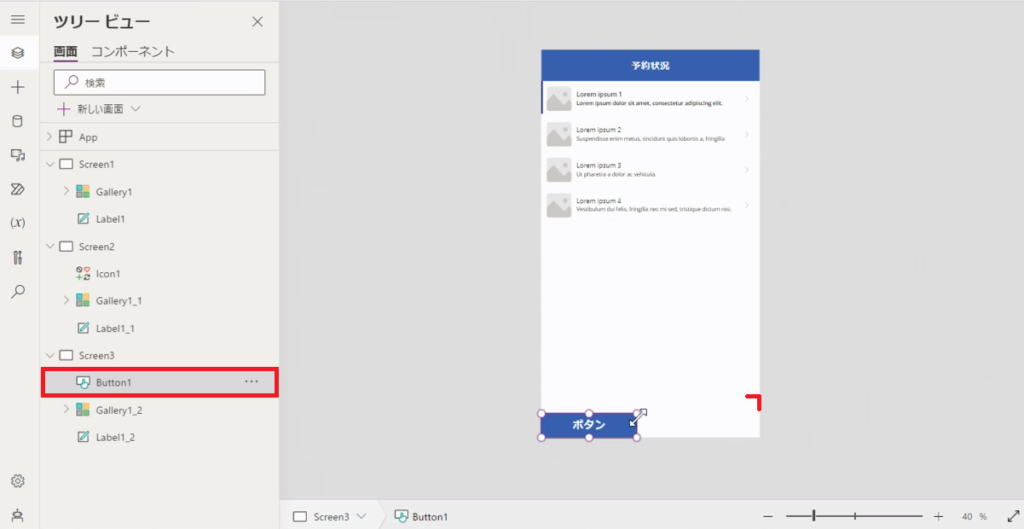
7.サイズを合わせ、 ボタンに「予約画面へ」と入力します。
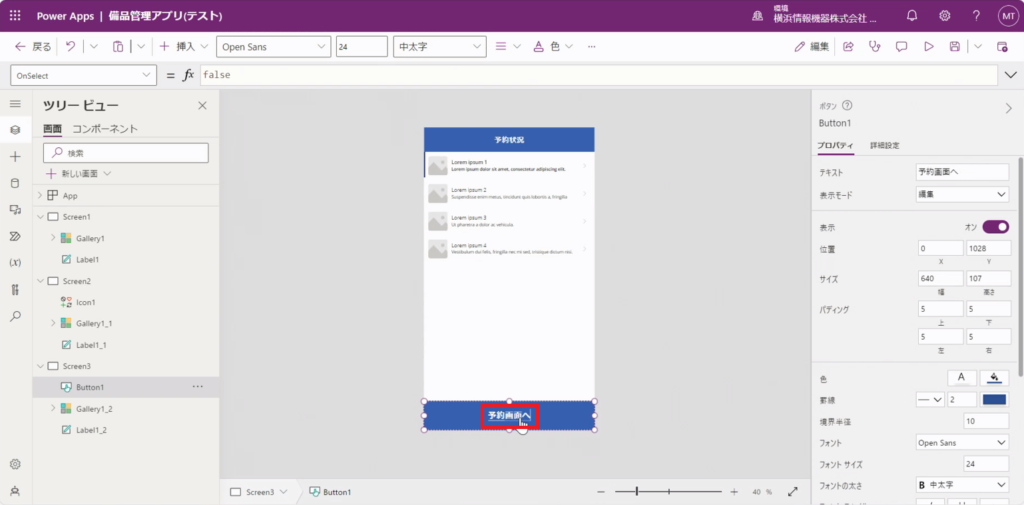
Point!挿入から選択したコントロールは大体イメージ通りのプロパティになっていました。
例えば…「ボタン」→「OnSelect」などなど
8.Screen2で作成した「戻る矢印」をコピーします。
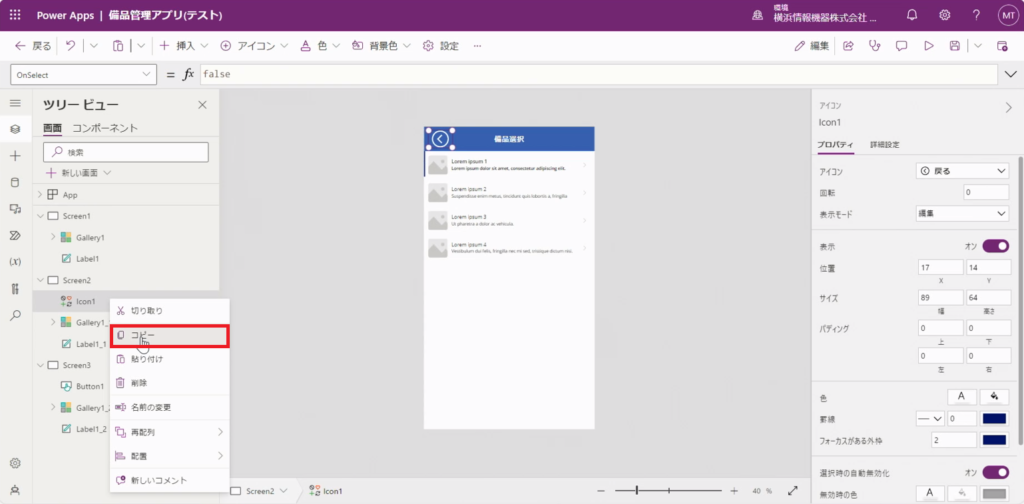
9.Screen3に「戻る矢印」を貼り付けます。
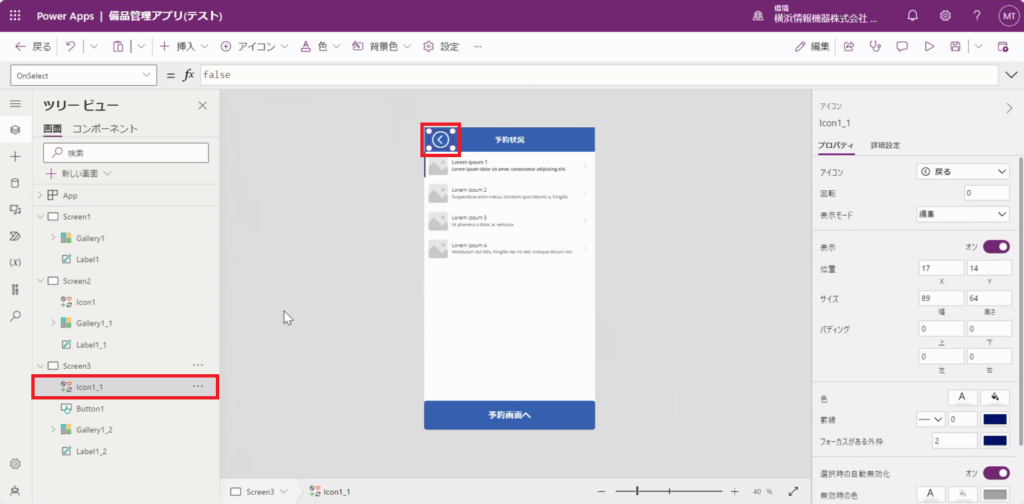
10.予約状況画面が完成しました。

・予約画面
1.「新しい画面」をクリックし、「空」の画面を選択します。
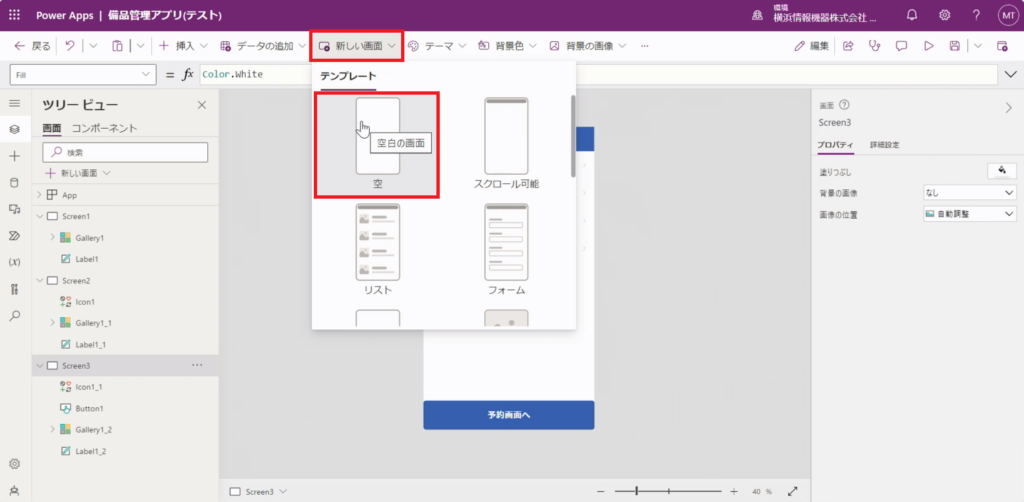
2.新しくScreen4が追加されました。
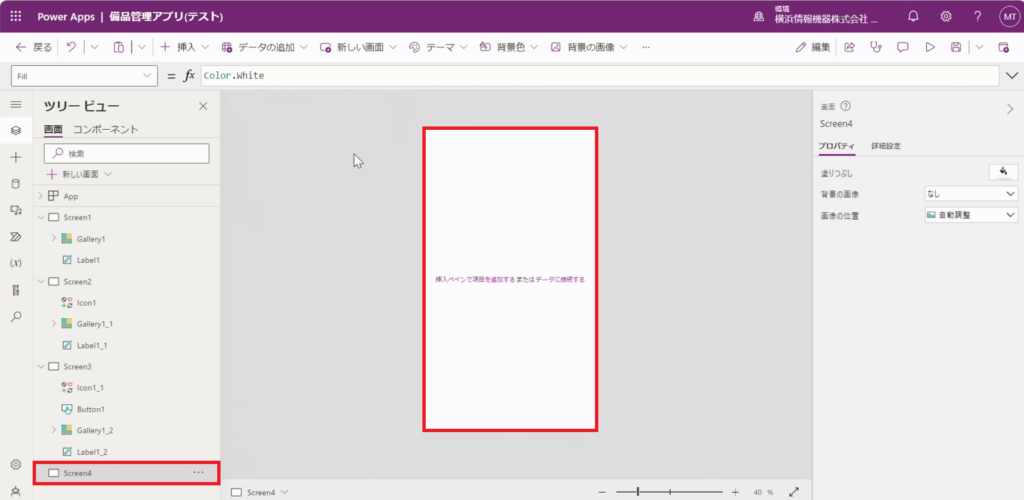
3.「備品選択画面-手順4~7」と同様、 Screen4にも「Label1」を貼り付けます。
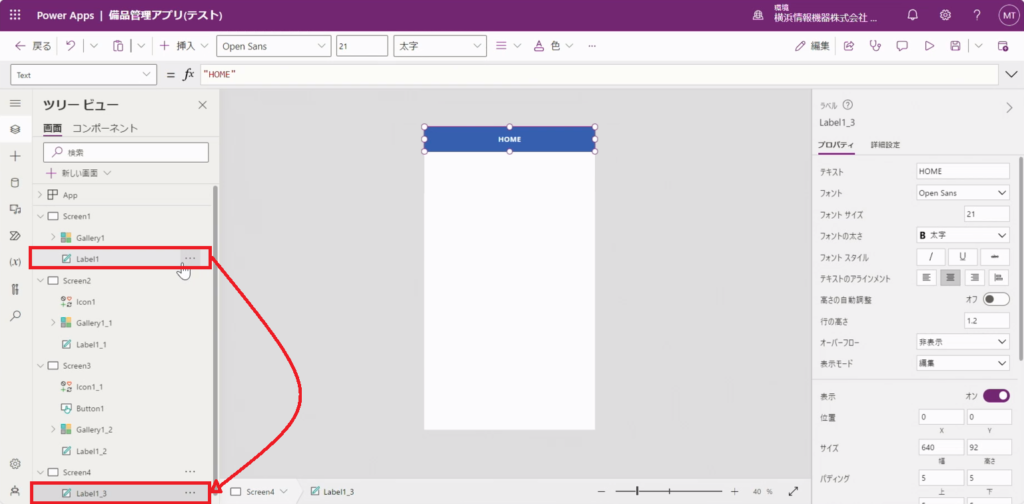
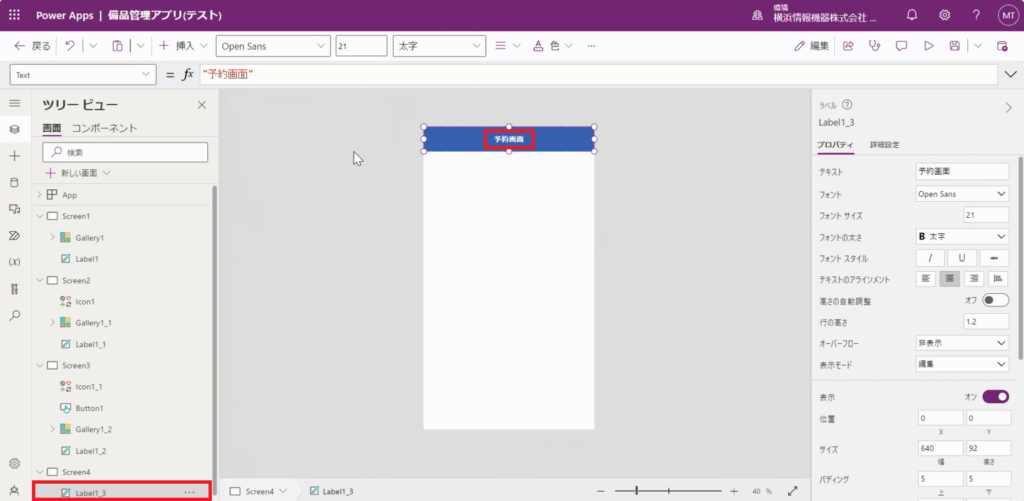
4.貼り付けたテキストラベル「 Label1_3」に、 「予約画面」と入力します。
5.「挿入」のプルダウンから「編集フォーム」を選択します。
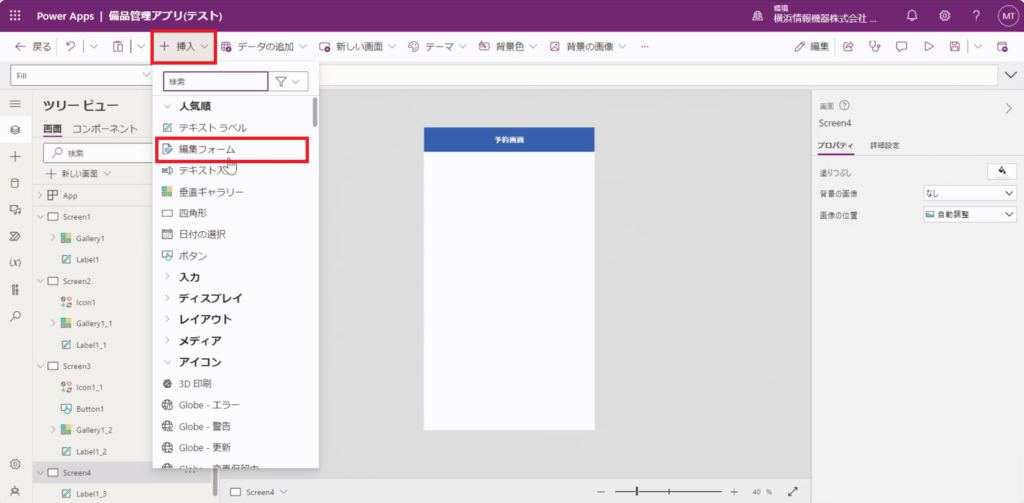
【復習】※フォームとは...データソースの指定されたレコードの情報を表示させるために利用します。
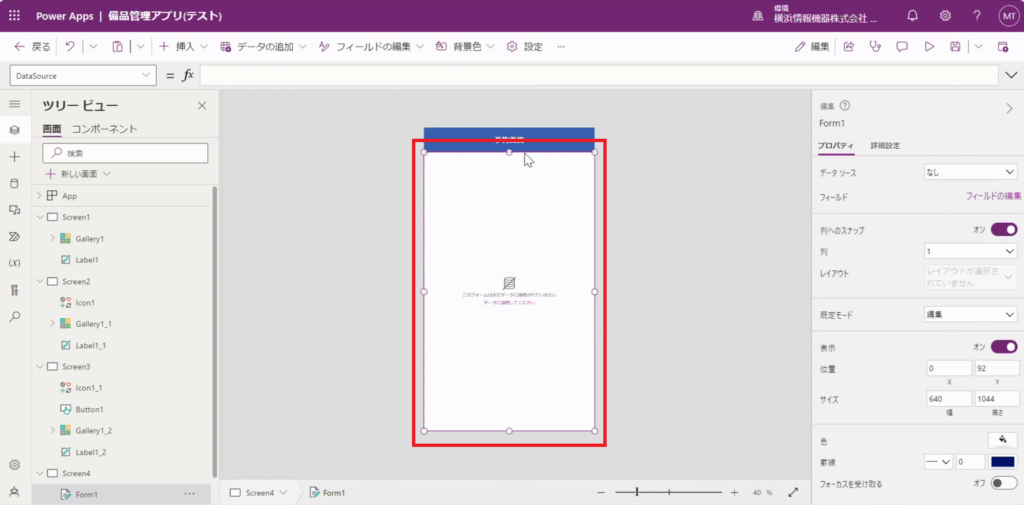
6.追加された編集フォームを画面のサイズに合わせます。
7. Screen3に貼り付けた「戻る矢印」をコピーし、 Screen4にも貼り付けます。

8.「Screen3」で作成した「Button1」をコピーして貼り付けます。
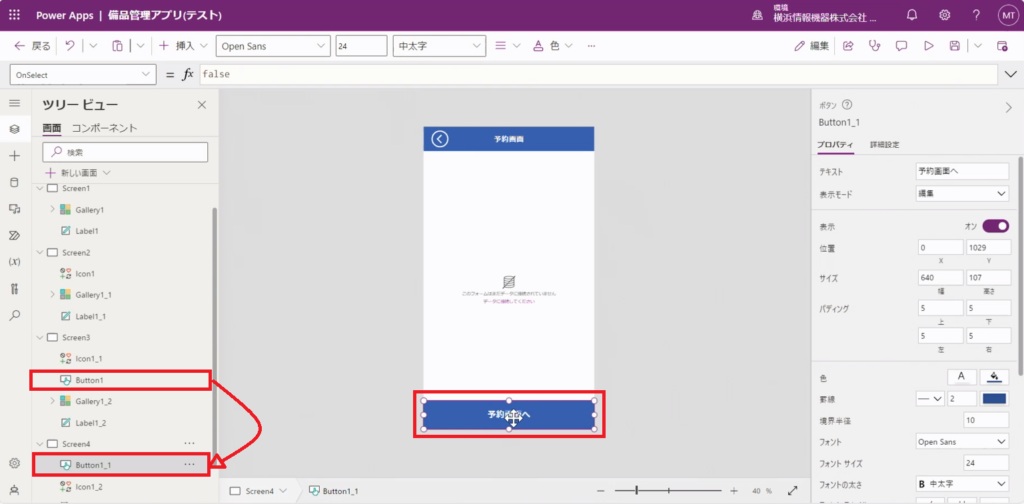
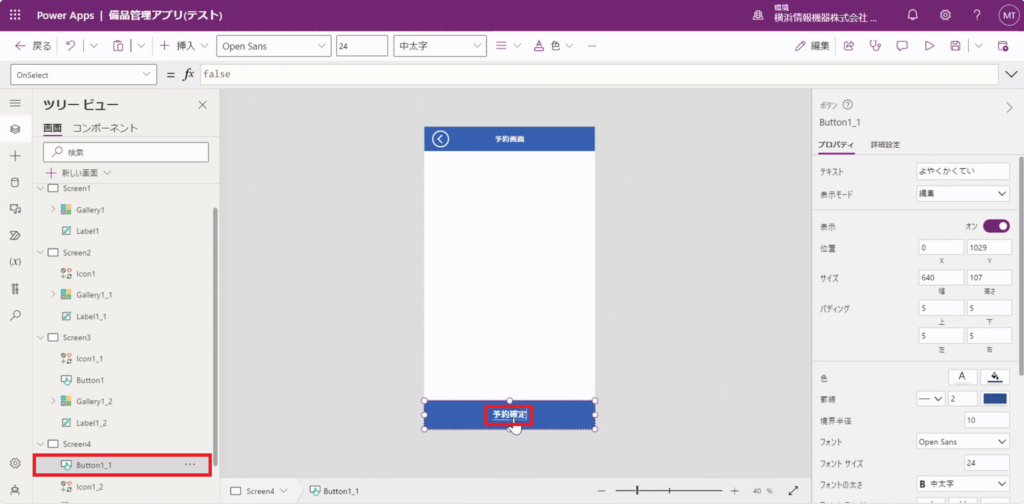
9.貼り付けた「Button1_1」に、「予約確定」と入力します。
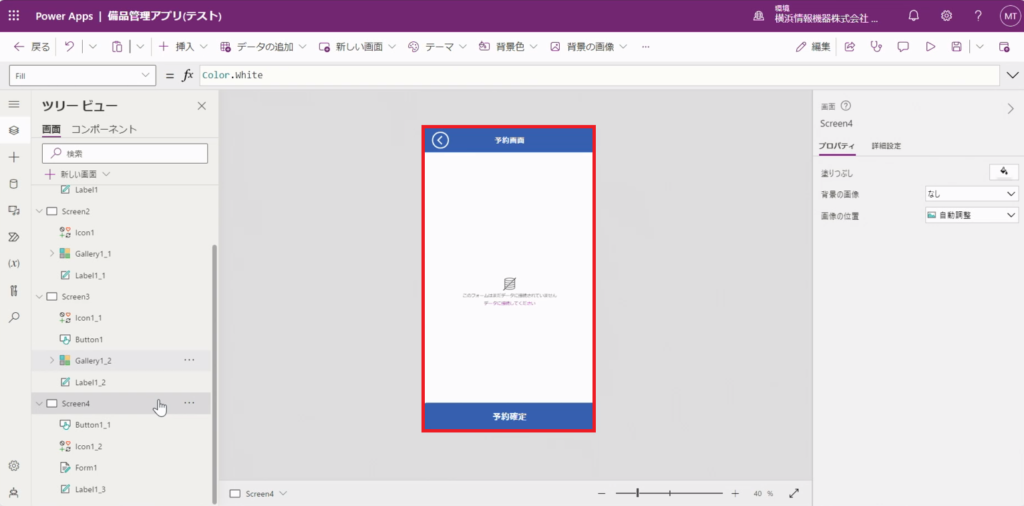
10.予約画面が完成しました。
・予約完了画面
1.「新しい画面」をクリックし「成功」の画面を選択します。
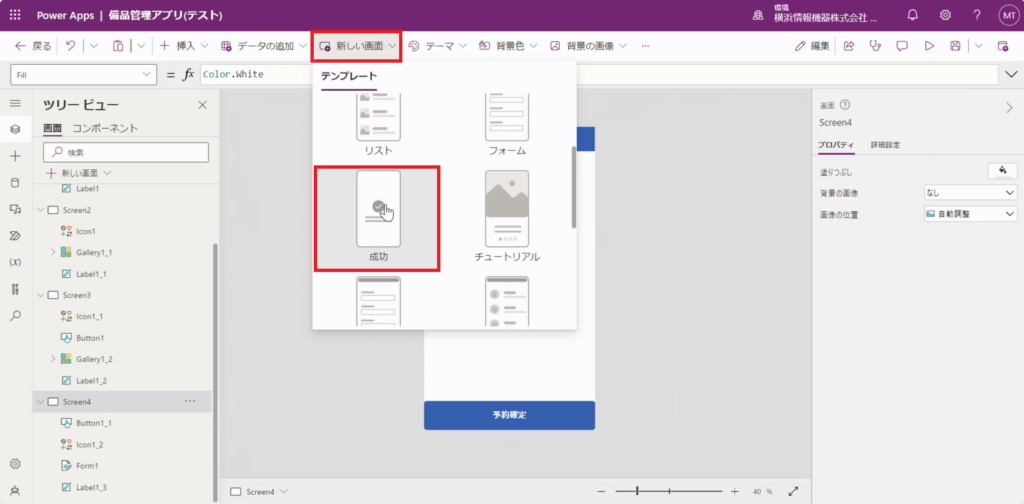
Point!ほかにも様々なフォーマットが用意されていました。
2.新しく予約完了画面が追加されました。
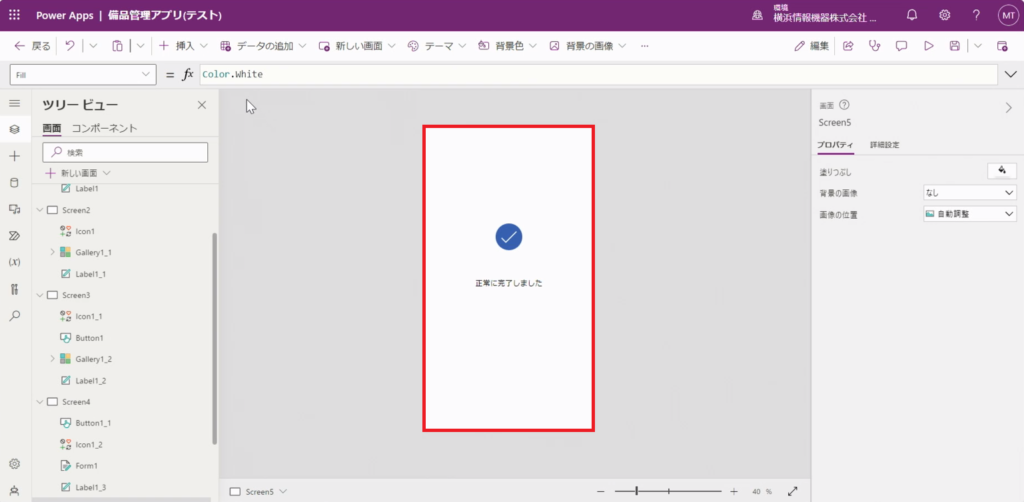
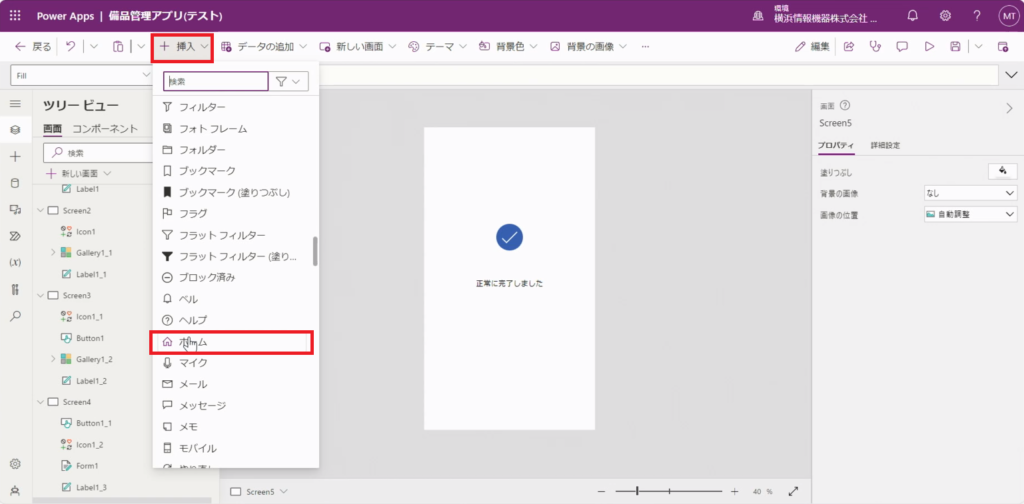
3.「挿入」をクリックし、「アイコン」のプルダウンから「ホーム」を選択します。
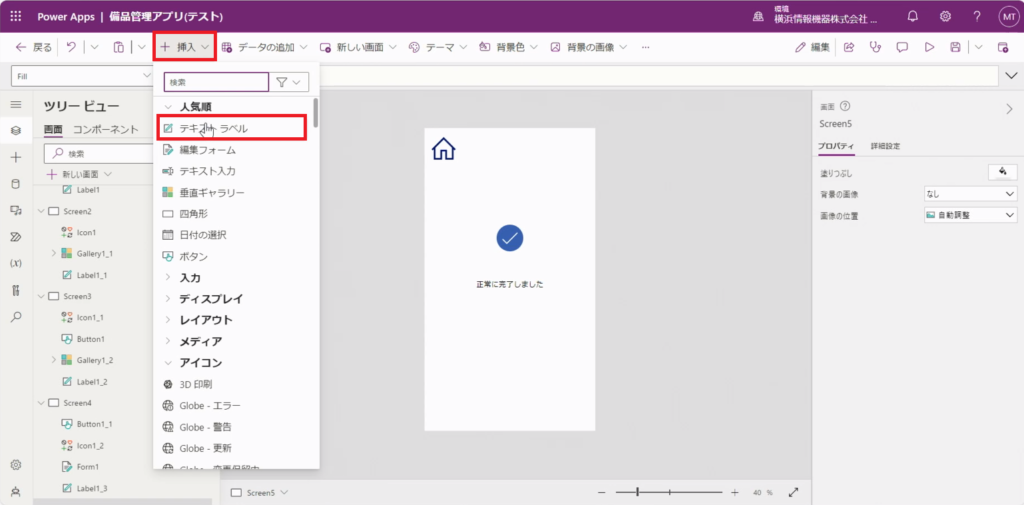
4.「挿入」をクリックし、「テキストラベル」を選択します。
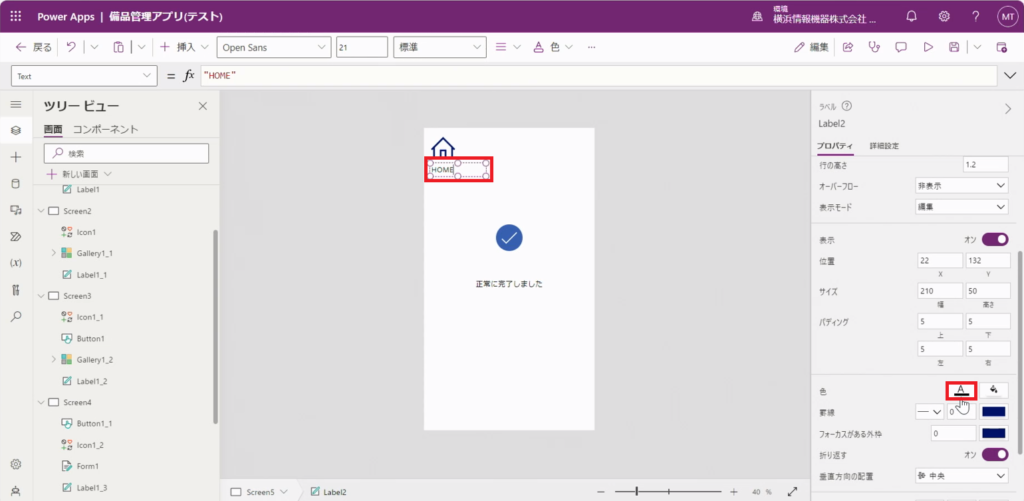
5.テキストラベルに「HOME」と入力し、色の変更をします。
6.「Screen1」をダブルクリックし、Screen名を変更します。
Screen2~5も、同じ手順で名前を変更していきます。
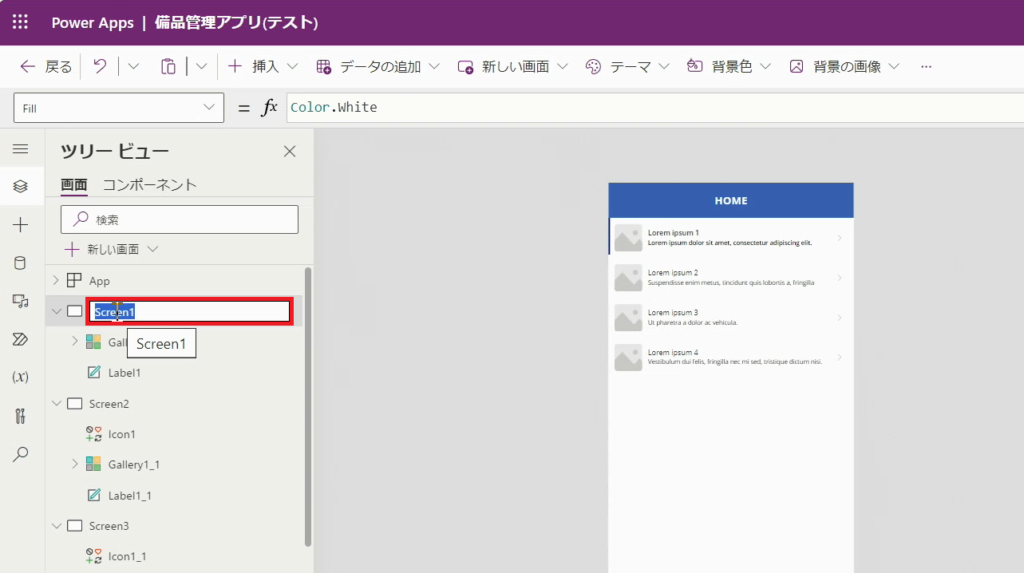
Point!項目の名前は自由に変えることができるので、screen名だけでなく「Icon1」→「戻る矢印」などのように変えてみてもわかりやすそうですね。
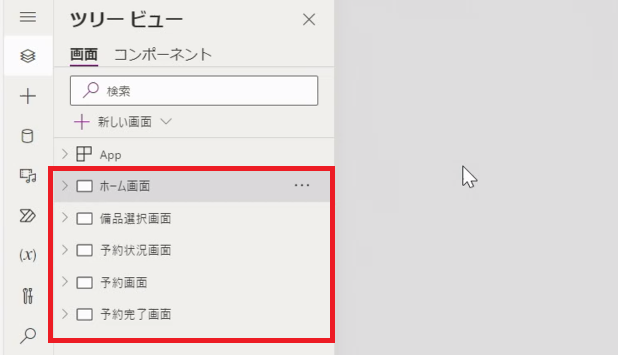
7.各Screenの名前の変更ができました。
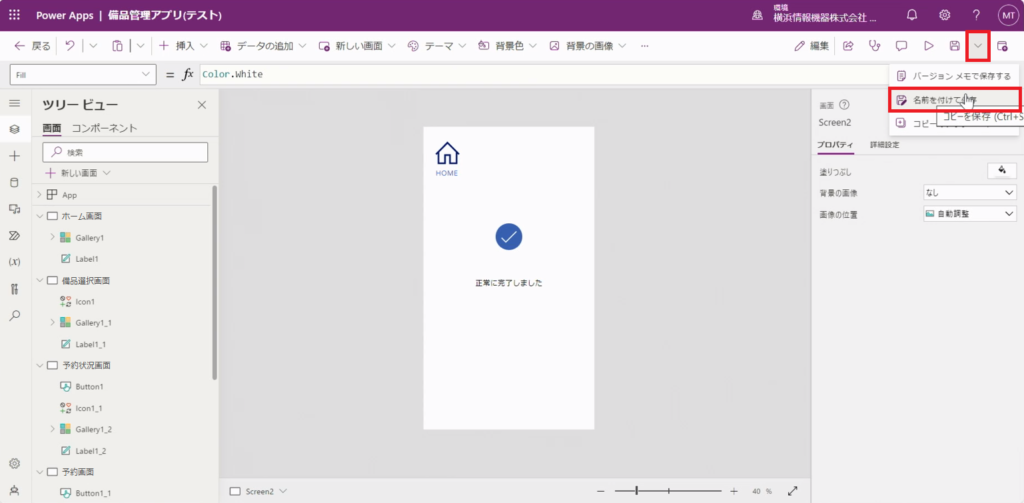
8.予約完了画面が完成しました。右上の「チェックマーク」をクリックし、「名前を付けて保存」をクリックします。
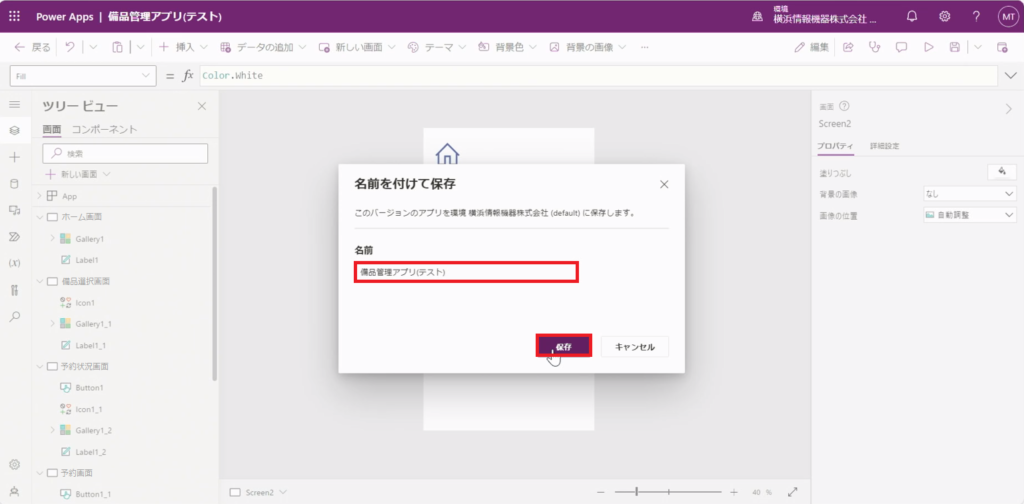
9.「名前」にアプリ名を任意で入力し、「保存」をクリックします。
これでアプリのデザイン、見た目が完成しましたので、アプリとして動くように機能を設定していきます。
2.機能の追加
今回はSharePointのブログで作成したリストを用いて(データソースとして)、備品管理アプリを作成していきます。 詳しくは「プレビュー・警告」に記載しましたが、Power Appsを作成するにあたり、用いるデータソースが重要となります。
そのため、作成の際は利用目的やデータの規模を再度確認したうえでデータソースの選択をすることをお勧めします。
手順1.ホーム画面
1.「ホーム画面」を選択します。
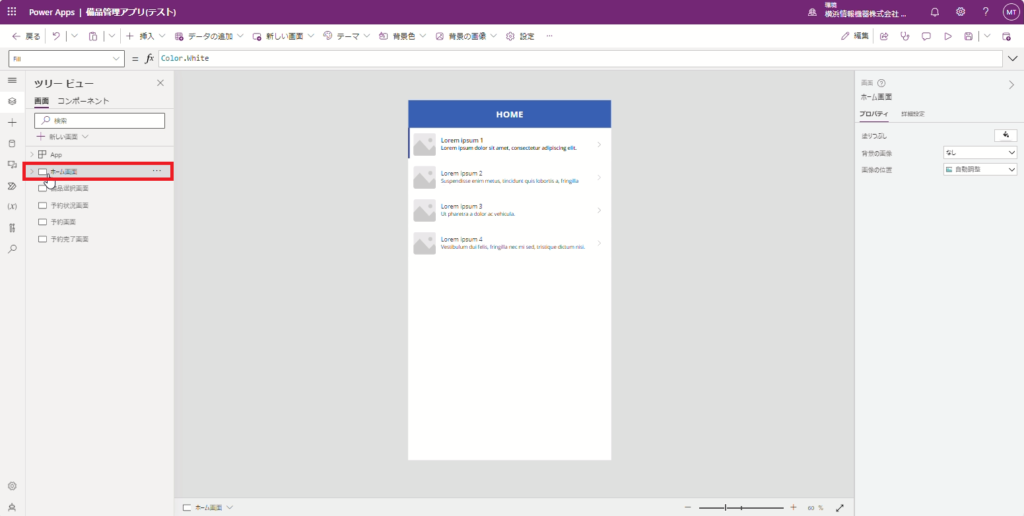
Point!ツリービューを使いこなそう!
ツリービューは名前の通り、Screen(ここではホーム画面)を親に階層化して表示してくれるスペースです。画面から操作個所を選んだほうが直感的で楽ですが、ツリービューから対象を選択することで選び間違え等は確実に減らせます。
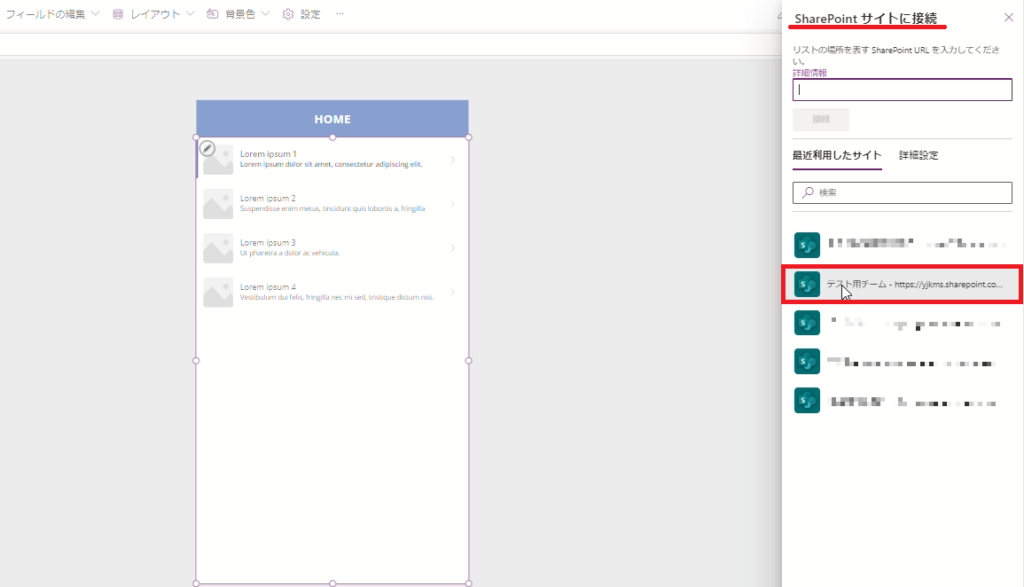
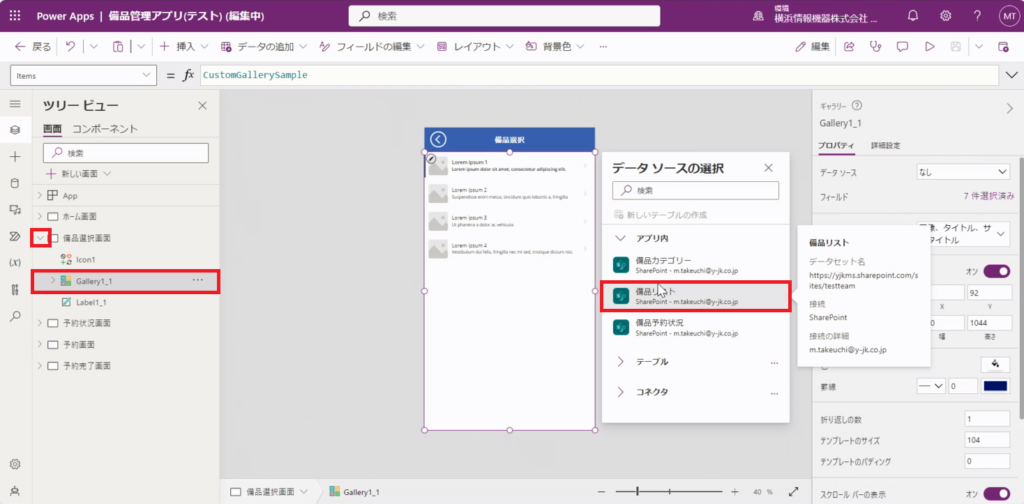
2.「ホーム画面」のプルダウンから「Gallery1」を選択すると、「データソースの選択」の画面が表示されます。
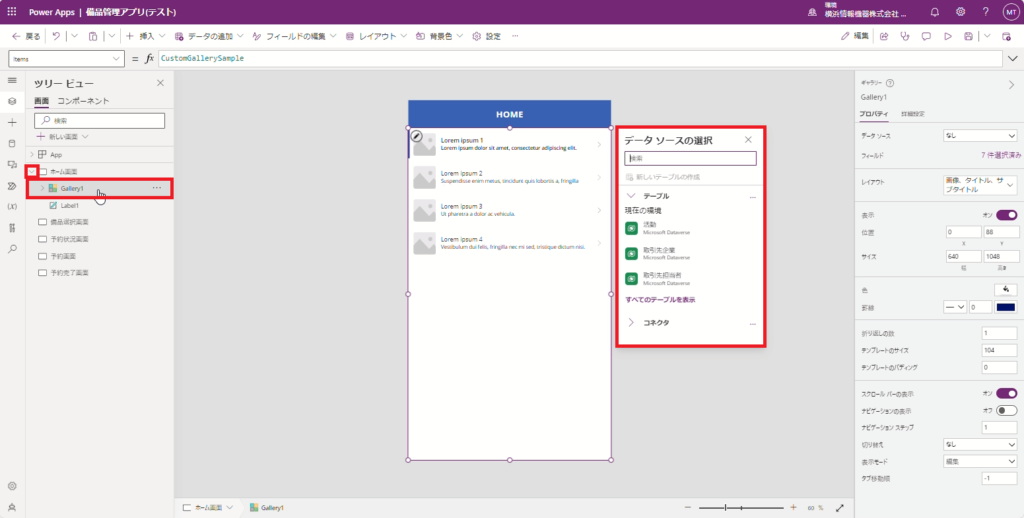
3.データソースの検索バーに「SharePoint」と入力し、「SharePoint」を選択します。
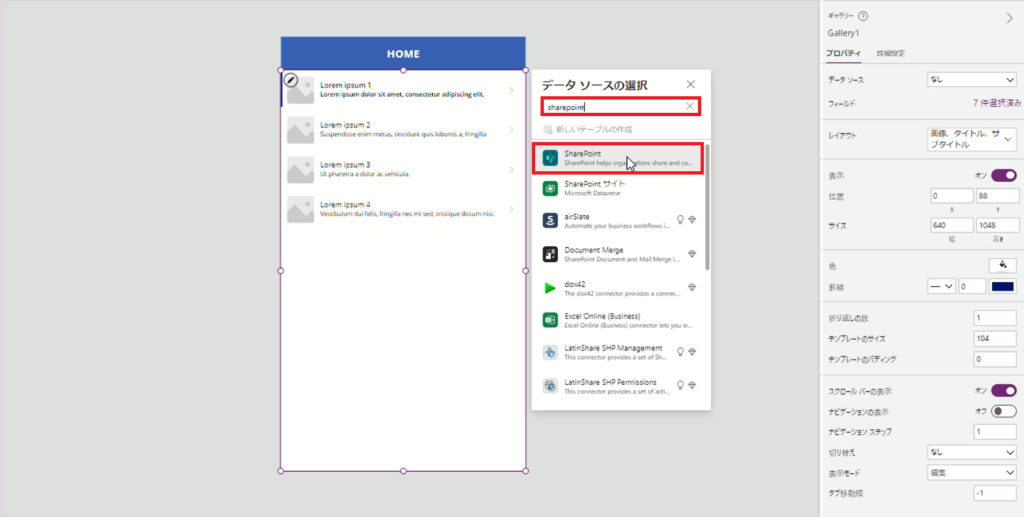
4.「SharePoint」をクリックします。
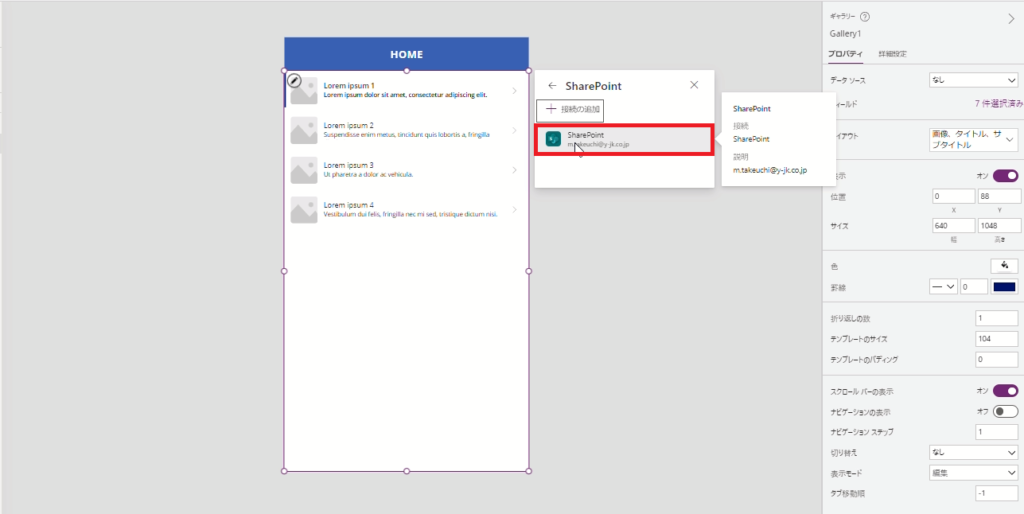
5.画面右に出てくる「SharePointサイトに接続」から「テスト用チーム」を選択します。
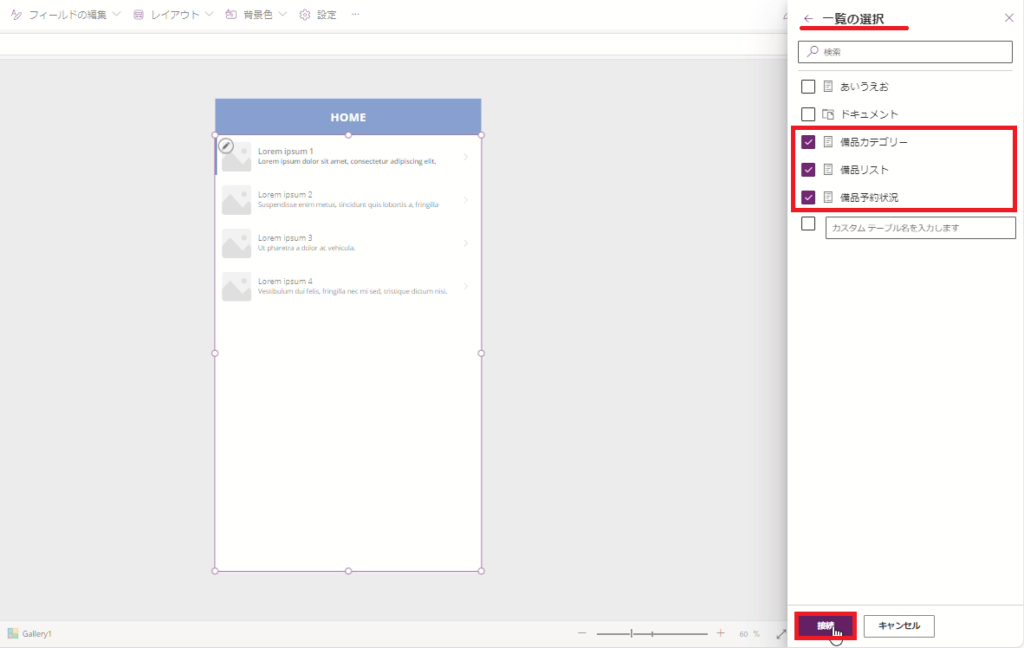
6.「一覧の選択」から「備品カテゴリー」「備品リスト」「備品予約状況」を選択し、「接続」をクリックします。
※ここでは、アプリ内で使用するデータソースをまとめて選択していますが、画面ごとに使用するデータソースを選択することも可能です。
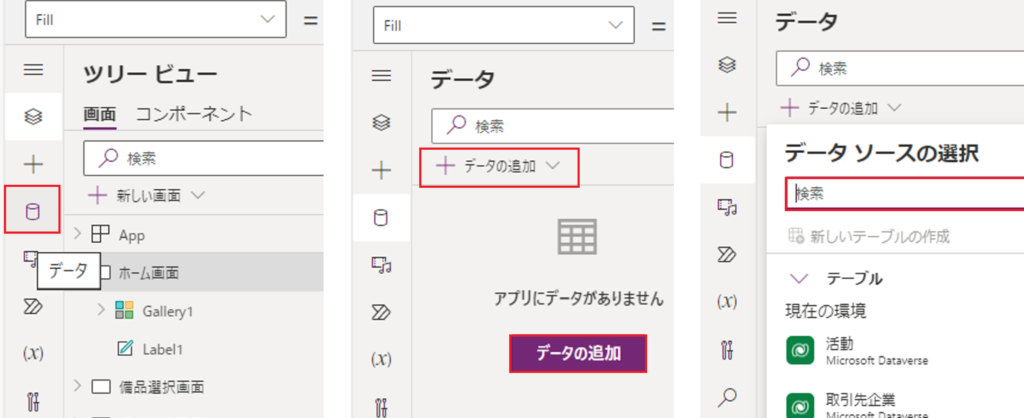
Point!データソースの選択方法は他にもいくつかあります。例えば、メニューからデータを選択し追加する方法です。入口が違うだけで「手順3~6」とほとんど変わらないのですがご参考までに。
7.選択した「備品カテゴリー」のデータを基に、画面が作成されました。
画面に適用されている「データソース」・「レイアウト」が確認出来ます。
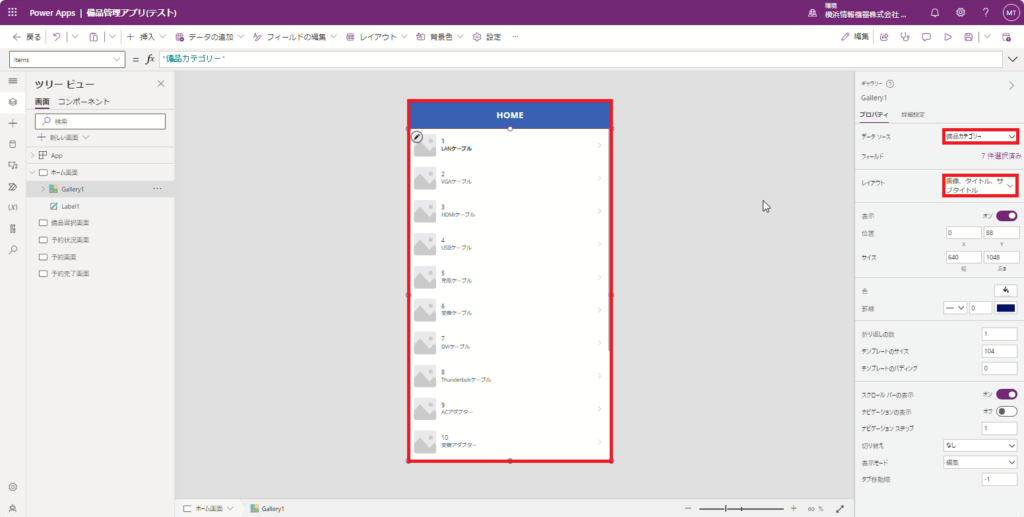
Point!「データソース」のプルダウンから、作業中のスクリーンで使用するデータソースを選択できます。
8.「画像マーク」を選択します。ツリービューの「Gallery1」のプルダウンから、「Image1」をクリックしていただくと確実です。
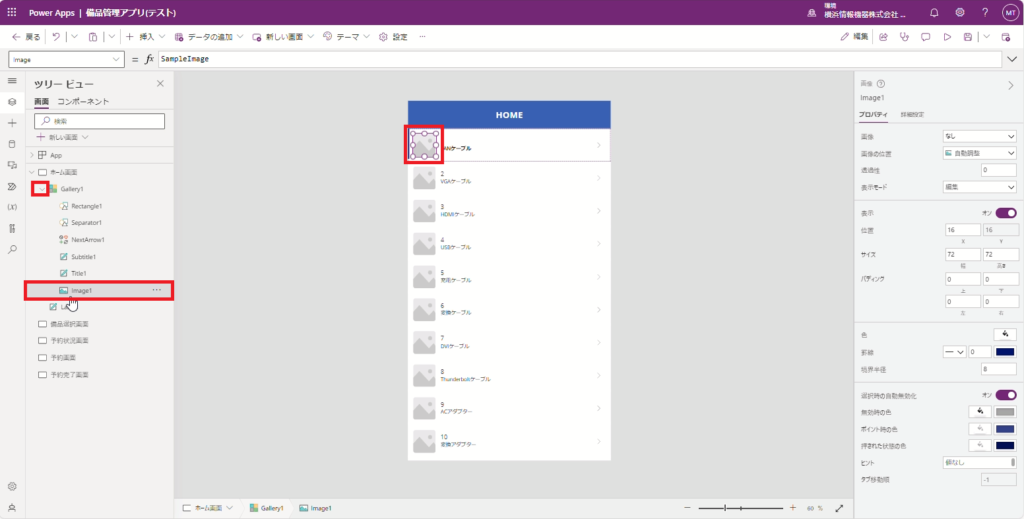
9.「Image1」の数式に下記を入力します。
First(ThisItem.添付ファイル).AbsoluteUri
※適用されているデータソース「備品カテゴリー」に格納されている画像データが反映されました。

Point!関数の解説
前提:接続されているデータソースのレコード(列)がカードごとにマップされている状態である。「 詳しくはこちらで解説!」
→「備品カテゴリーのリスト内、添付ファイルの列にある画像(ThisItem.添付ファイル)の一枚目の画像を(First)間違えずに(AbsoluteUri)持ってきて!」
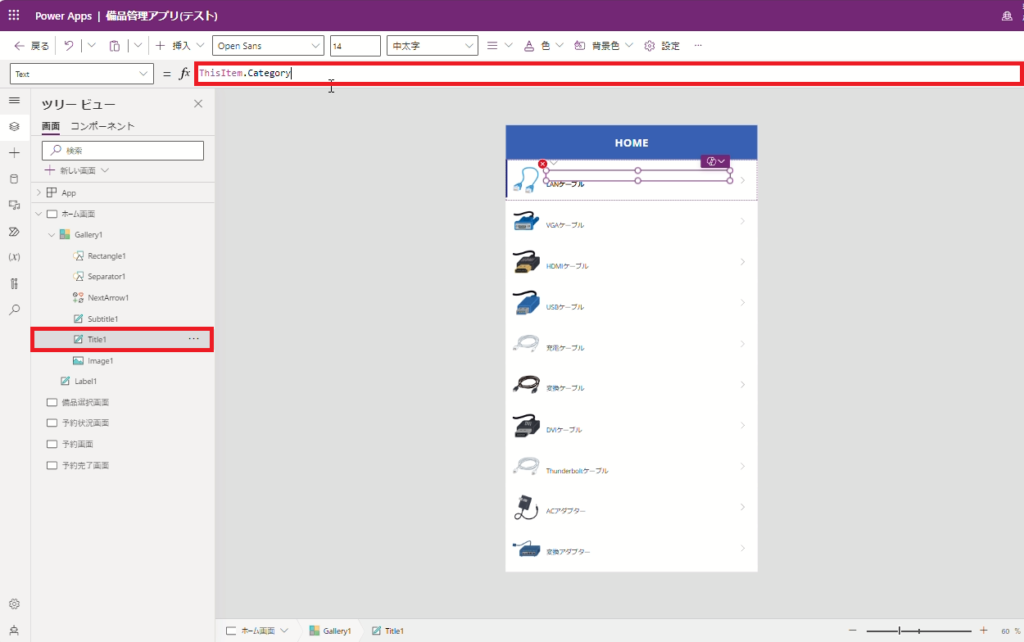
10.「Title1」の数式に下記を入力します。
ThisItem.Category
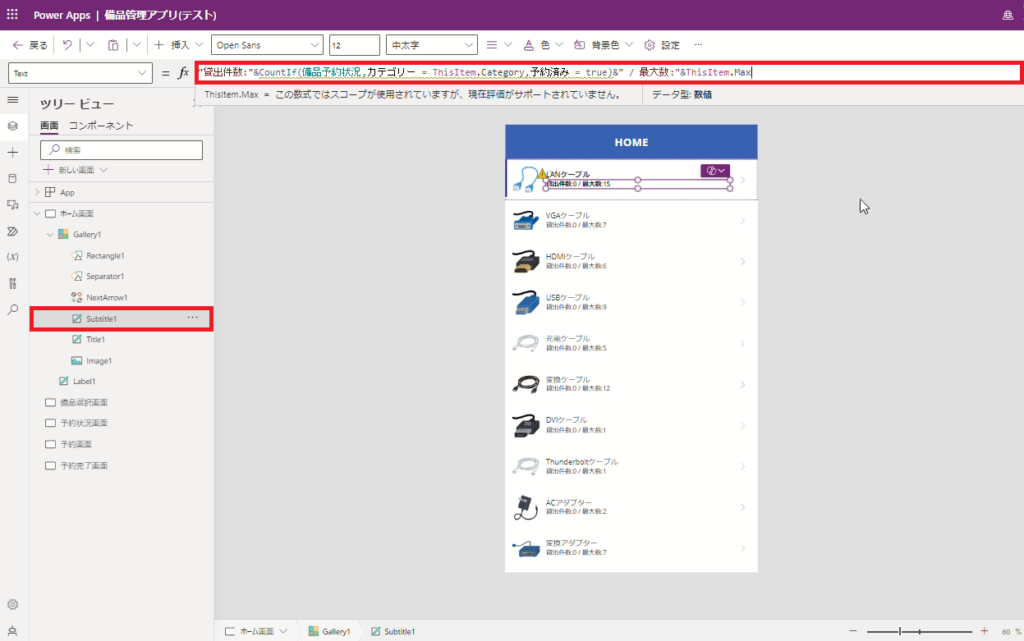
11.「Subtitle1」の数式に下記を入力します。
"貸出件数:"&CountIf(備品予約状況,カテゴリー = ThisItem.Category,予約済み = true)&" / 最大数:"&ThisItem.Max
Point!コントロールに文字列として表示させたいのに数式として扱われエラーが出る…
→「””(ダブルクォーテーション)」で囲えば解決!
文字列として表示させたい場合、文法に合わないものを無理に引数として書いて渡す必要がある。 「””」で囲うことで文字列として渡すことが渡すことができるのである。
・コントロールとは? 「詳しくはこちらで解説!」
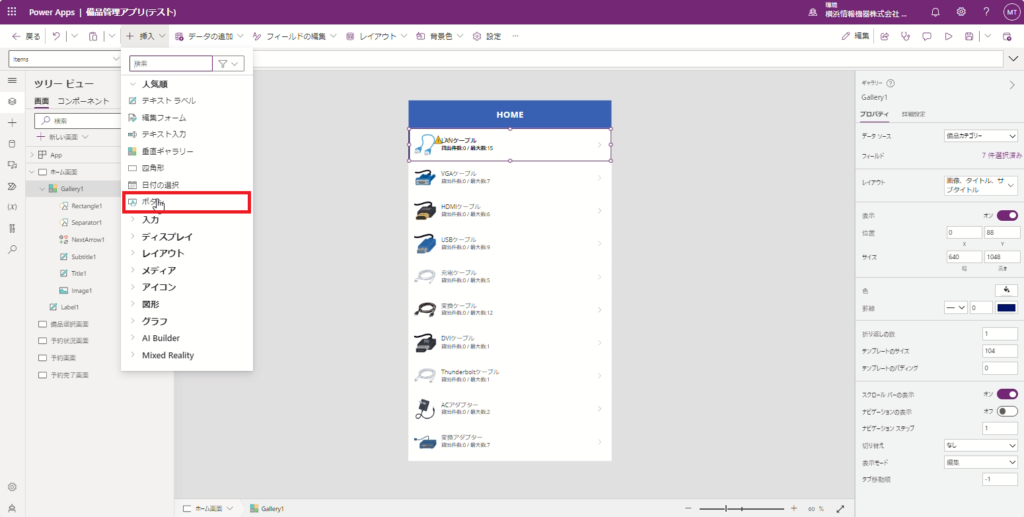
12.続いて、「ホーム画面」→「備品選択画面」へ画面が切り替わるためのボタンを設置していきます。
13.「Gallery1」を選択し、「挿入」をクリックします。

Point!「Gallery1」(赤の点線部分)が選択されていないと、ボタンが正しく追加されませんのでご注意ください。
14.「ボタン」を選択します。
14.「Button2」が追加されました。自動的に一項目につき、一つのボタンが追加されます。
※ボタンが正しく反映されない場合は、手順13の選択範囲を再度ご確認ください。
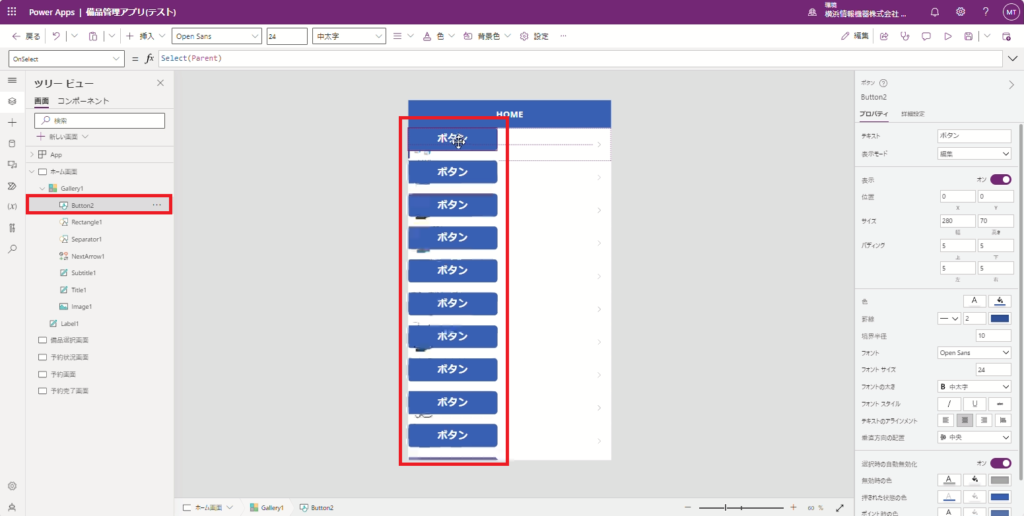
Point!正しくボタンが追加できない
→どこにボタンを挿入しているかが重要。
上記の手順では「Gallery1」に追加していることで、「Gallery1」の一項目ずつに反映されるが、例えば「ホーム画面」つまりスクリーンを選択した状態で挿入するともちろんスクリーンに一つのボタンが追加されるだけになる。
そのため、「どこに」ボタンを挿入しているかが重要となるのである。
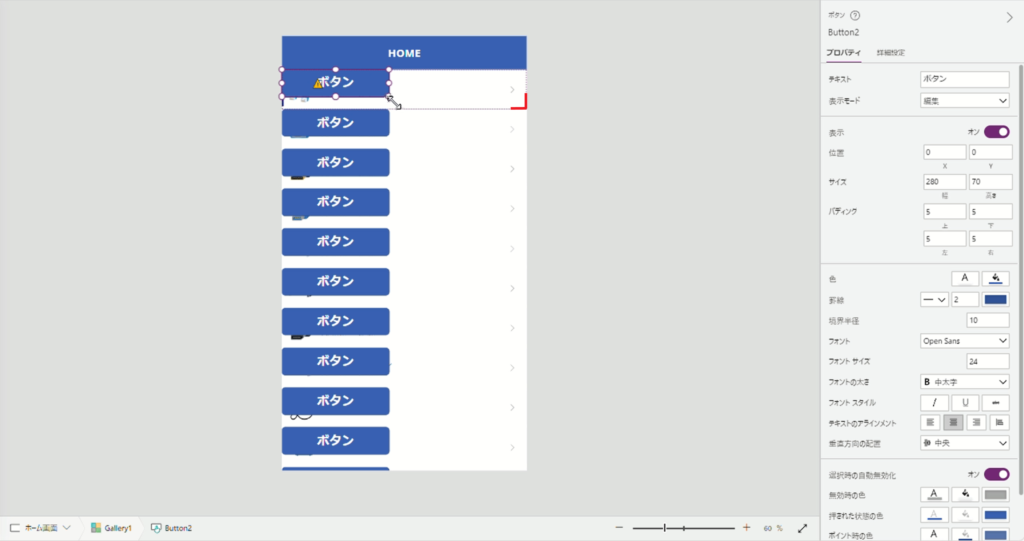
15.ボタンのサイズを合わせます。ボタンの角を赤のラインに合わせるように広げます。
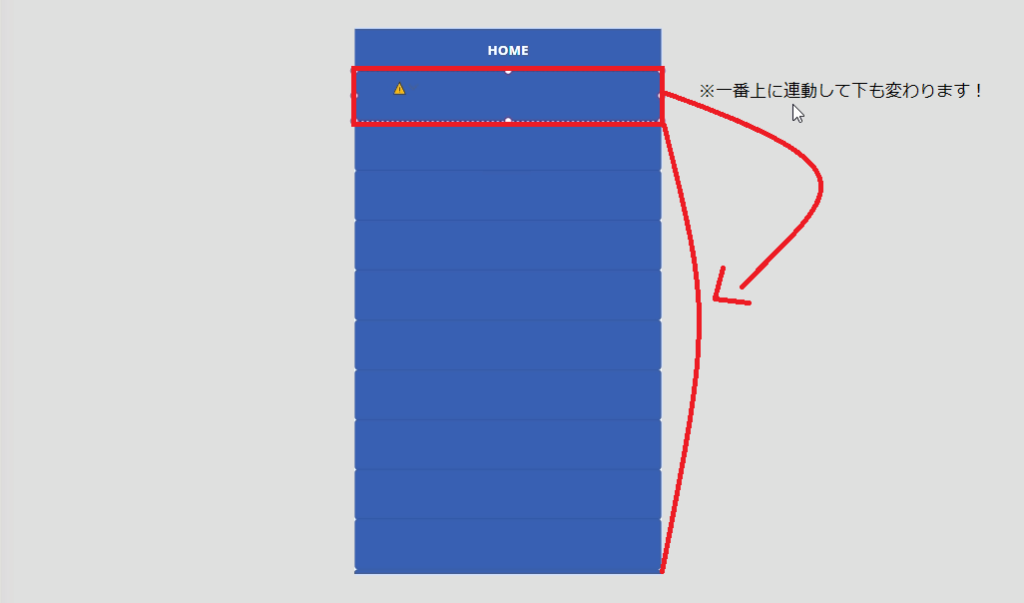
1番上のボタンを操作すると、すべてのボタンが連動して動きます。
16.ボタンのサイズを合わせ、「ボタン」というテキストを削除します。
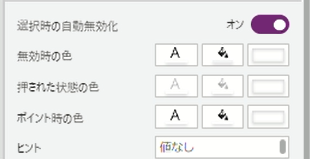
17.「Button2」の背景を透明にします。
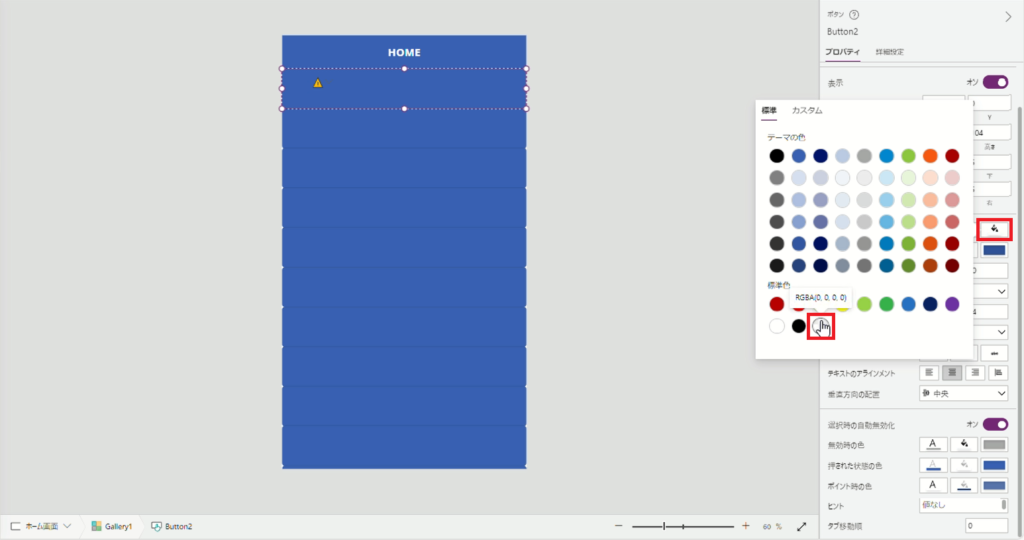
18.背景と合わせ、変更可能なすべての色を透明に変更します。
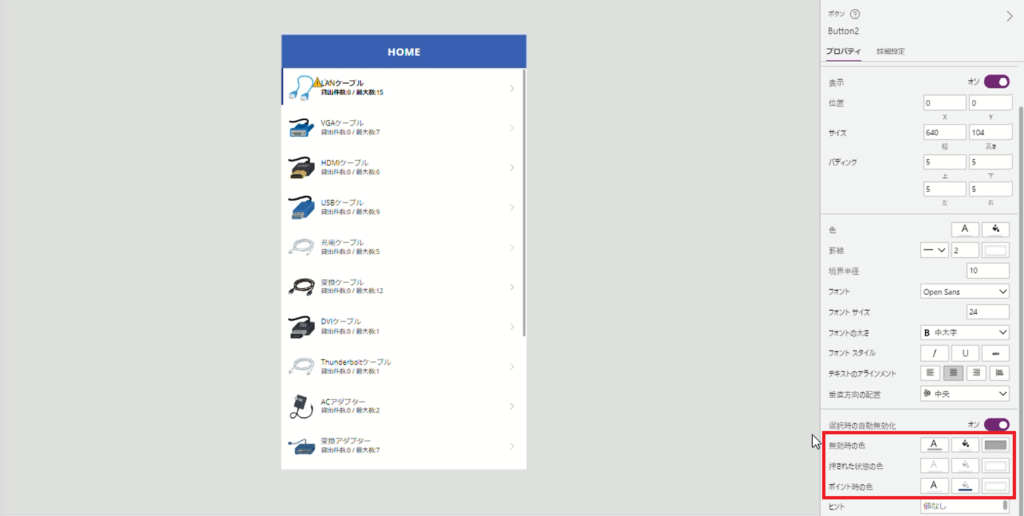
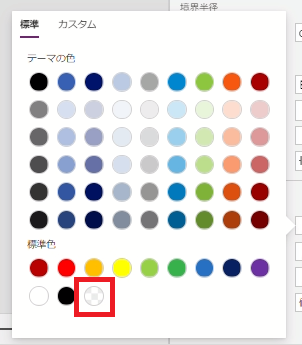
19.クリックで色の変更ができない部分は、数式を削除することで透明に変更することができます。
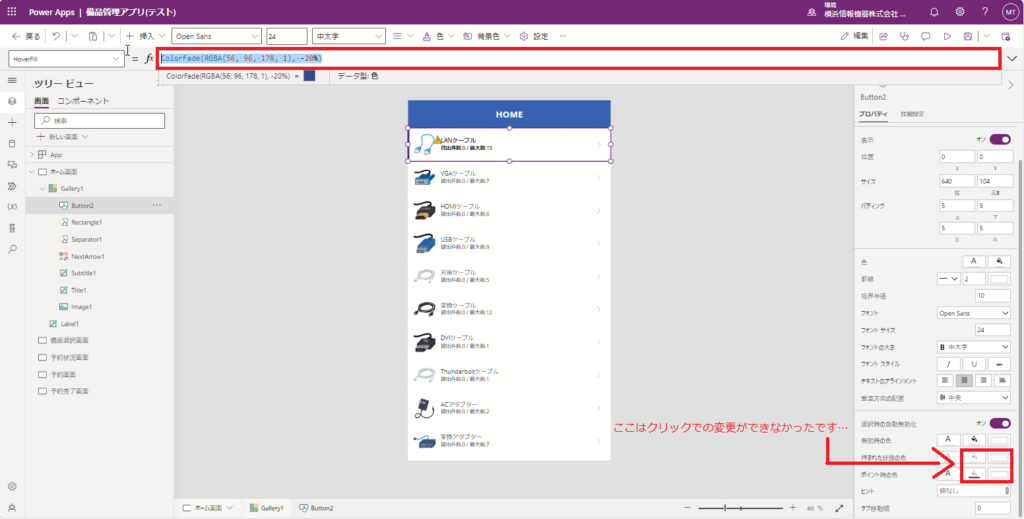
20.すべての色を透明にすることが出来ました。
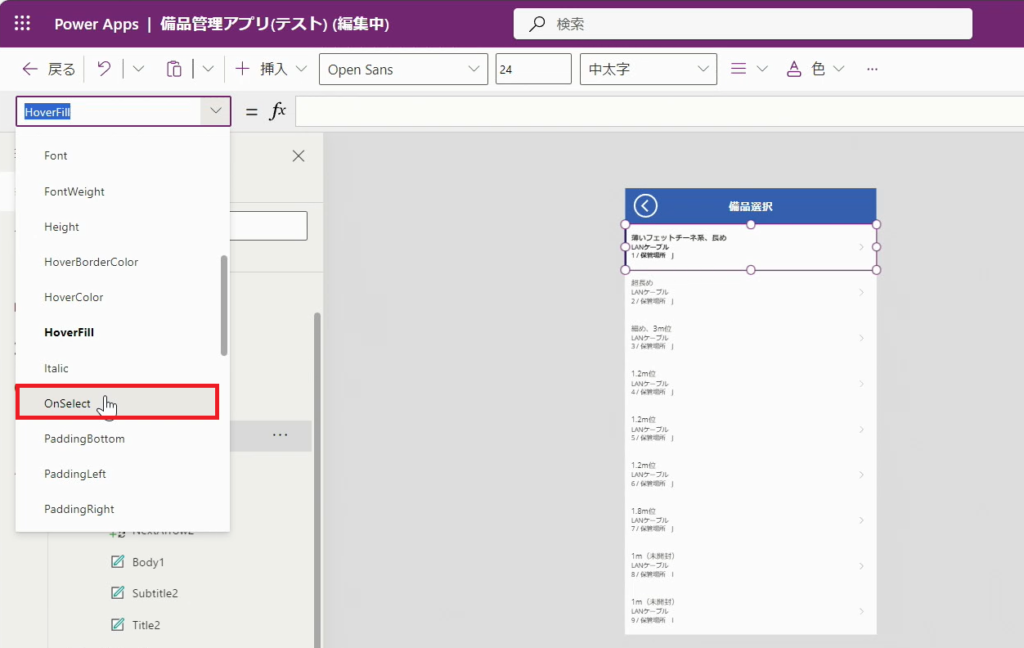
21.「HoverFill」の矢印をクリックします。
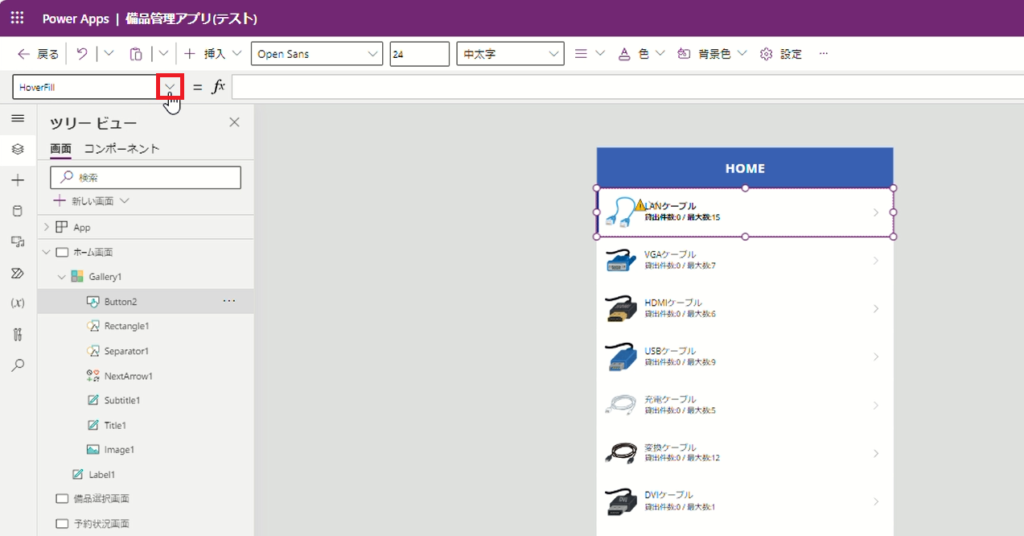
22.プルダウンから「OnSelect」を選択します。
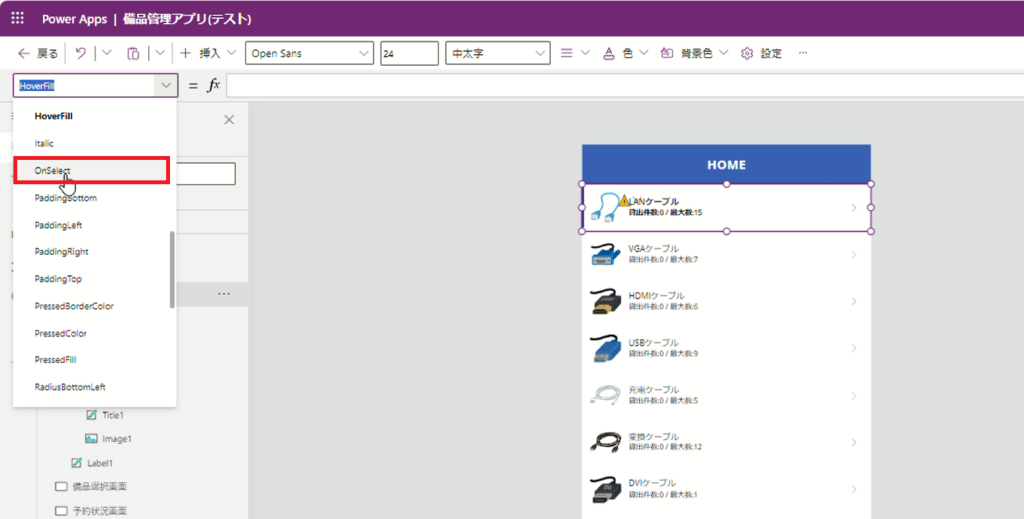
Point!ボタンの色を設定していたことで、色のプロパティになっているため、ボタンとしてのプロパティに変更する作業である。
23.数式に下記を入力します。
Navigate(備品選択画面)
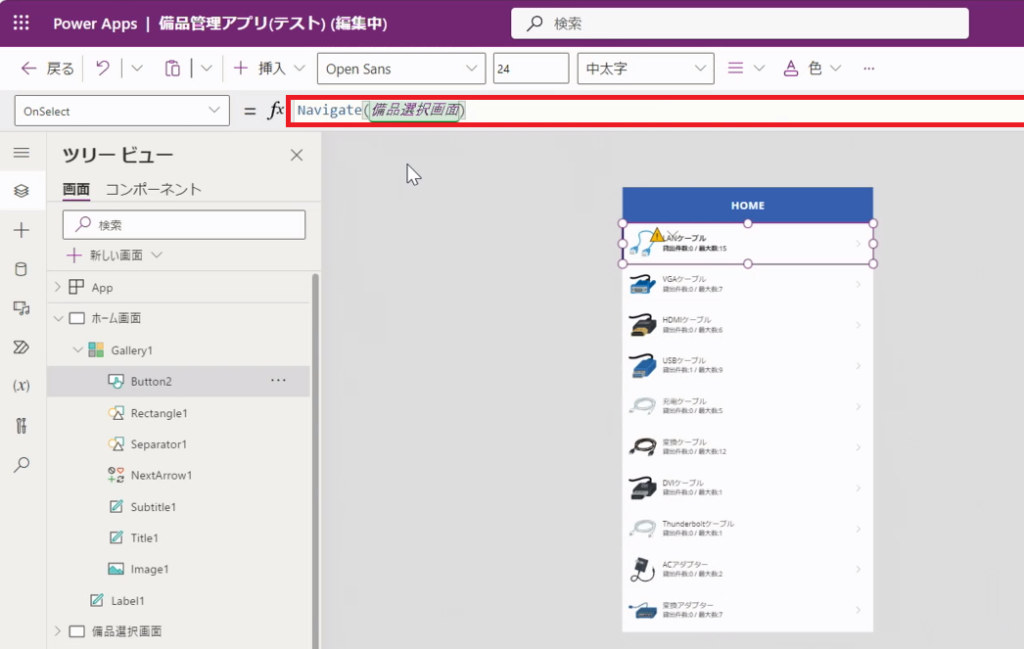
Point!Navigate=画面を指定して移動させられる関数。
24.ホーム画面が完成しました。

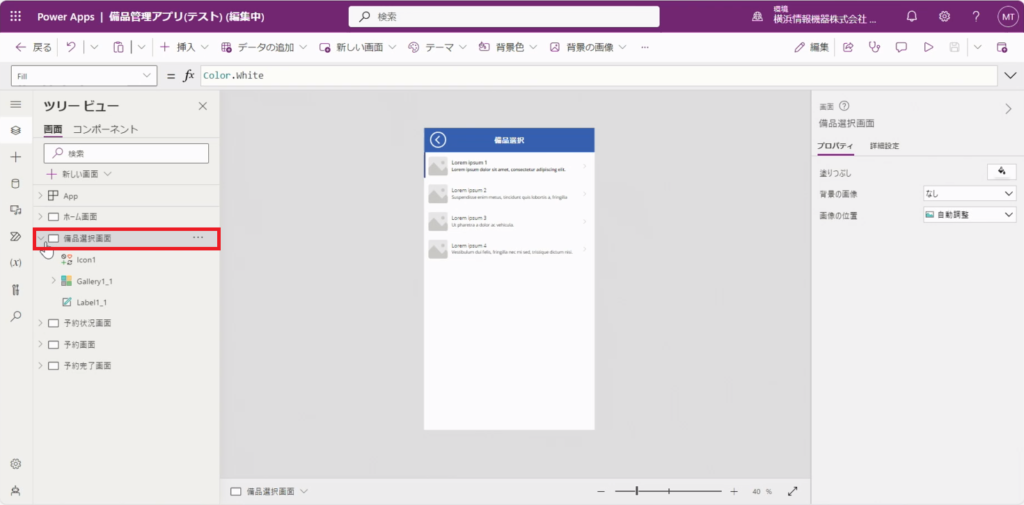
手順2.備品選択画面
1.「備品選択画面」を選択します。
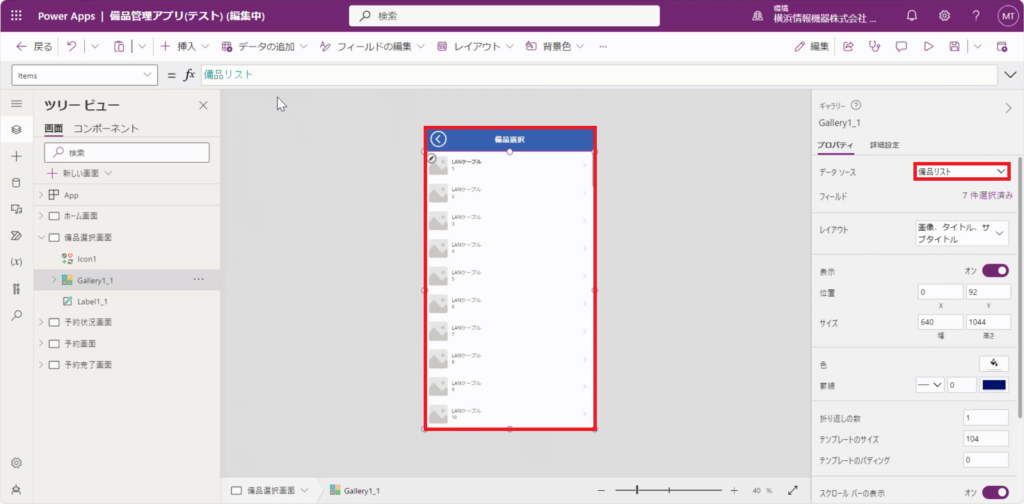
2.「備品選択画面」のプルダウンから「Gallery1_1」を選択し、「データソースの選択」から「備品リスト」を選択します。
3.選択した「備品リスト」のデータを基に、画面が作成されました。
4.「レイアウト」のプルダウンから、「タイトル、サブタイトル、本文」を選択し、レイアウトを変更します。
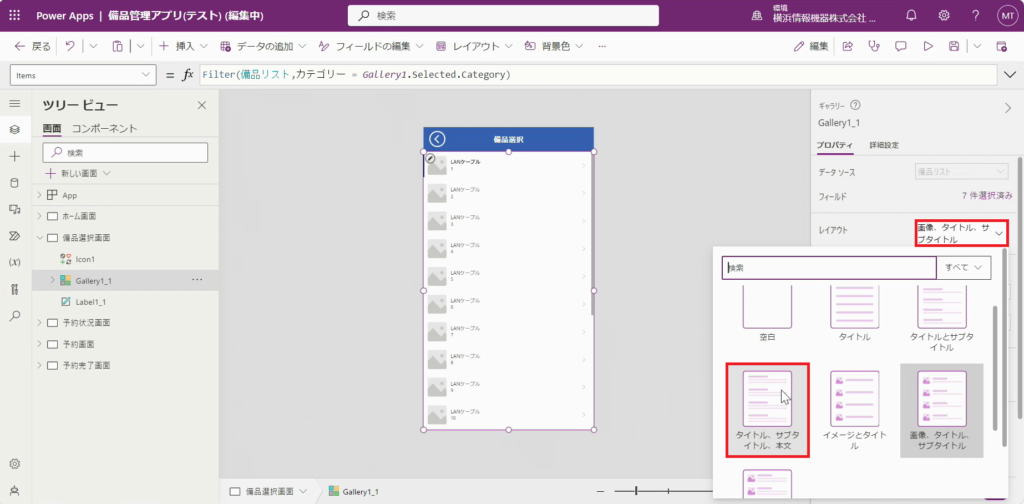
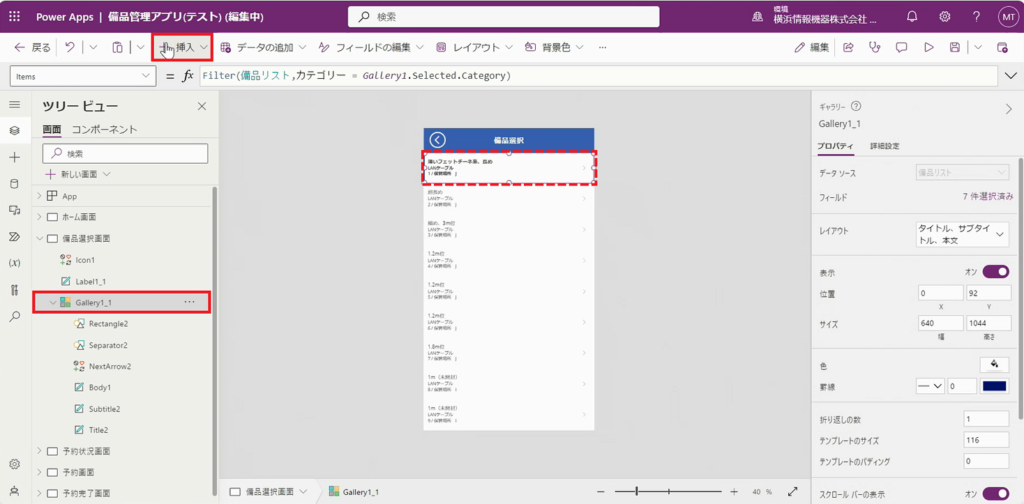
5.「Gallery1_1」の数式に下記を入力します。
Filter(備品リスト,カテゴリー = Gallery1.Selected.Category)
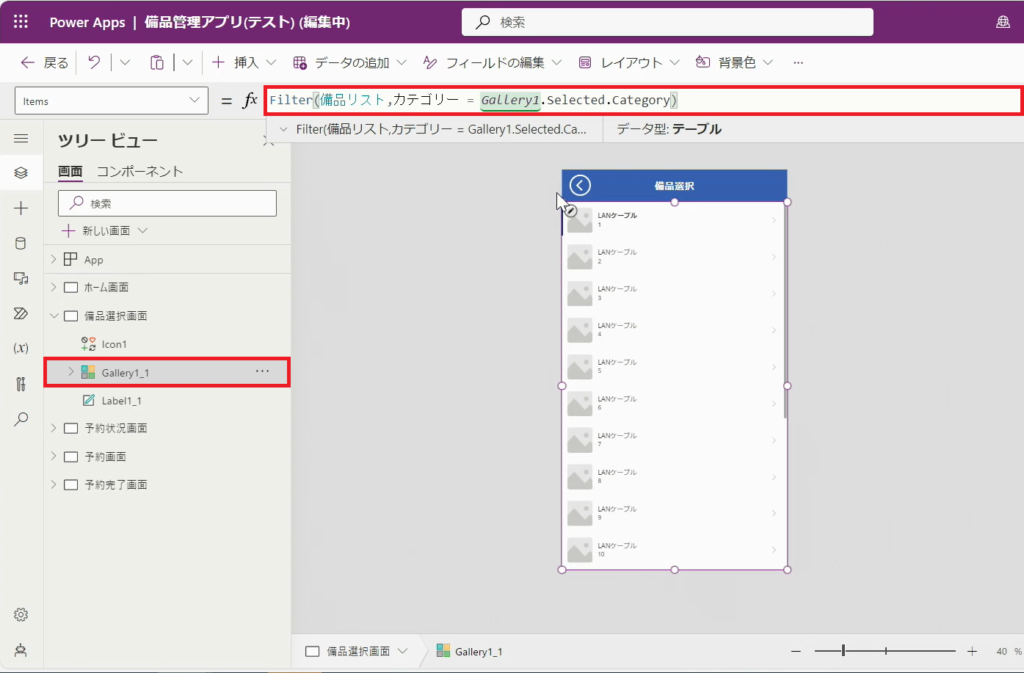
Point!関数の解説
以下の条件に当てはまるデータだけを表示して (Filter)
→備品リストのカテゴリーの列の中で (備品リスト,カテゴリー) 、Gallery1で選択されたカテゴリー(Gallery1.Selected.Category) と一致する (=) データ
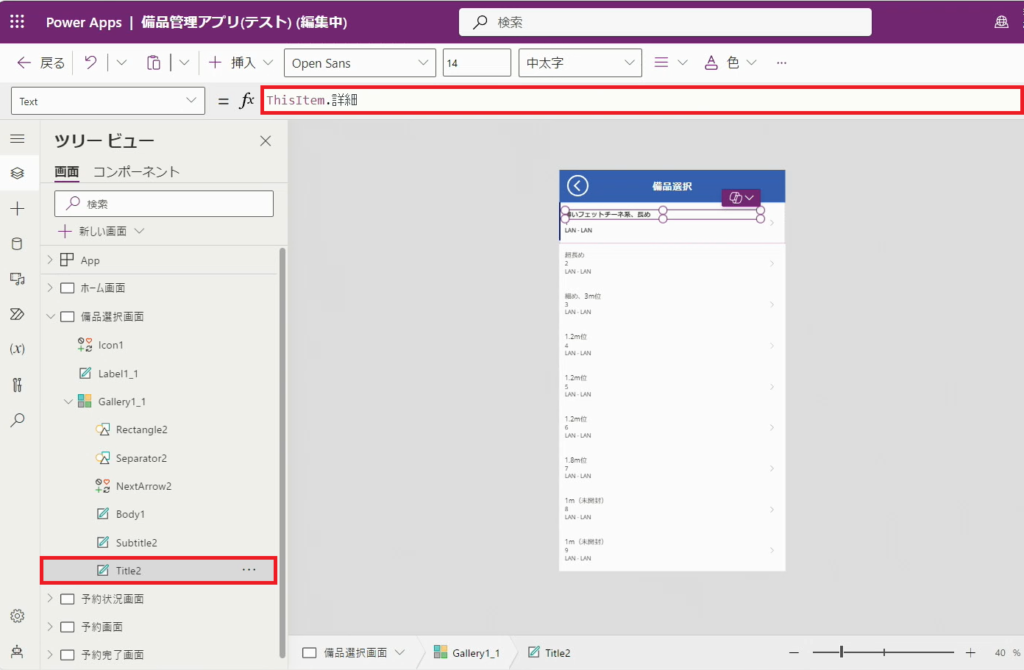
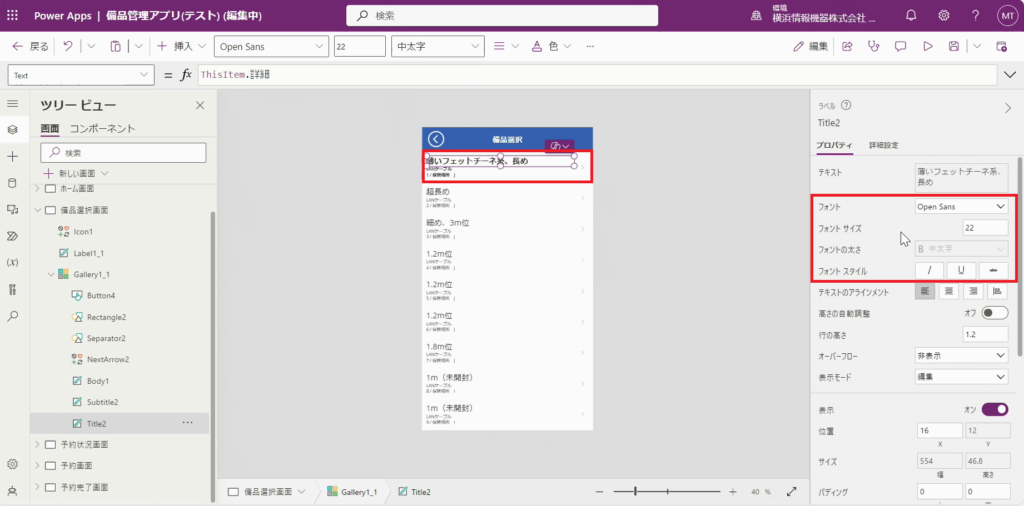
6.「Gallery1_1」のプルダウンから「Title2」をクリックします。
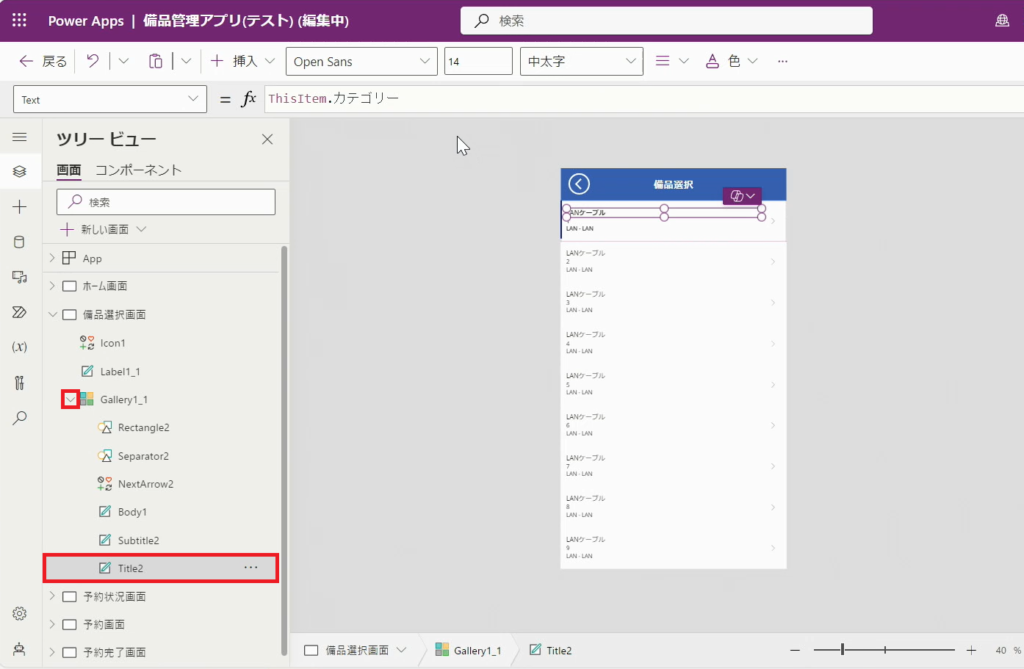
7.「Title2」の数式に下記を入力します。
ThisItem.詳細
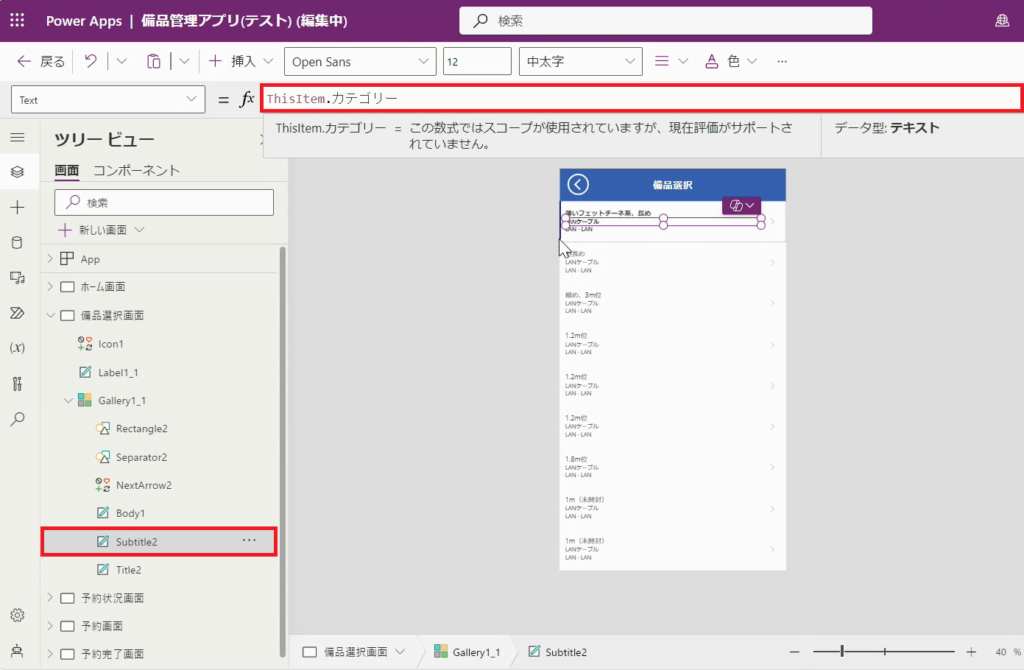
8.「Subtitle2」の数式に下記を入力します。
ThisItem.カテゴリー
9.「Body1」の数式に下記を入力します。
ThisItem.'No.'&" / "&"保管場所 "&ThisItem.保管場所

10.次に、画面が切り替わるためのボタンを設置していきます。
11.「Gallery1_1」を選択し、「挿入」をクリックします。
Point!「Gallery1_1」(赤の点線部分)が選択されていないと、ボタンが正しく追加されませんのでご注意ください。
12.「ボタン」を選択します。
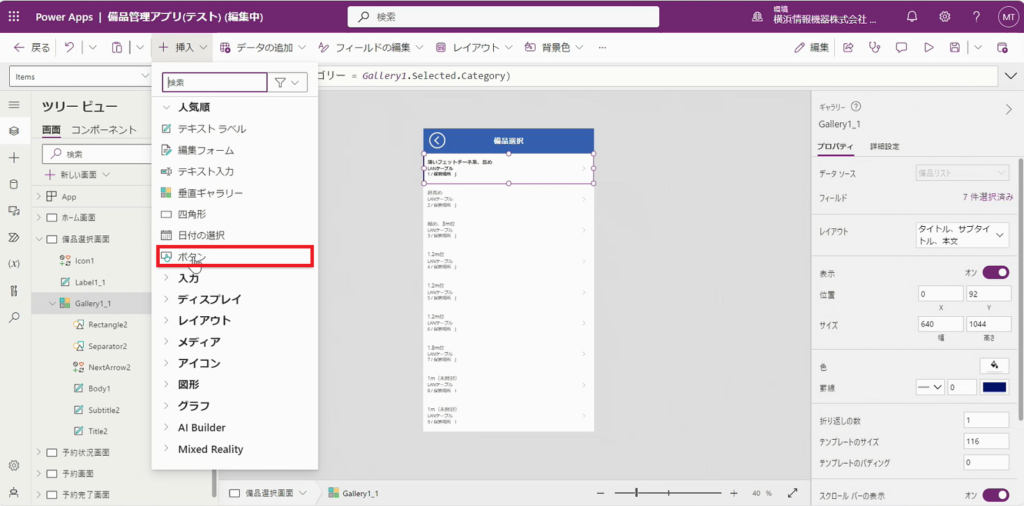
13.「Button4」が追加されました。
※ボタンが正しく反映されない場合は、手順11の選択範囲を再度ご確認ください。
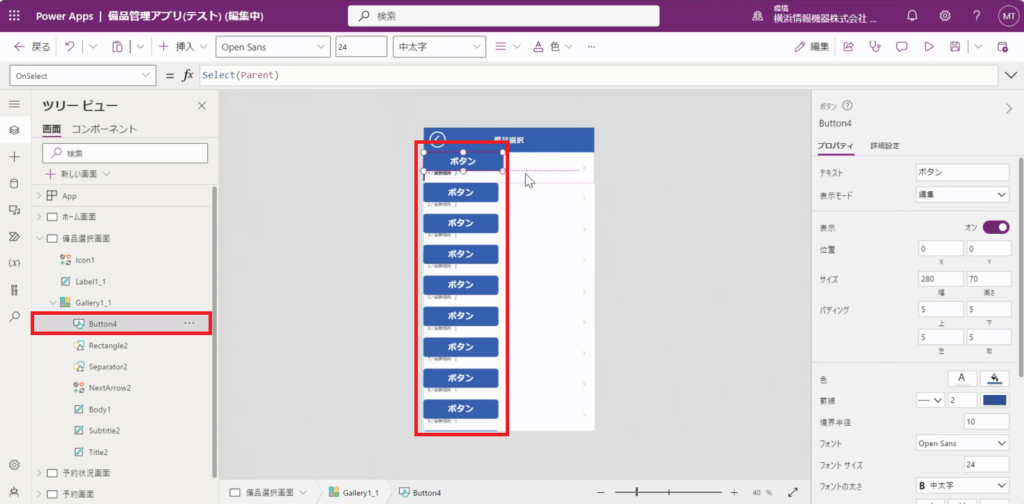
14.追加された「Button4」のサイズを合わせ、色を透明にします。
手順は、「ホーム画面作成-手順15~20」をご参考ください。
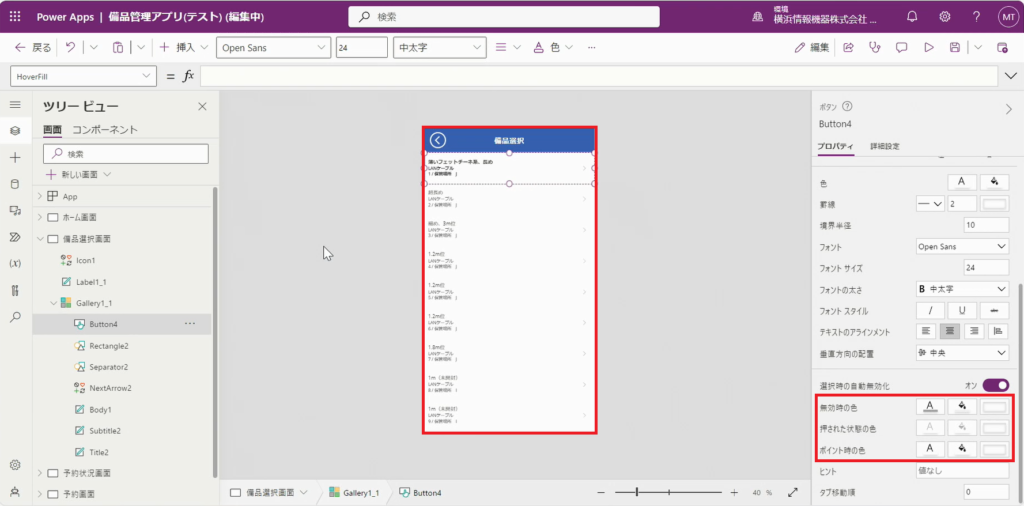
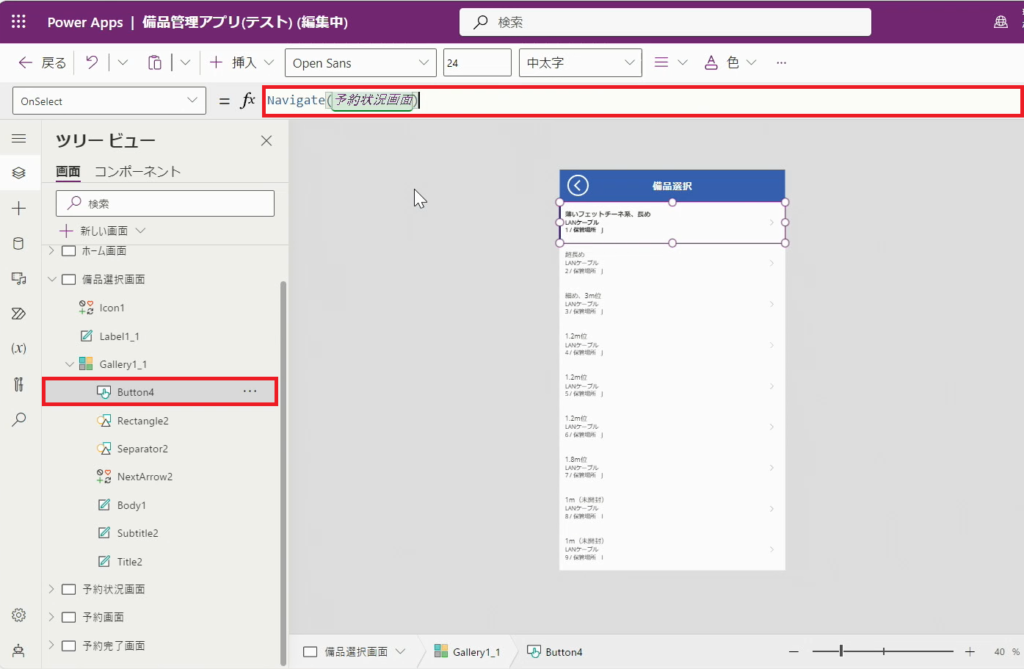
15.「HoverFill」の矢印をクリックします。
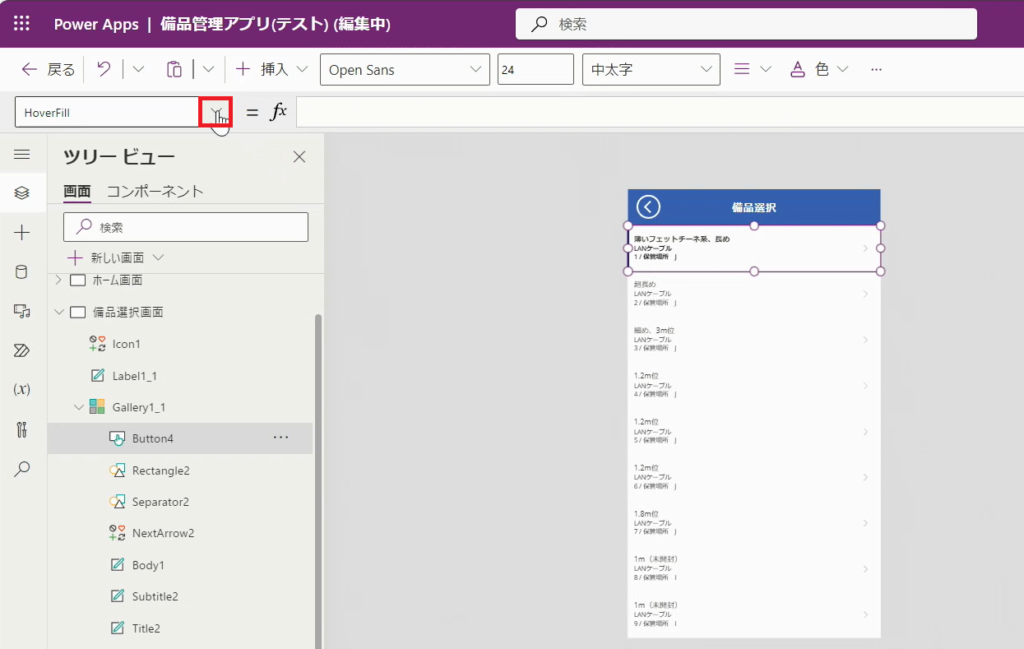
16.「OnSelect」を選択します。
17.「Button4」の数式に下記を入力します。
Navigate(予約状況画面)
18.「Icon1(戻る矢印)」の数式に下記を入力します。
Back()
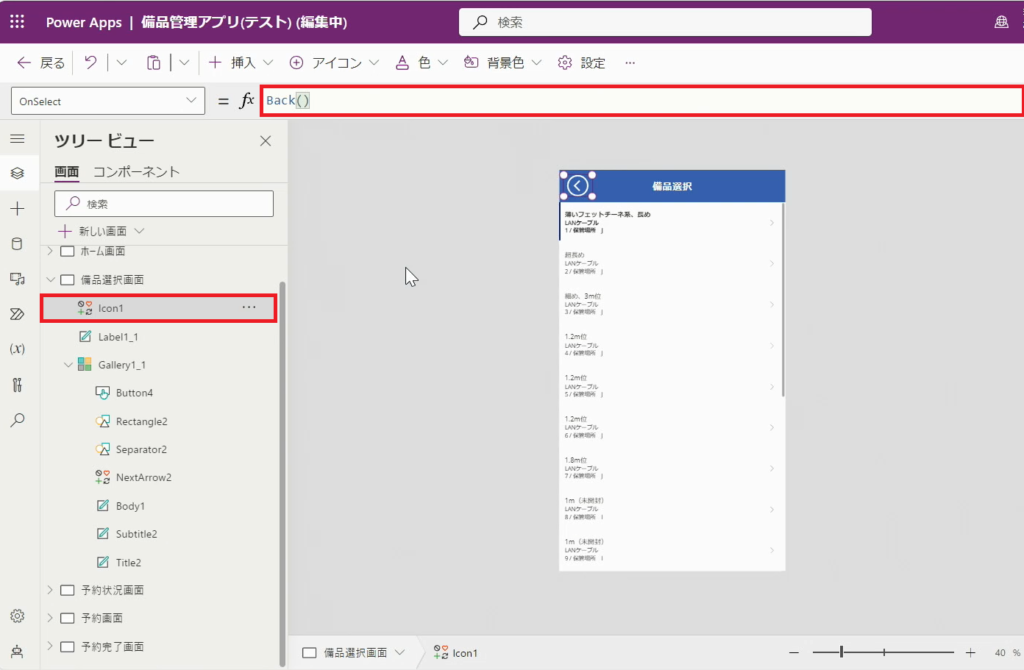
Point!Back=ひとつ前の画面に戻る関数。
19.プロパティにて「Title2」「Subtitle2」「Body1」の文字サイズやフォントを自由に設定することが出来ます。
20.備品選択画面が完成しました。
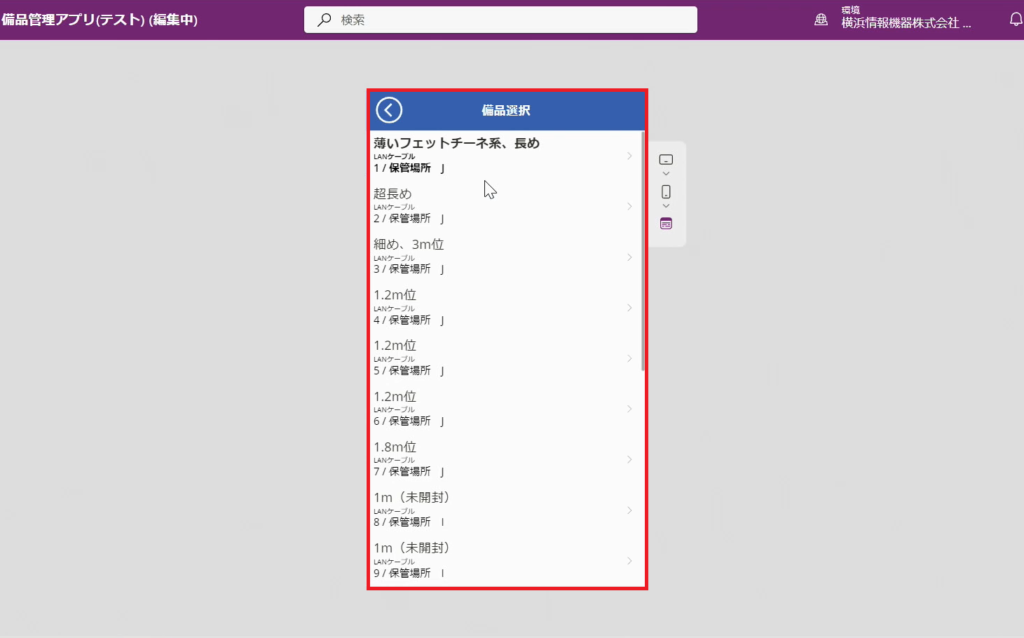
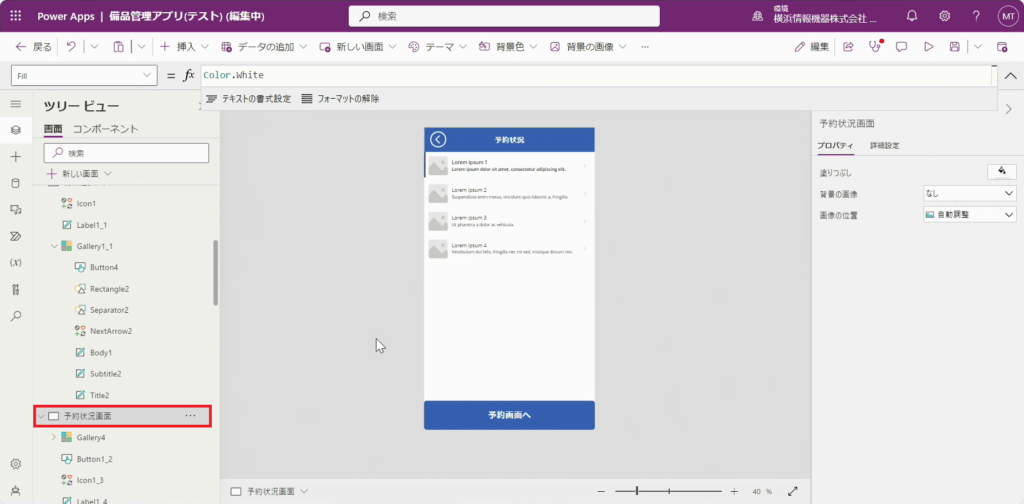
手順3.予約状況画面
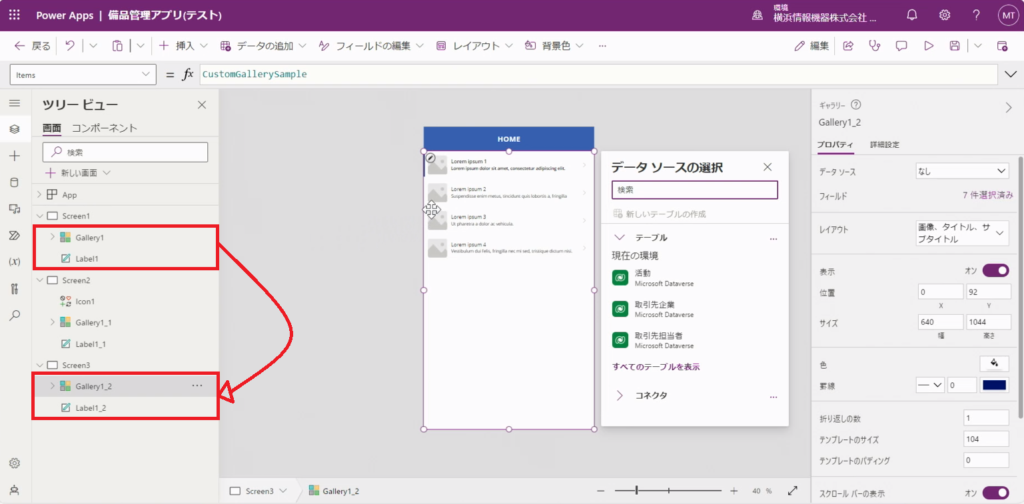
1.「予約状況画面」を選択します。
2.「予約状況画面」のプルダウンから「Gallery4」を選択し、「データソースの選択」から「備品予約状況」を選択します。
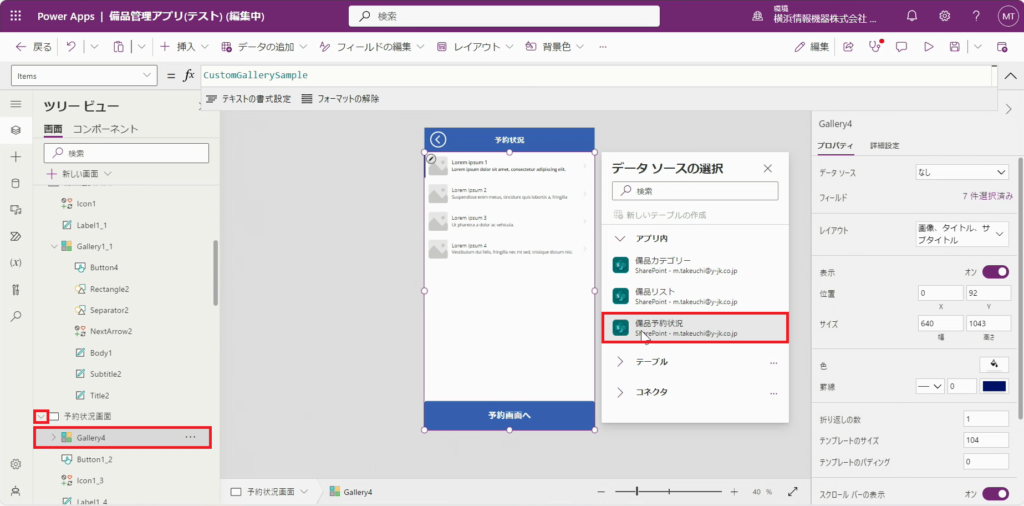
3.選択した「備品予約状況」のデータを基に、画面が作成されました。
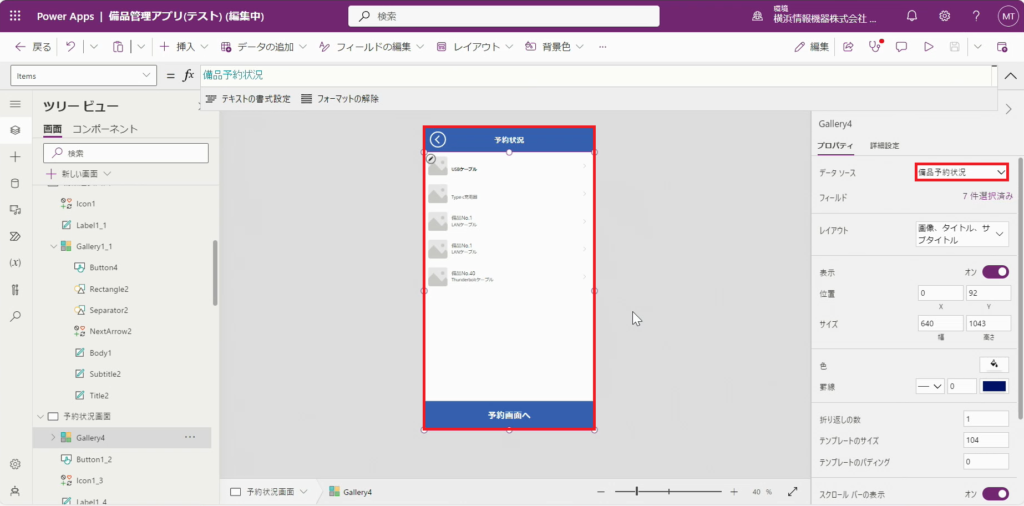
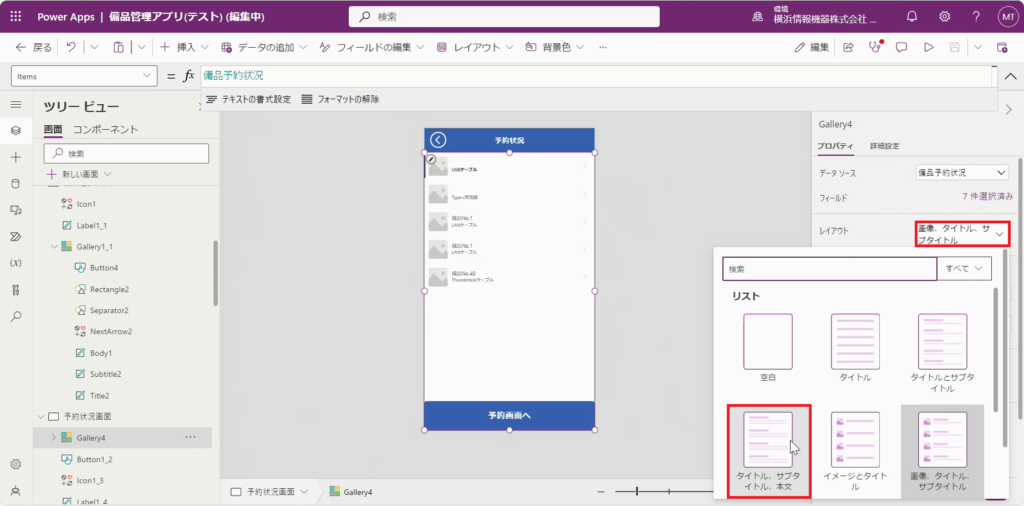
4.「レイアウト」のプルダウンから、「タイトル、サブタイトル、本文」を選択し、レイアウトを変更します。
5.「Gallery4」の数式に下記を入力します。
Filter(備品予約状況,タイトル = "備品No."&Gallery4.Selected.'No.',予約済み = true)
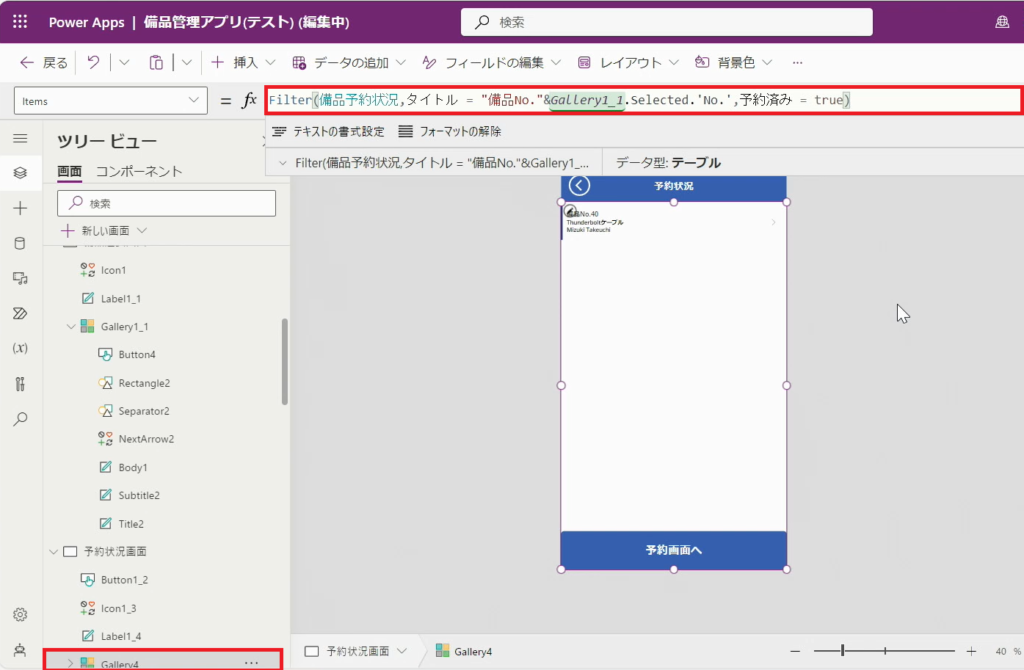
Point!関数の解説
以下の条件に当てはまるデータだけを表示して (Filter)
→Gallery4で選択された(Selected)ナンバー(‘No.’)と一致し、且つ予約済みの列にチェックが入っている (= true)データ
6.「Button1」の数式に下記を入力します。
NewForm(Form1);UpdateContext({newMode:true});Navigate(予約画面);
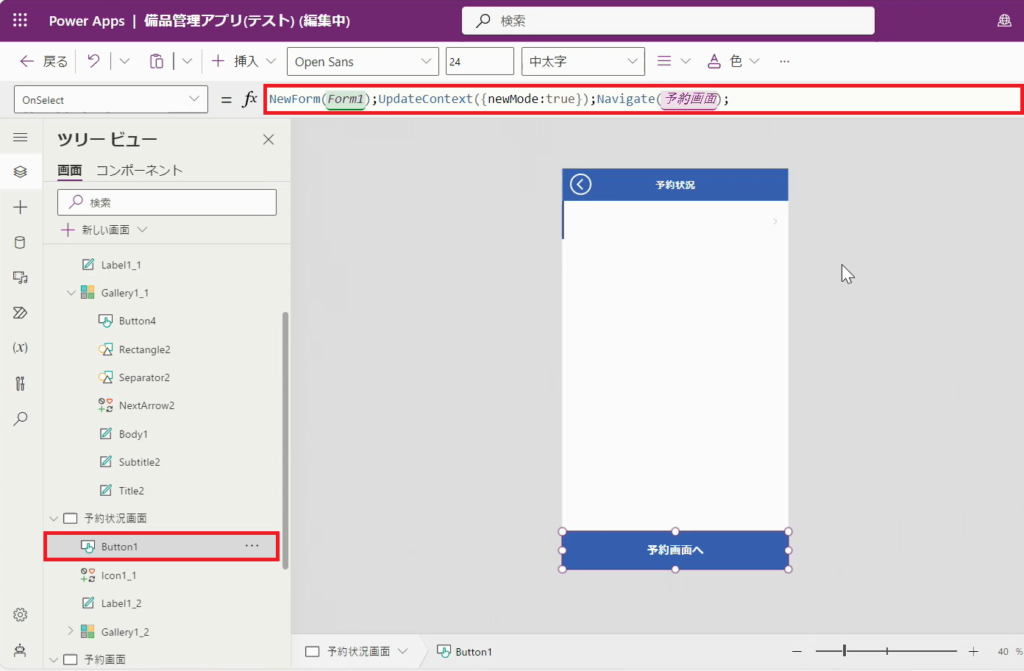
Point!関数の解説
簡単に言えばここをクリックするたびに新しい情報で予約画面が作成されるようにする式。
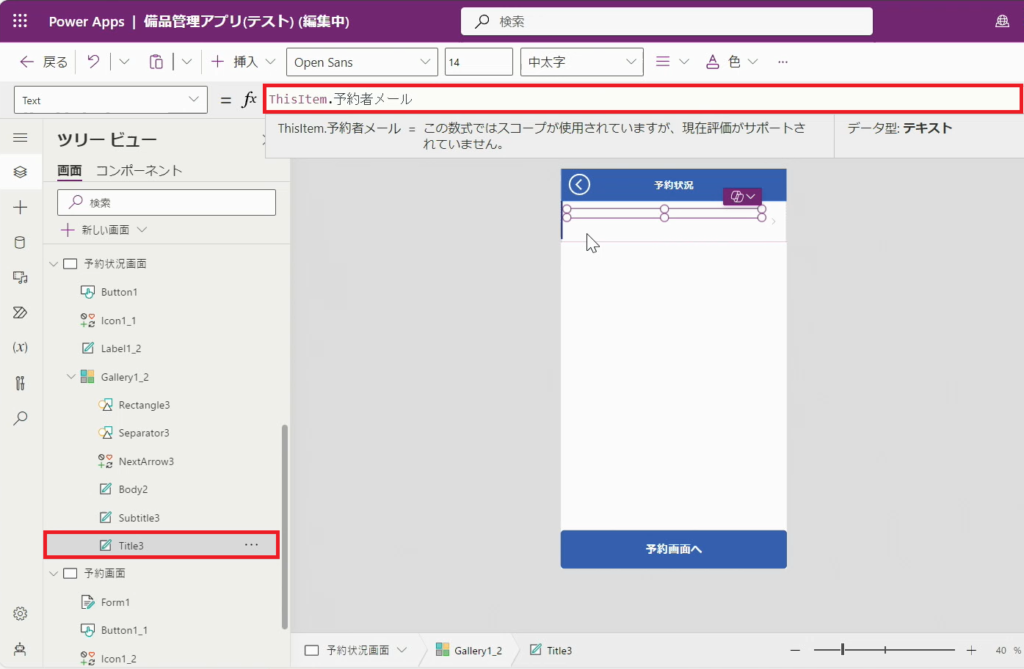
7.「Gallery 1_2」のプルダウンから、「Title3」を選択します。
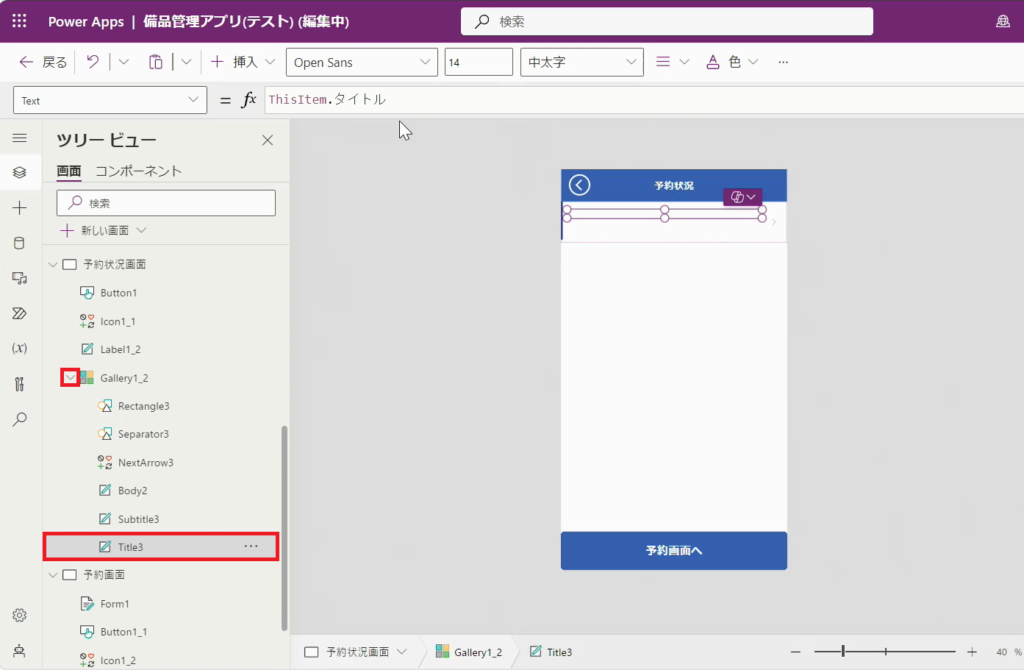
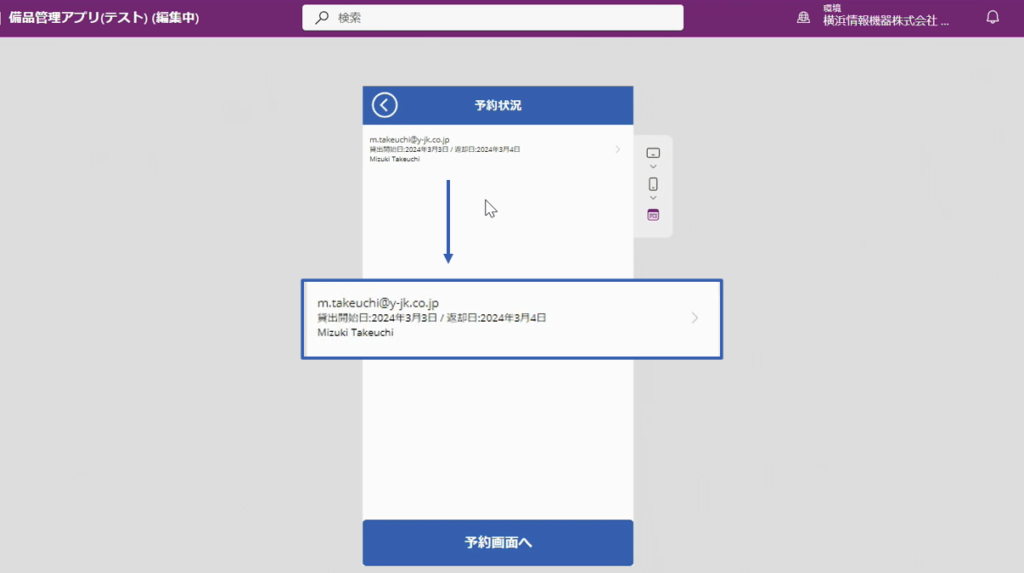
8.「Title3」の数式に下記を入力します。
ThisItem.予約者メール
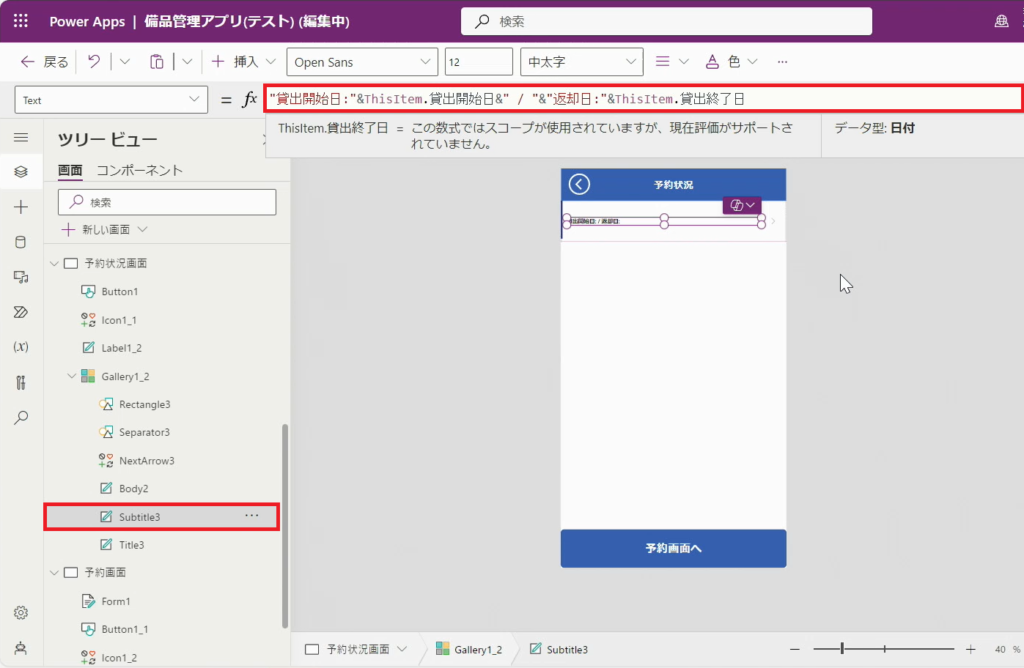
9.「Subtitle3」の数式に下記を入力します。
"貸出開始日:"&ThisItem.貸出開始日&" / "&"返却日:"&ThisItem.貸出終了日
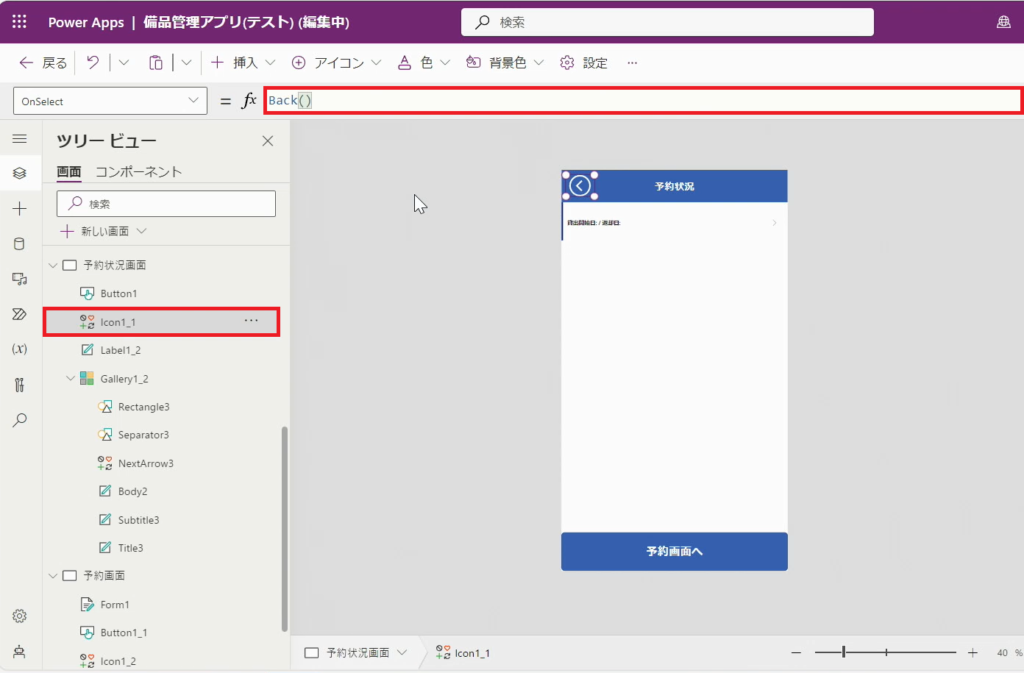
10.「Icon1_1 (戻る矢印) 」の数式に下記を入力します。
Back()
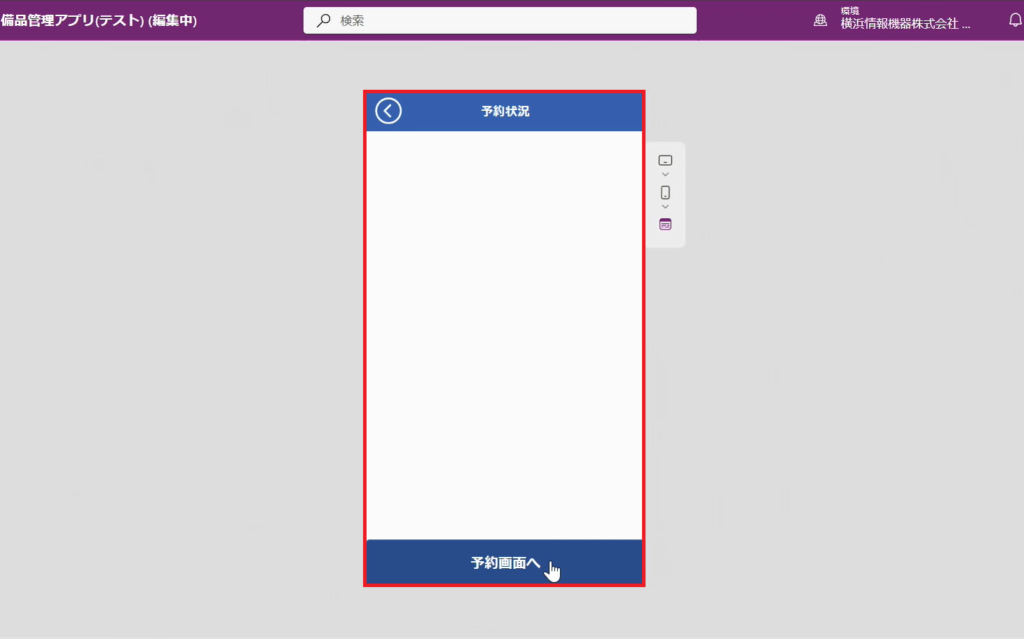
11.予約状況画面が完成しました。
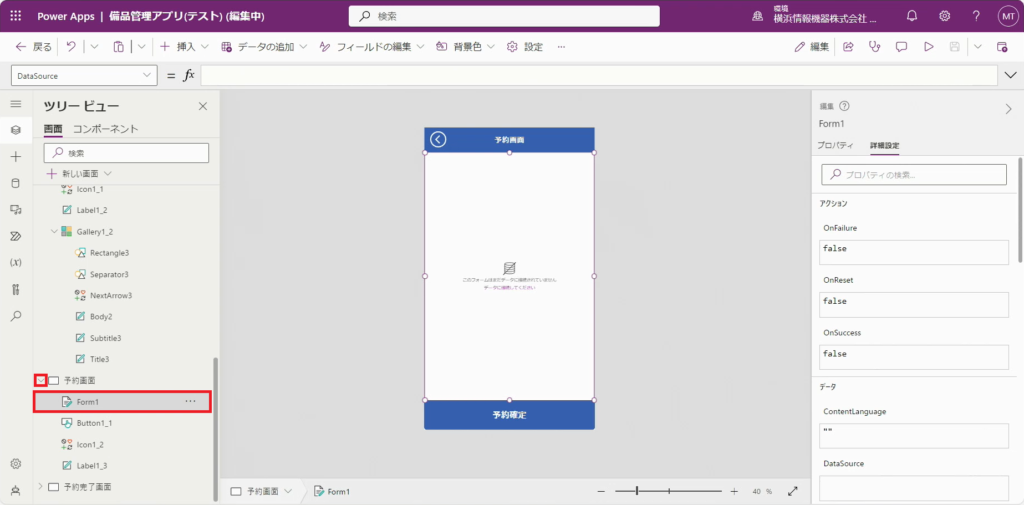
手順4.予約画面
1.「予約画面」のプルダウンから「Form1」を選択します。
2.プロパティの「データソース」のプルダウンから「備品予約状況」を選択します。
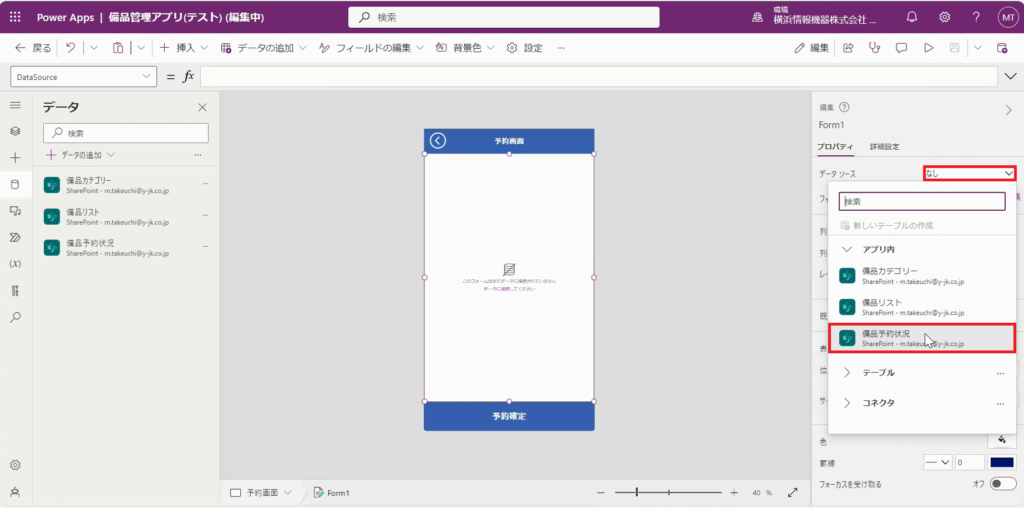
3.選択した「備品予約状況」のデータを基に、予約フォームの画面が作成されました。
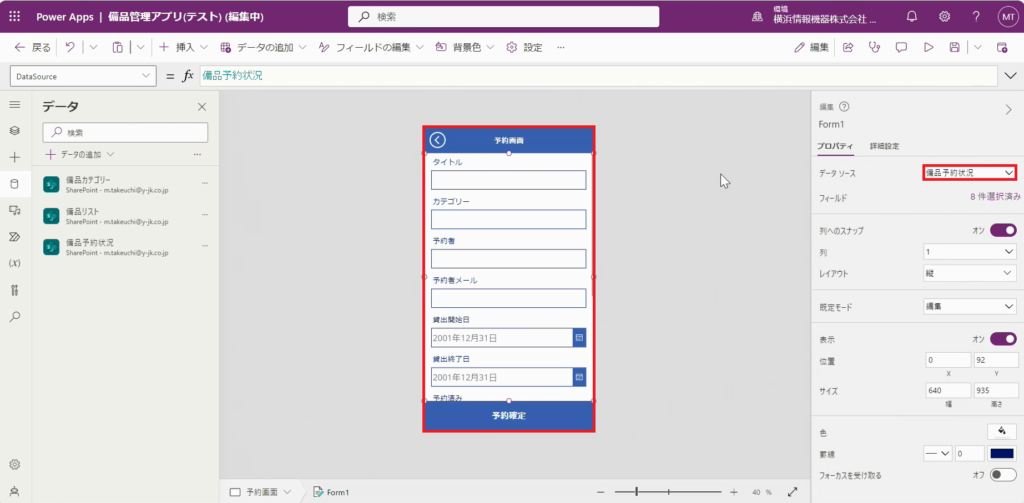
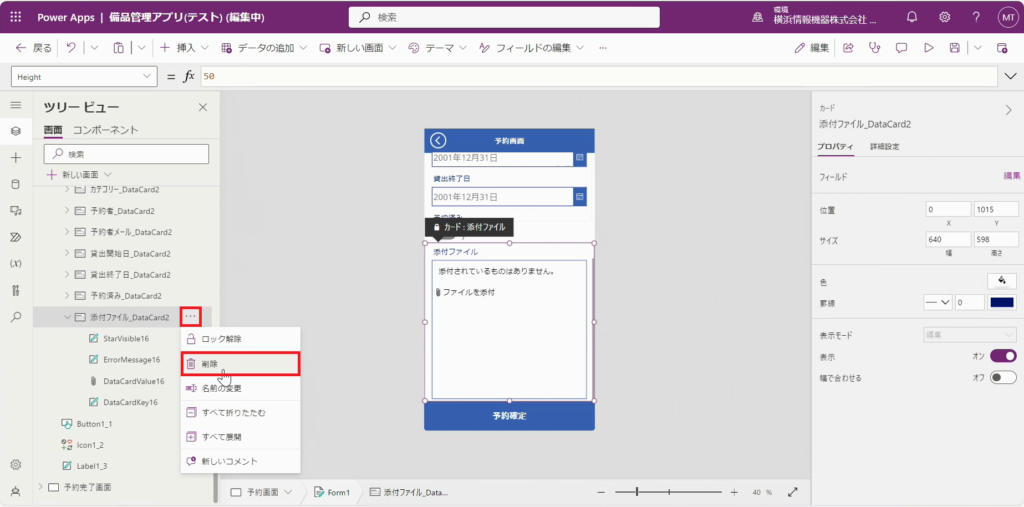
4.今回は、予約フォーム内の「添付ファイル」は不要なため削除します。
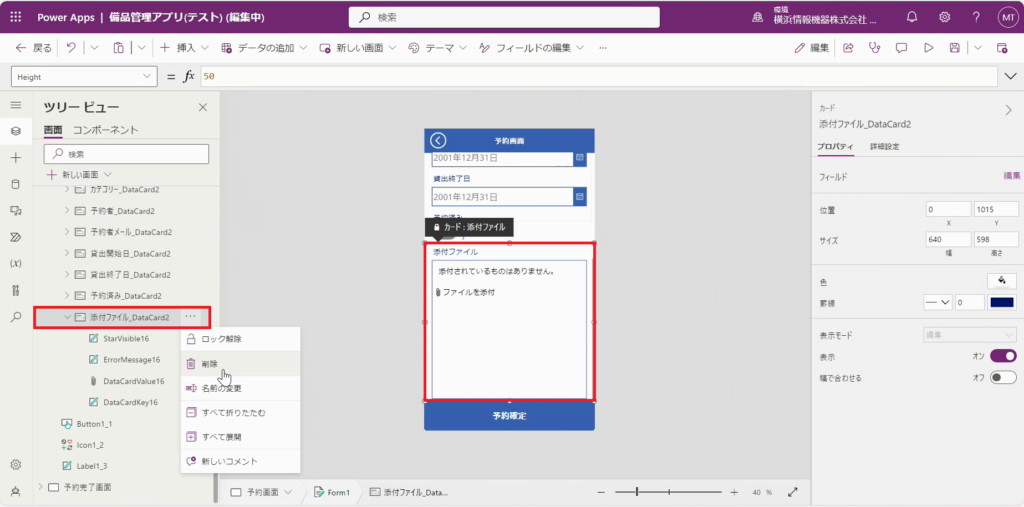
5.「添付ファイル_DataCard2」を選択し、「三点リーダー」から「削除」をクリックします。
6.タイトルの青枠部分のみを選択します。ツリービューの「DataCardValue9」をクリックしていただくと確実です。
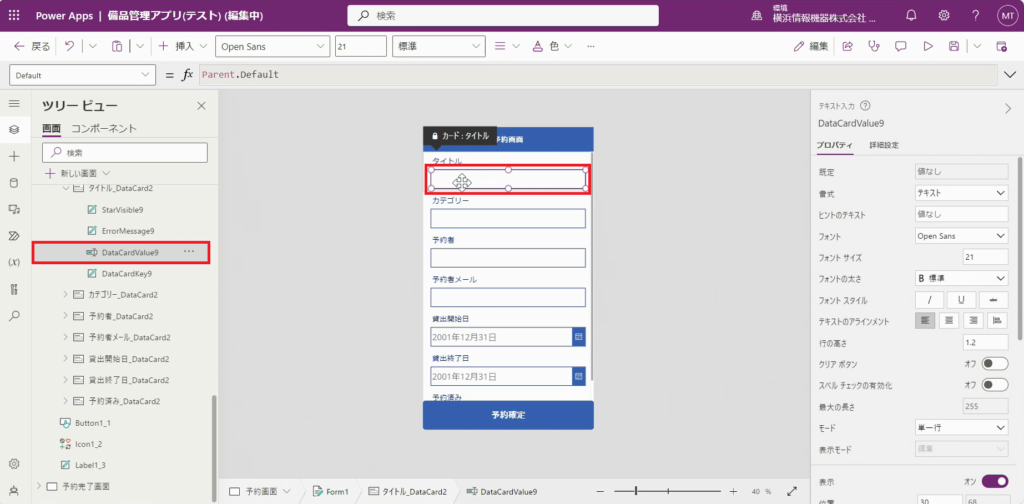
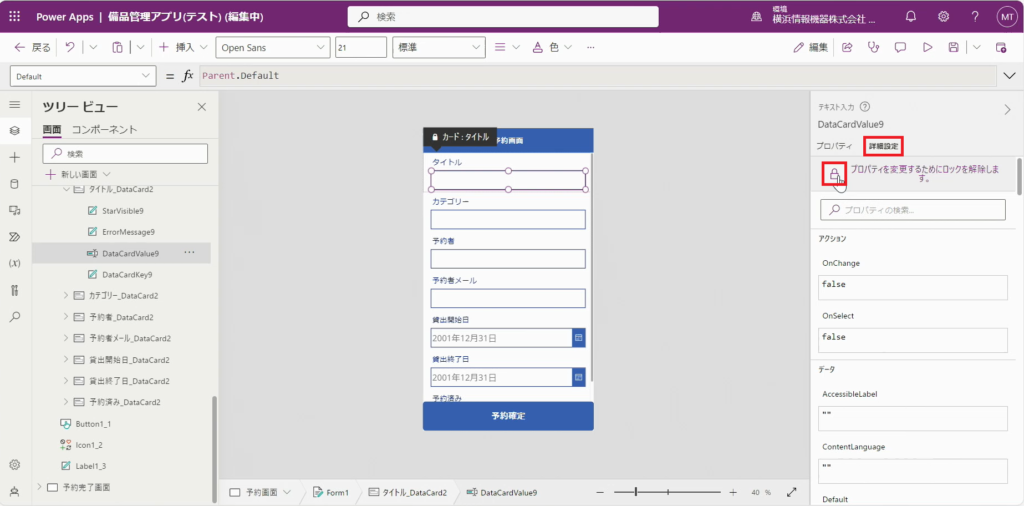
7.「詳細設定」にある「鍵マーク」をクリックし、ロックを解除します。
※項目ごとに毎回ロックを解除しないと、数式の入力が出来なくなりますのでご注意ください。
8.「DataCardValue9」の数式に下記を入力します。
If(Form1.Mode = FormMode.New,"備品No."& Gallery 1_1.Selected.'No.',Parent.Default)
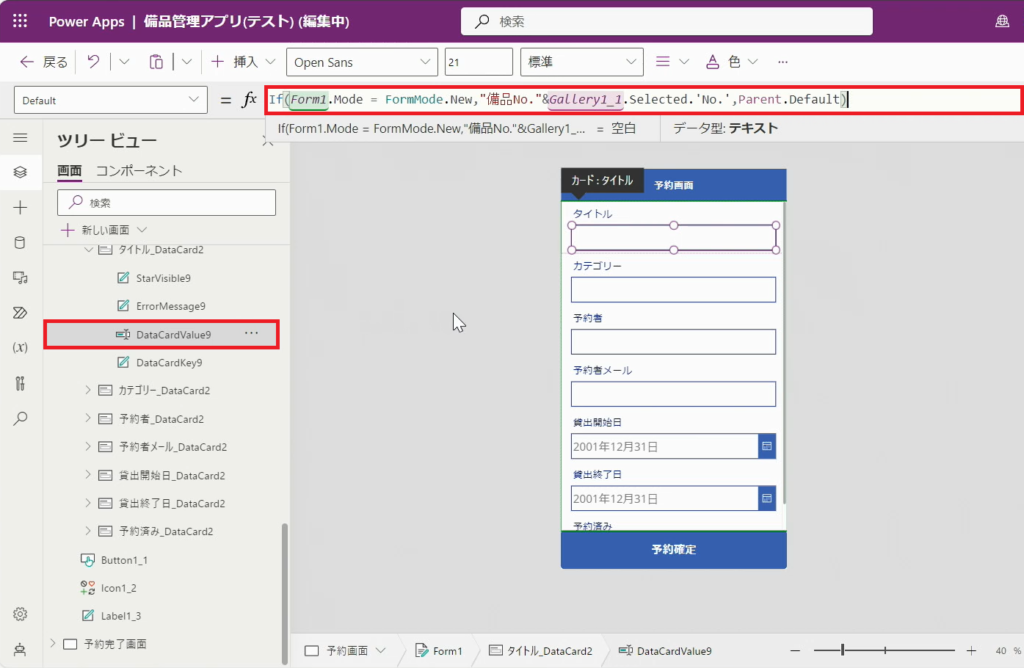
Point!関数の解説
新規のボタン(予約画面へ)を押したときのみ、入力されるよう設定しています。
このフォームが新記入力モードの場合のみ、式の処理を実行する といったところです。
9.同様に、下記項目もロックを解除し数式を入力していきます。
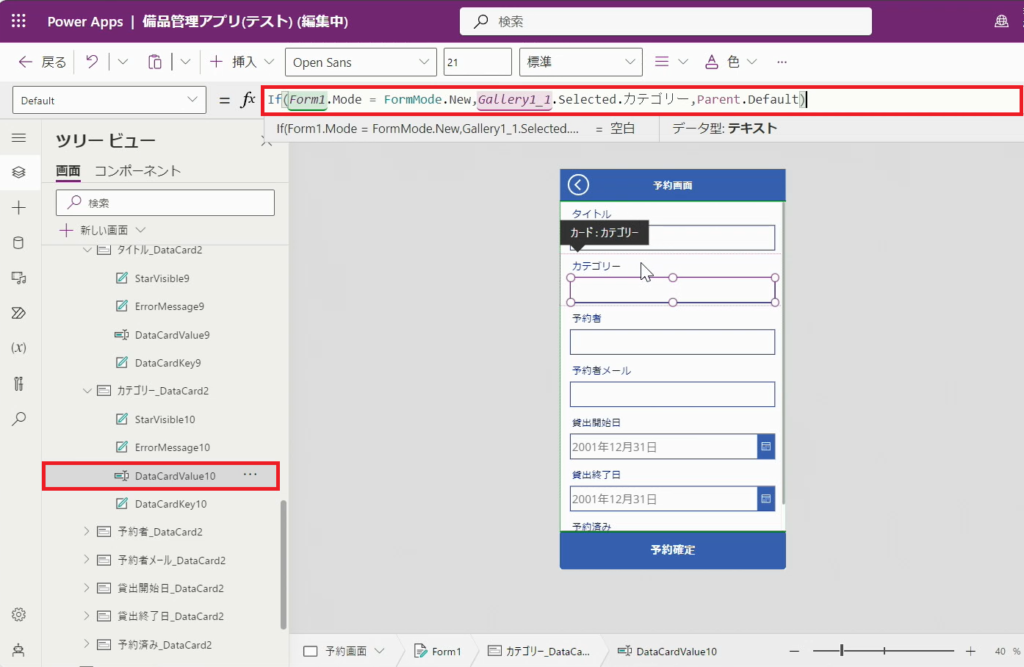
10.カテゴリー
・項目 「 DataCardValue10」
・数式
If(Form1.Mode = FormMode.New,Gallery 1_1.Selected.カテゴリー,Parent.Default)
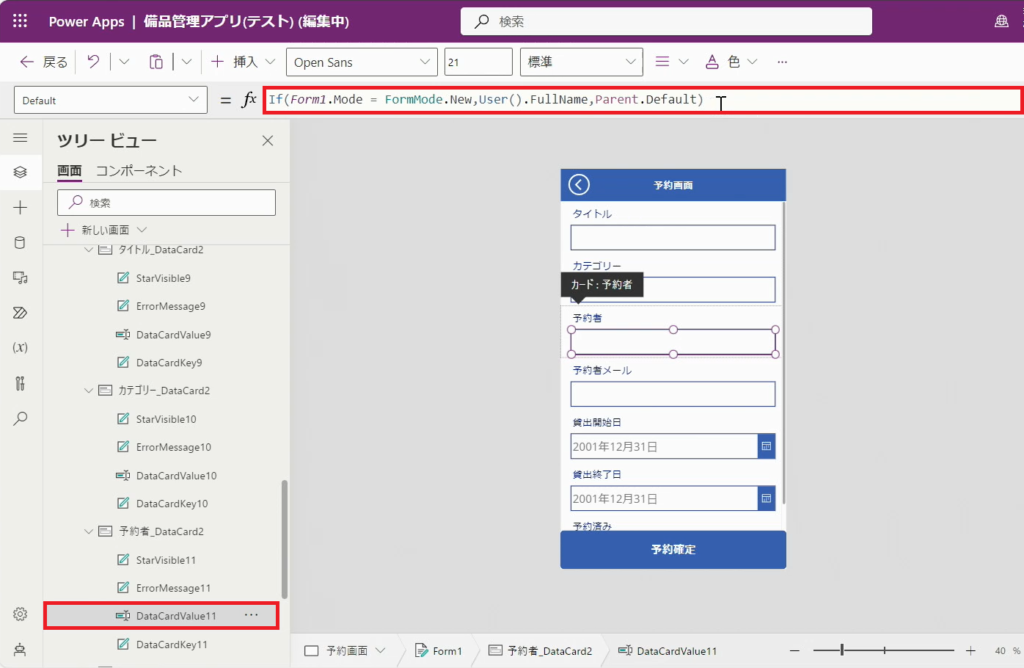
11.予約者
・項目 「 DataCardValue11」
・数式
If(Form1.Mode = FormMode.New,User().FullName,Parent.Default)
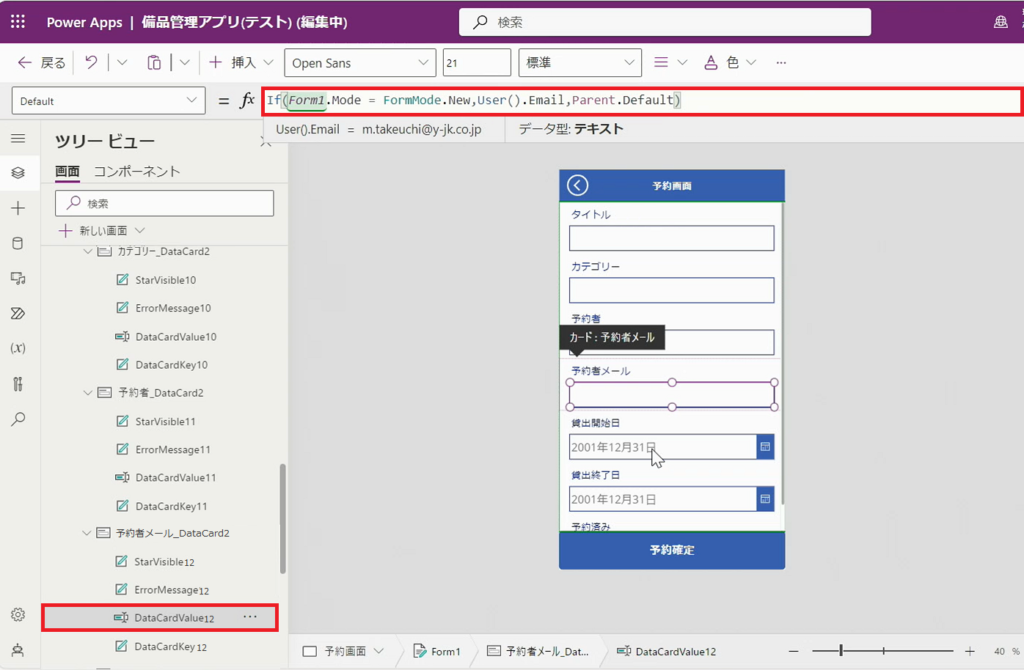
12.予約者メール
・項目 「 DataCardValue12」
・数式
If(Form1.Mode = FormMode.New,User().Email,Parent.Default)
13.貸出開始日
・項目 「 DataCardValue13」
・数式
Text(Now(),"yyyymmdd"
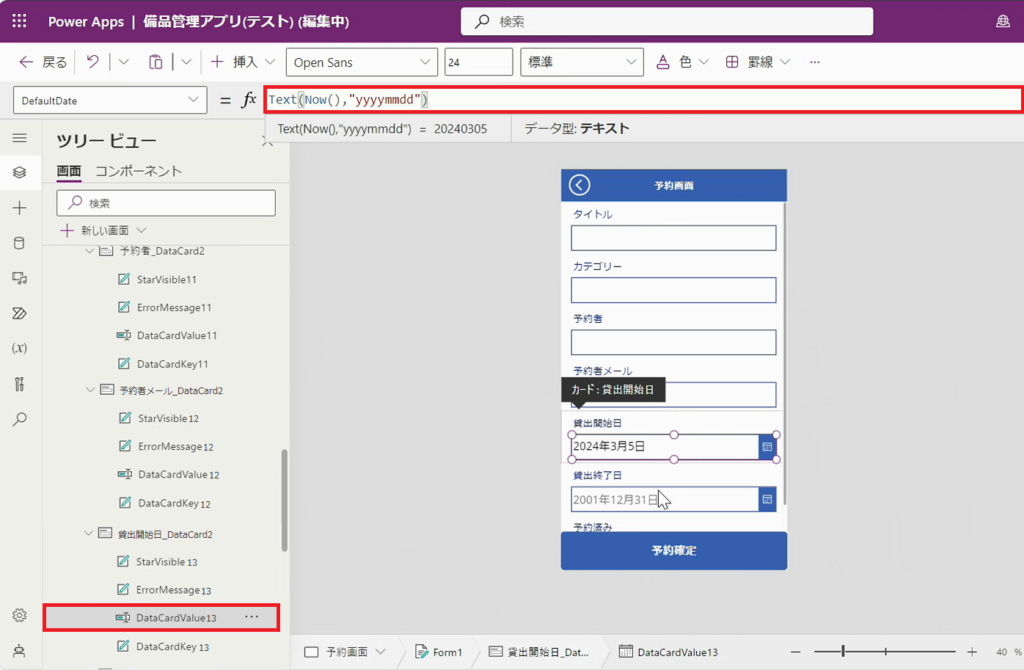
Point!今の時間をダブルクォーテーションで囲っている形式(=yyyymmdd)で返してもらうための式。
14.貸出終了日
・項目 「 DataCardValue14」
・数式
Text(Now()+1,"yyyymmdd")
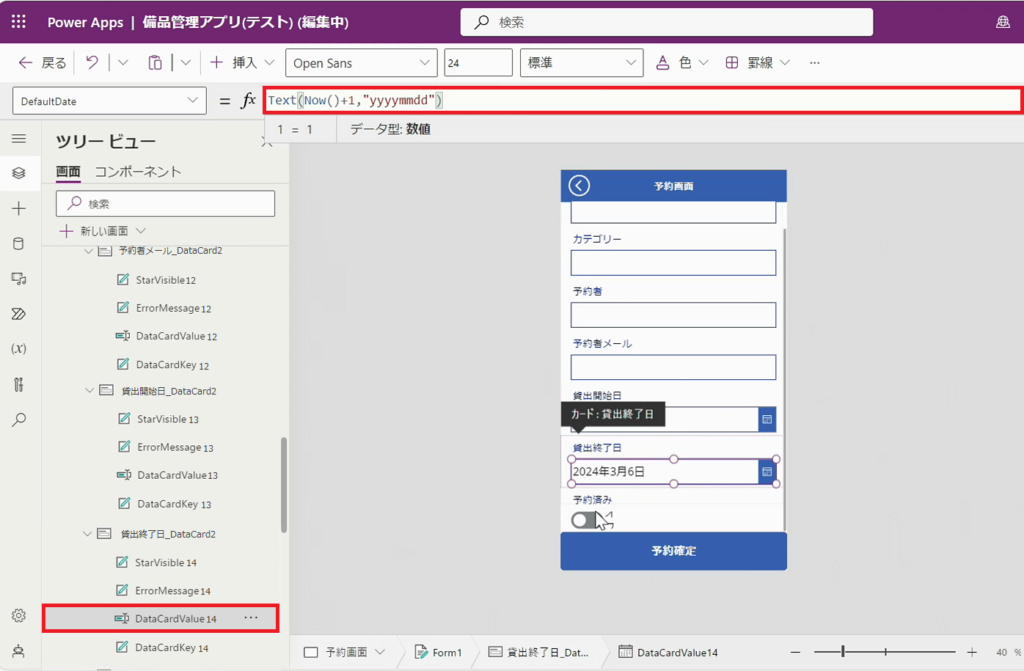
Point!+1とすることで取得した日付の一日後の日付が表示される。
15.「Button1」の数式に下記を入力します。
If(CountIf(備品予約状況,タイトル = "備品No."&Gallery 1_1.Selected.'No.',予約済み = true) >= Gallery 1_1.Selected.備品在庫,Notify("すでに備品が貸し出されています。",NotificationType.Error),
Navigate(予約完了画面);SubmitForm(Form1))
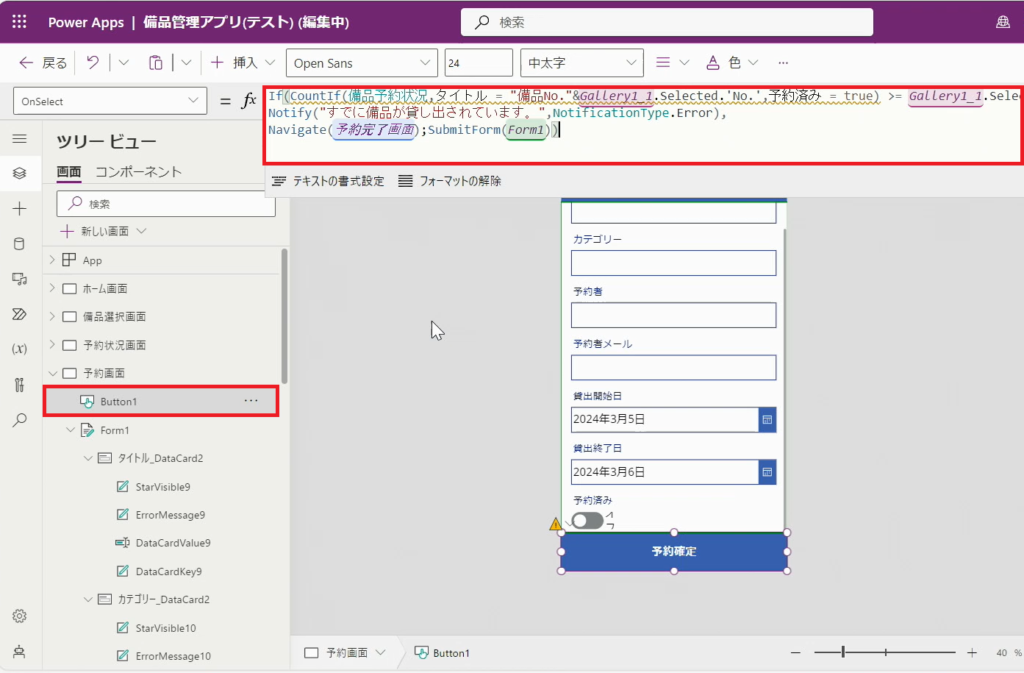
Point!関数の解説
もし(if)
備品予約状況のリストにある備品の総数(備品予約状況,タイトル)=Gallery1_1で選択されている備品で、且つ予約済みにチェックが入っている(“備品No.”&Gallery 1_1.Selected.’No.’,予約済み = true)
がGallery1.1で選択したレコードの備品在庫よりも(Gallery 1_1.Selected.備品在庫)
多い場合(>)=画面の上部にエラーメッセージとして(NotificationType.Error)「すでに備品が貸し出されています。」と通知してください。(Notify(“すでに備品が貸し出されています。”)
多くない場合(>)=入力されたフォームの内容をデータソースに送信してください。(SubmitForm(Form1))
あと予約完了画面に飛んでください(Navigate(予約完了画面))
16.「Icon1_2 (戻る矢印) 」の数式に下記を入力します。
Back()

17.予約画面が完成しました。
手順5.予約完了画面
1.「予約完了画面」を選択します。
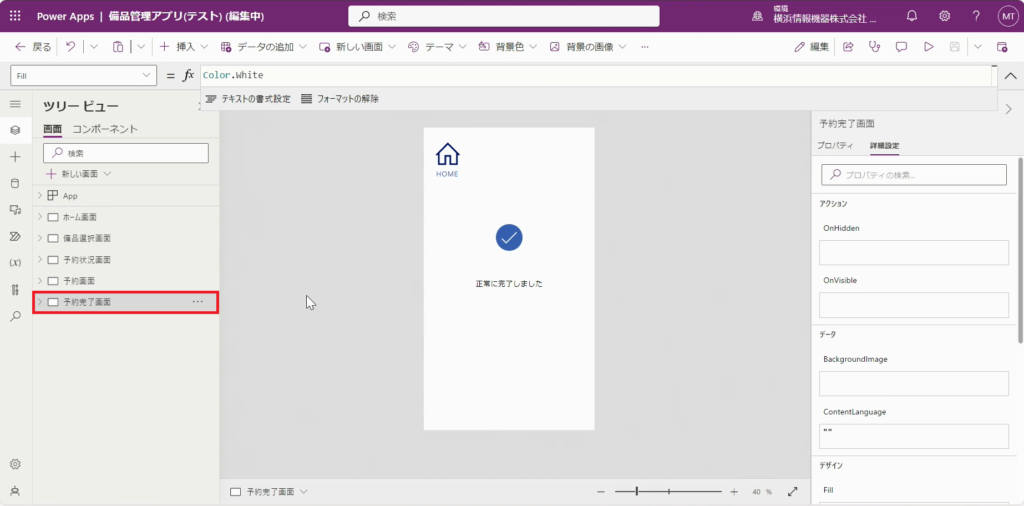
2.「予約完了画面」のプルダウンから「Icon2」を選択します。
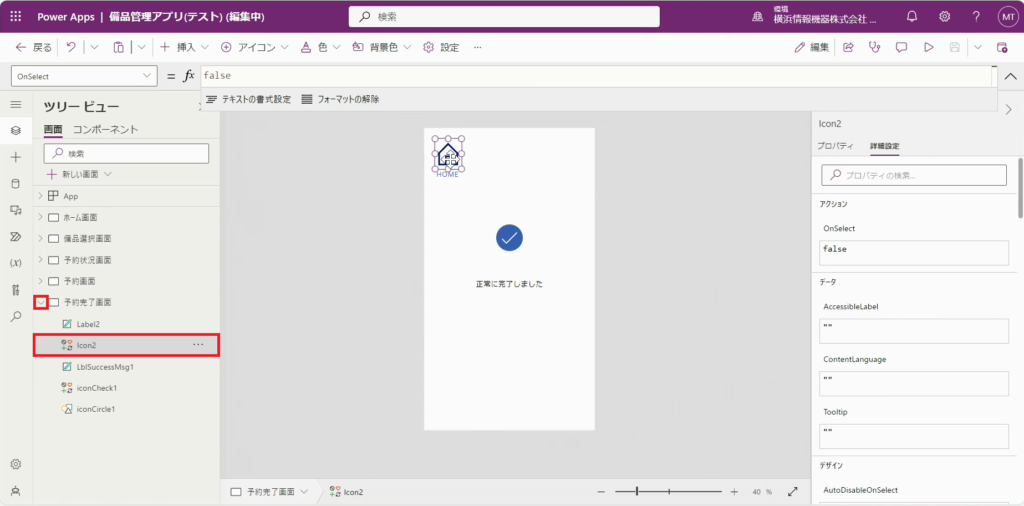
3.「Icon2 (ホームボタン) 」の数式に下記を入力します。
Navigate(ホーム画面)
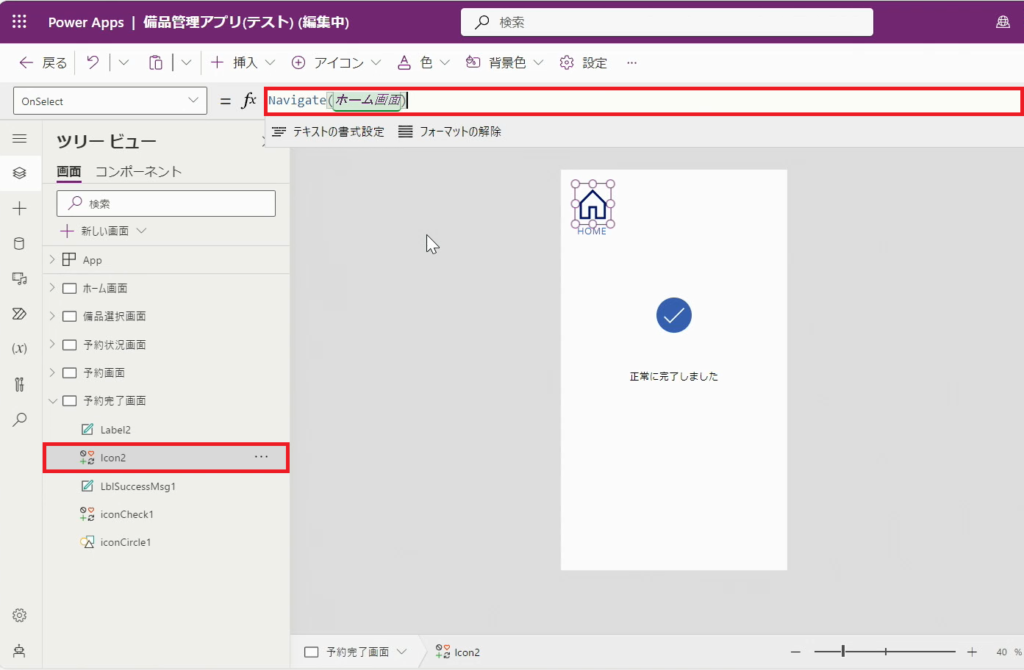
4.予約完了画面が完成しました。
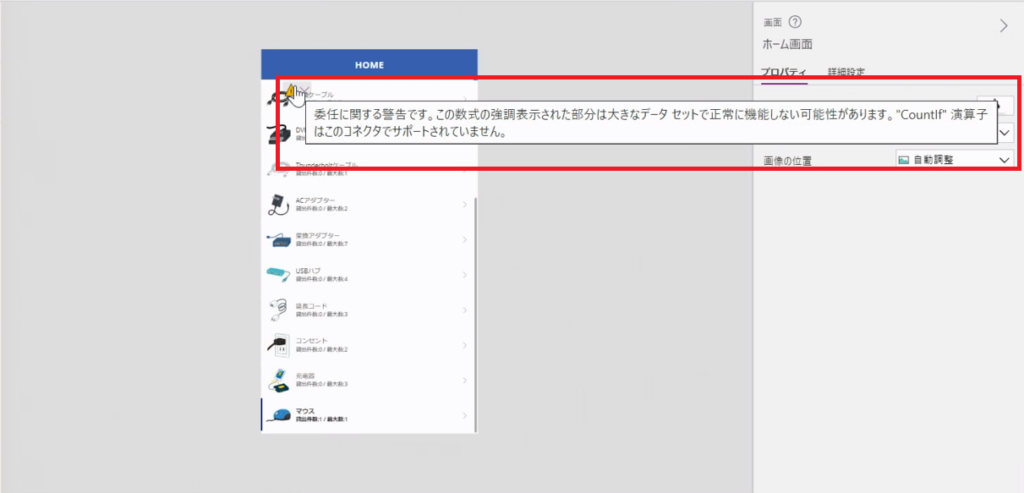
*委任エラーについて*
Power Appsでは、データソースに対して検索やフィルターという指示を出した際にPower Apps内ではなく、データソース側で検索やフィルターを行います。そして結果だけをPower Appsに返してくれます。このことを委任するという言い方で表現しています。最初に紹介したSharePointのリストやDataversesは委任に対応しているためデータソースとして用いることができるのです。
例えばExcelなどはデータソースとして対応していません。
これを前提知識として本題のエラーについて。
重要となるのが、Power AppsがSharePointとやり取りできる最大のレコード数が2,000件ということです。(2,000件問題)
そのため、例えばデータソースに10,000件のレコードがありその中からフィルターにかけた結果を抽出したい場合、
10,000件の中から抽出する=×
先頭2,000の中から抽出する=〇
ということになってしまうのです。当然データは正確でなくなります。つまり委任エラーは、「データソースの規模次第で、もしかしたら正しい値返せないかもよ」ということを忠告してくれているのです。
3.Power Automateによる予約状況の整理、承認フローの自動化
Power Automateを使用して、貸出終了日が過ぎたものから自動で予約解除する機能を作成します。この機能により、Power Automateが自動でSharePointやPower Appsと連携し予約状況の整理を行います。
<フローの流れ>
備品予約状況のリスト内で条件に合うものに対し一定のスパンで操作を実行する。
一定のスパン:任意(本ブログでは15分毎)
条件:返却日が過ぎたもの
操作:予約済みのチェックを外す
手順1.Power Automateでフローを作成する
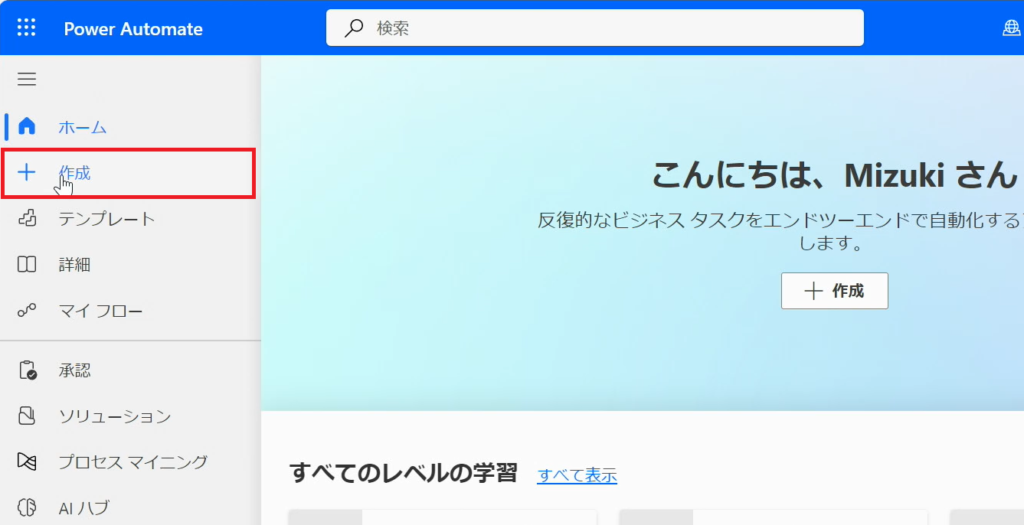
1.「Power Automate」を開きます。
2.「作成」をクリックします。
3.「スケジュール済みクラウドフロー」をクリックします。
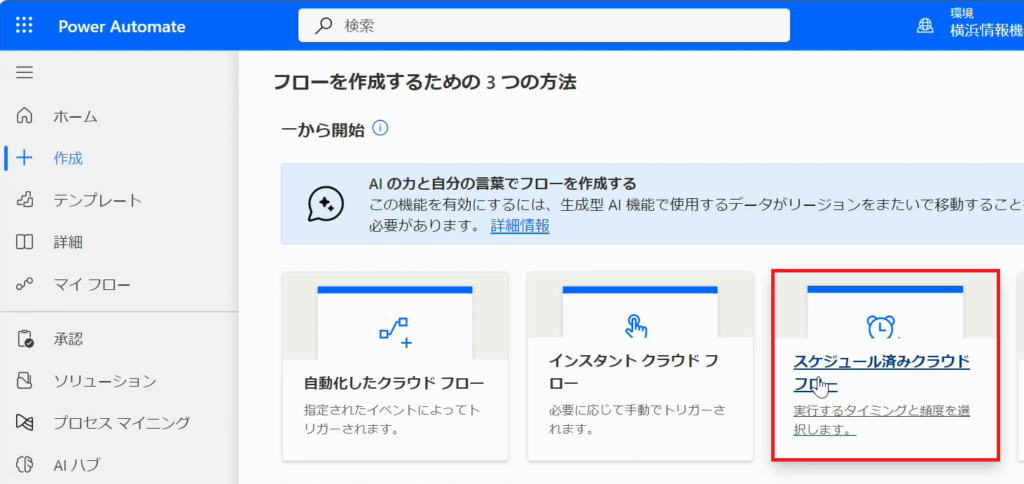
Point!「スケジュール済みクラウドフロー」ってなに?
→アクションごとではなく設定した時間ごとに実行されるフローのことです。
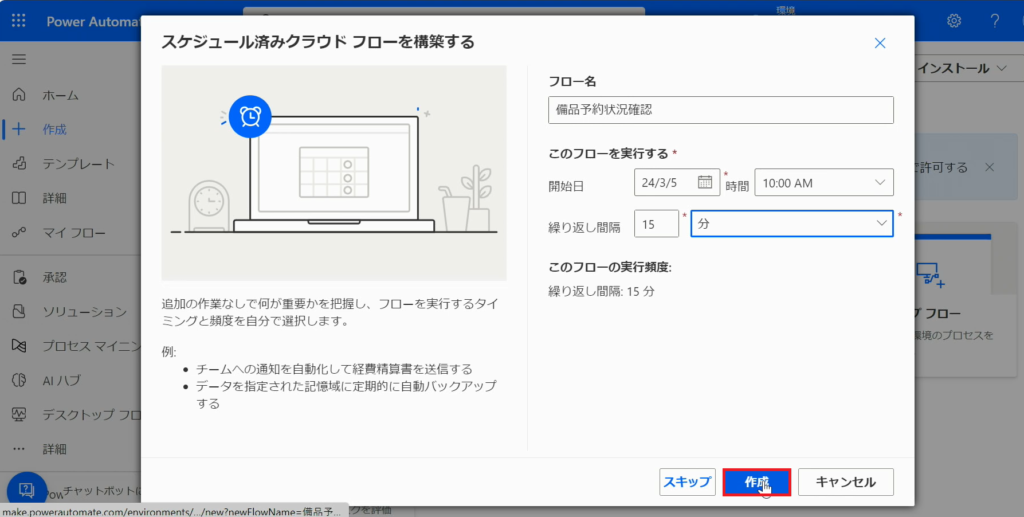
4.「フロー名」を入力します。ここでは「備品予約状況確認」とします。
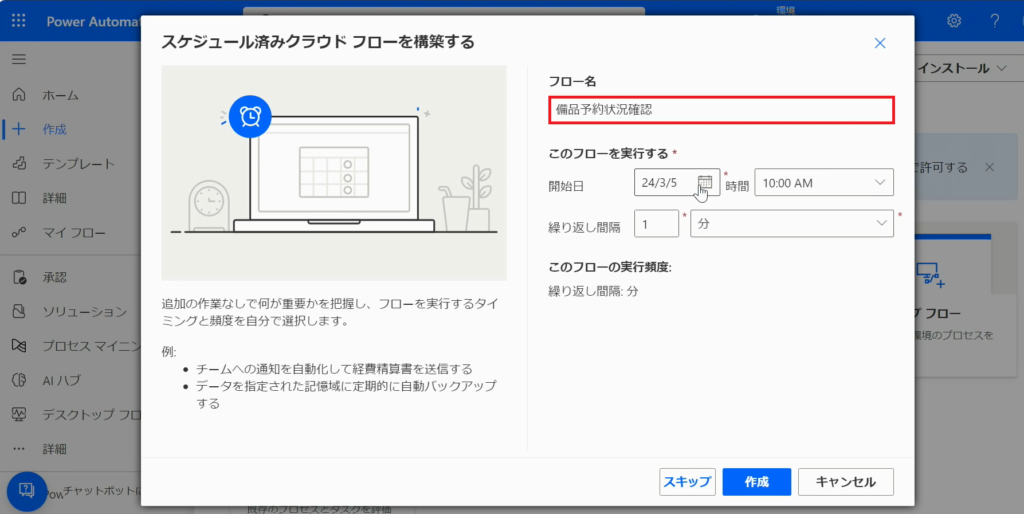
5.「開始日」でフローを開始する日を選択、「時間」のプルダウンからフローの実行時間を設定できます。

6.「繰り返しの間隔」を設定します。今回は、間隔を「15分」に設定しました。
※ここでは、フローの実行頻度を設定できます。(例:1日 / 1週間)

7.「作成」をクリックします。
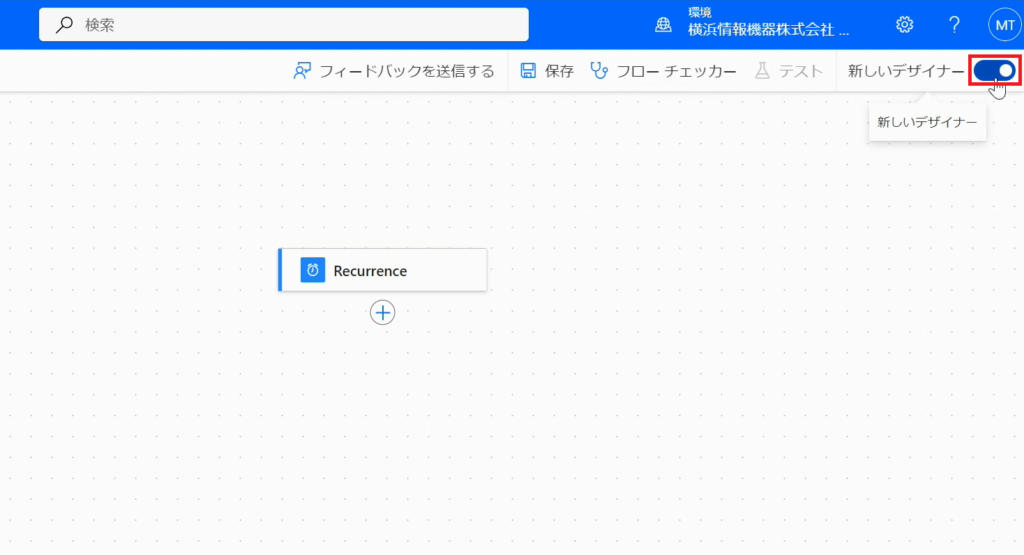
8.「新しいデザイナー」をクリックし、切り替えます。
9.「一定のスパン:任意(本ブログでは15分毎)」の部分を作成していきます。
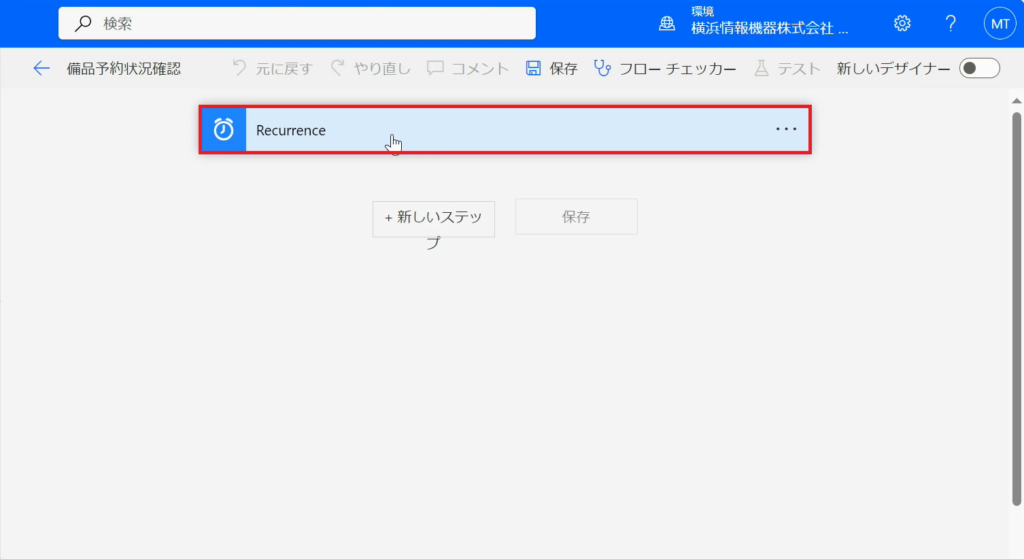
10.「Recurrence」をクリックします。
11.「詳細オプションを表示する」をクリックします。
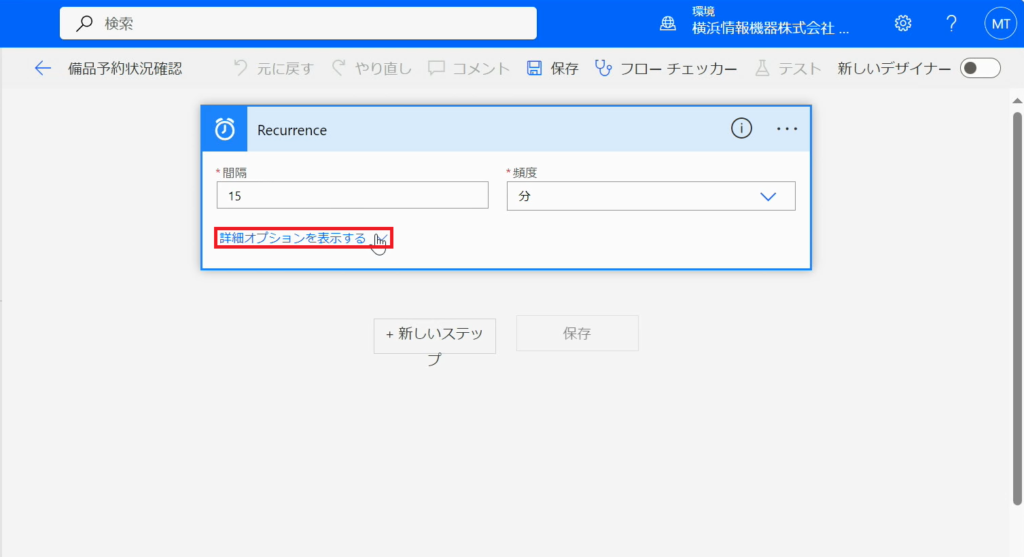
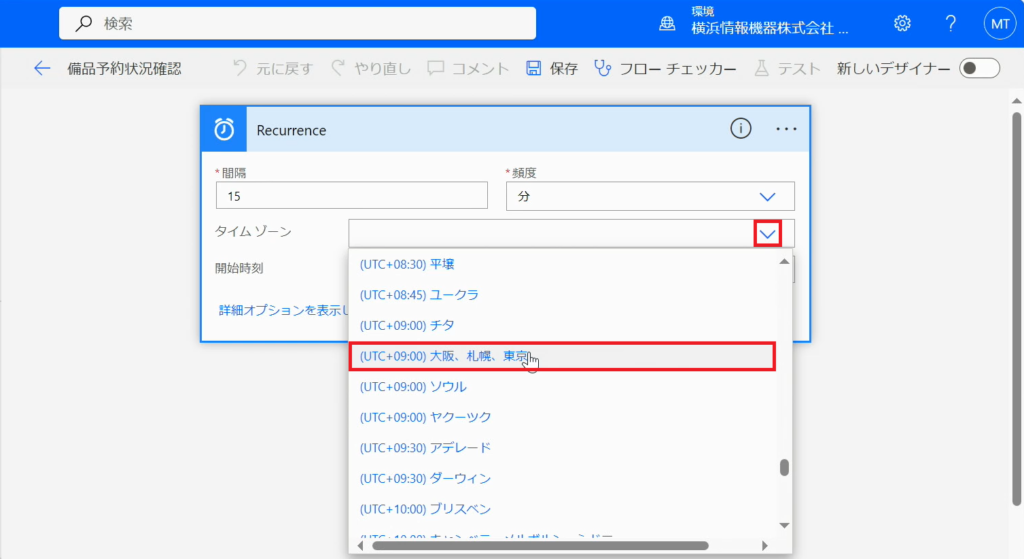
12.「タイムゾーン」のプルダウンから「(UTC + 09:00)大阪、札幌、東京」を選択します。
Point!最初にフローが実行する時間を設定しましたが、この「時間」はフローを実際に用いる環境に対応していなければいけません。そのため、ここでタイムゾーンを日本に設定する必要があります。
13.「開始時刻」の時間を手順5で設定した時間に変更します。
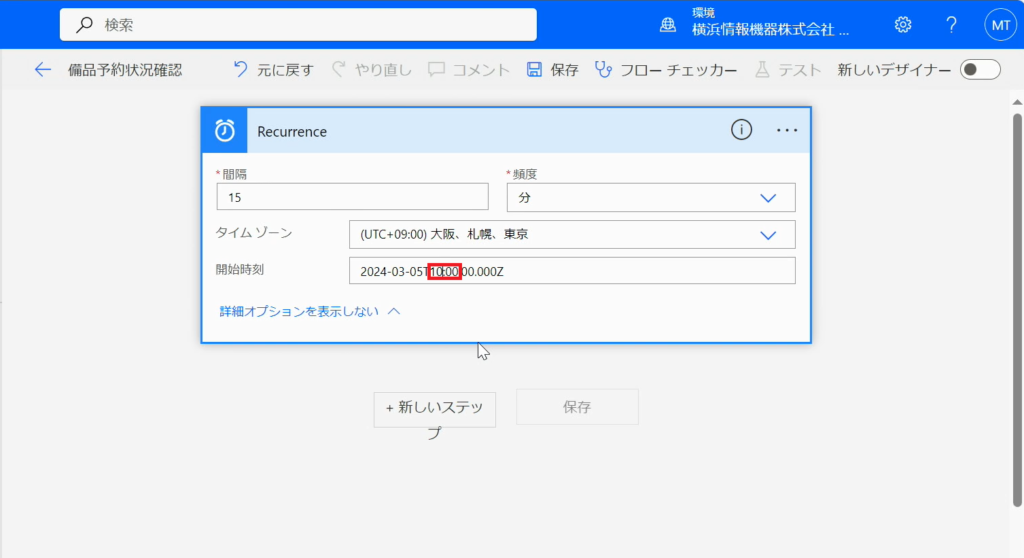
Point!ここで、フローが実行する時間を再度設定しなければいけないようです。おそらく、タイムゾーンを設定することで改めて設定が必要になります。
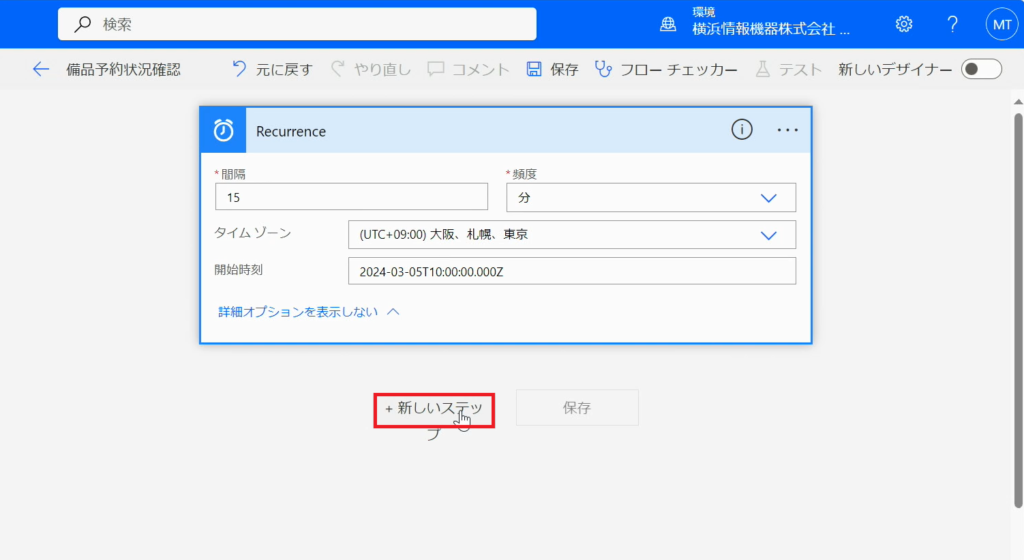
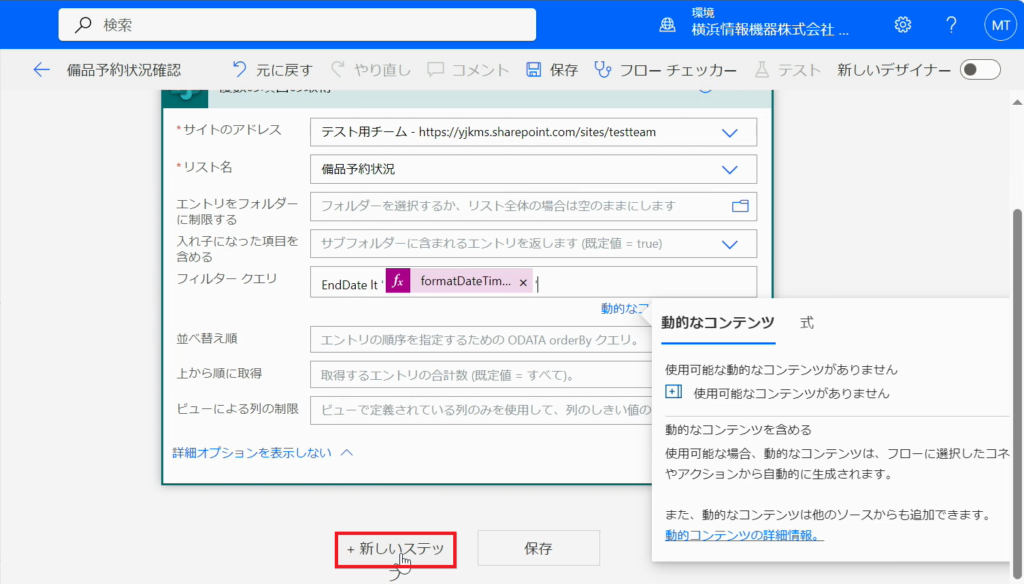
14.「新しいステップ」をクリックします。
15.「条件:返却日が過ぎたもの」の部分を作成していきます。
16.検索バーに「SharePoint」と入力し、「SharePoint」をクリックします。
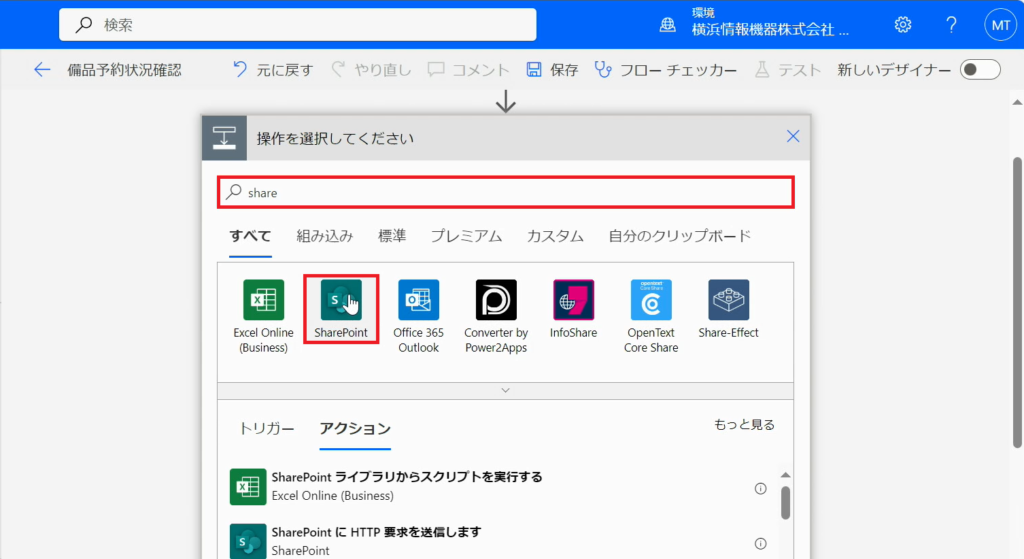
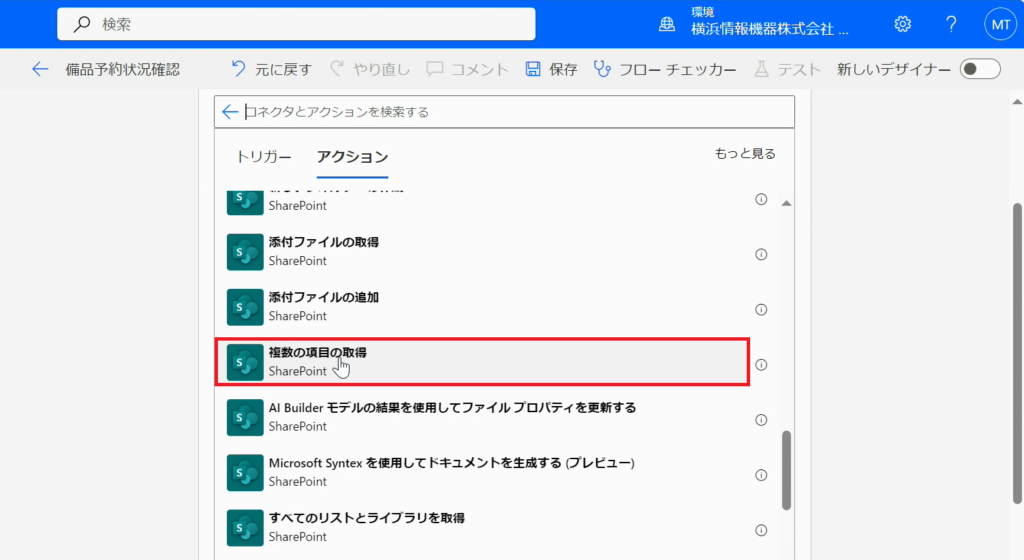
17.「複数の項目の取得」を選択します。
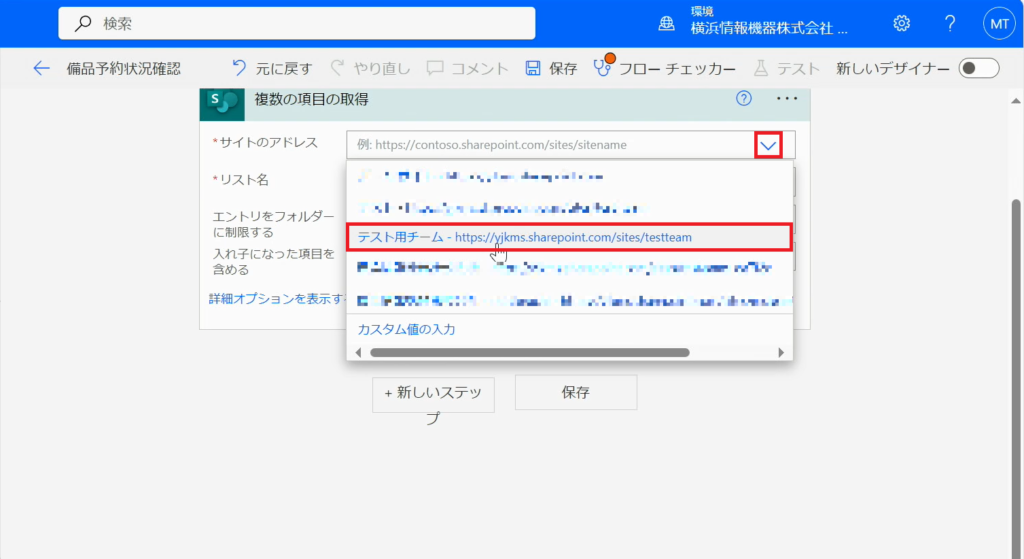
18.「サイトのアドレス」のプルダウンから、リストを作成したサイトを選択します。
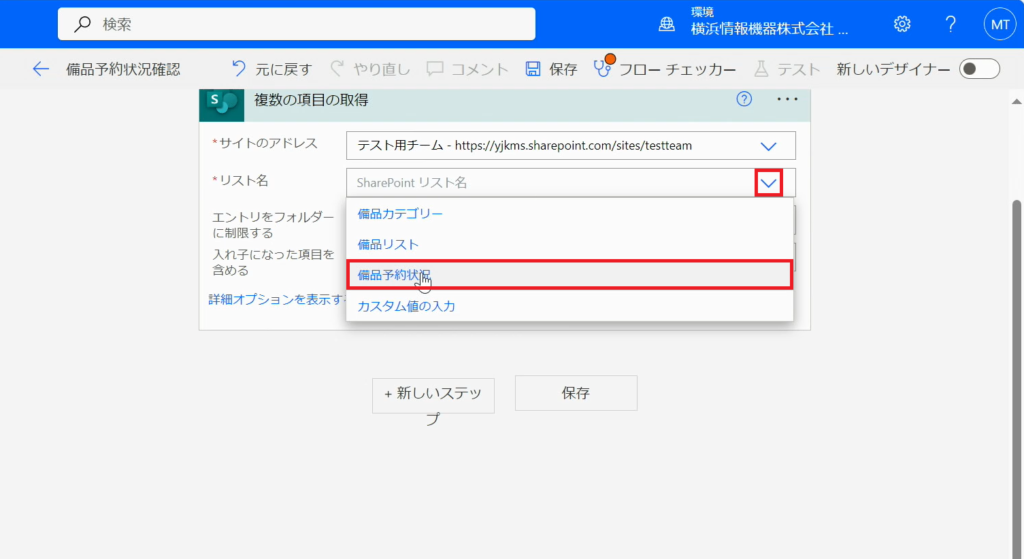
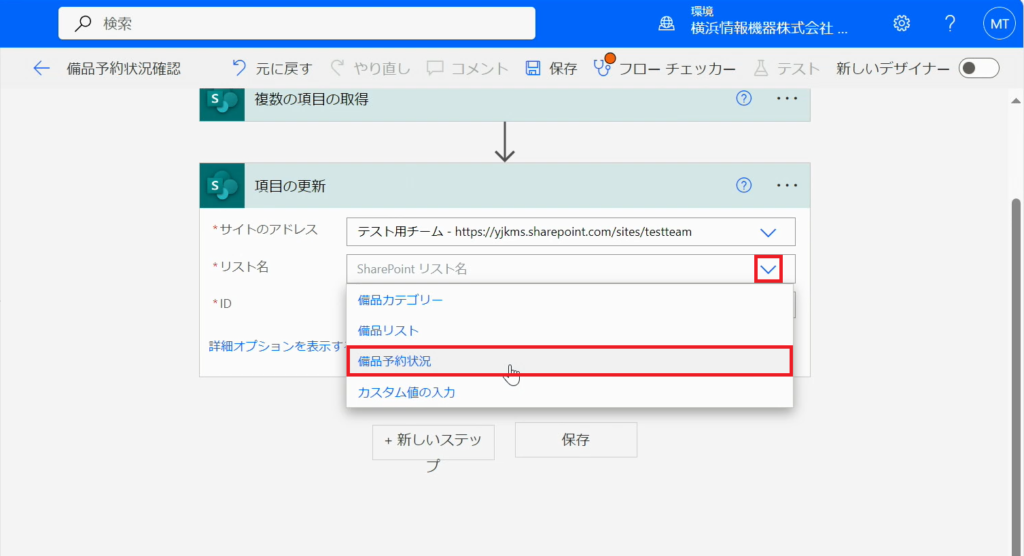
19.「リスト名」から「備品予約状況」を選択します。
※ここでは備品が予約されたときに、実際に予約状況が反映されるリストを選択してください。
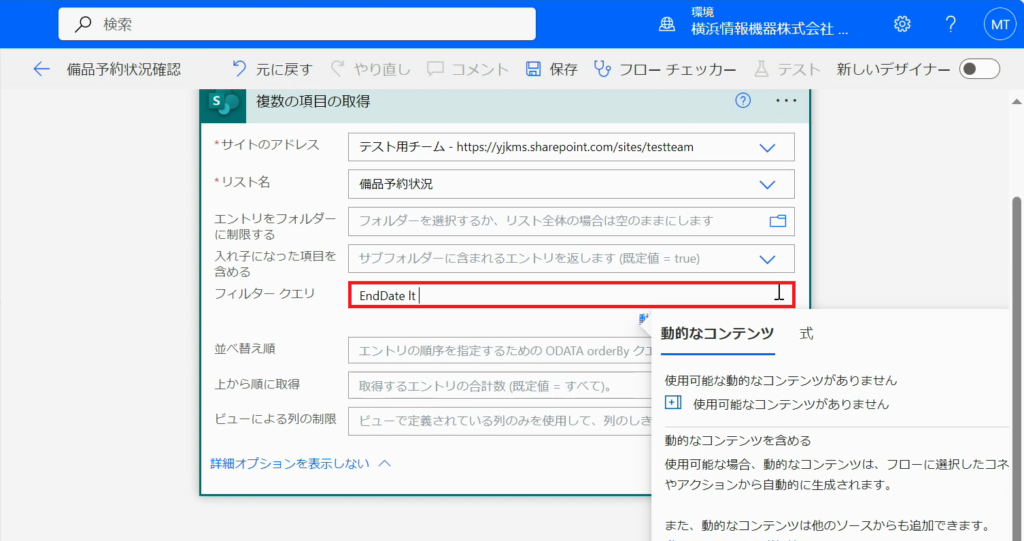
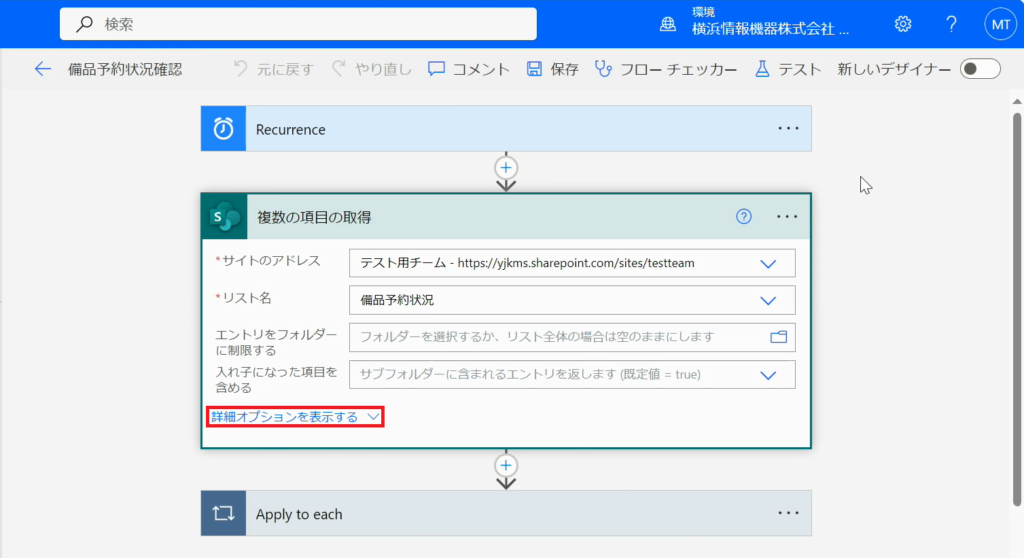
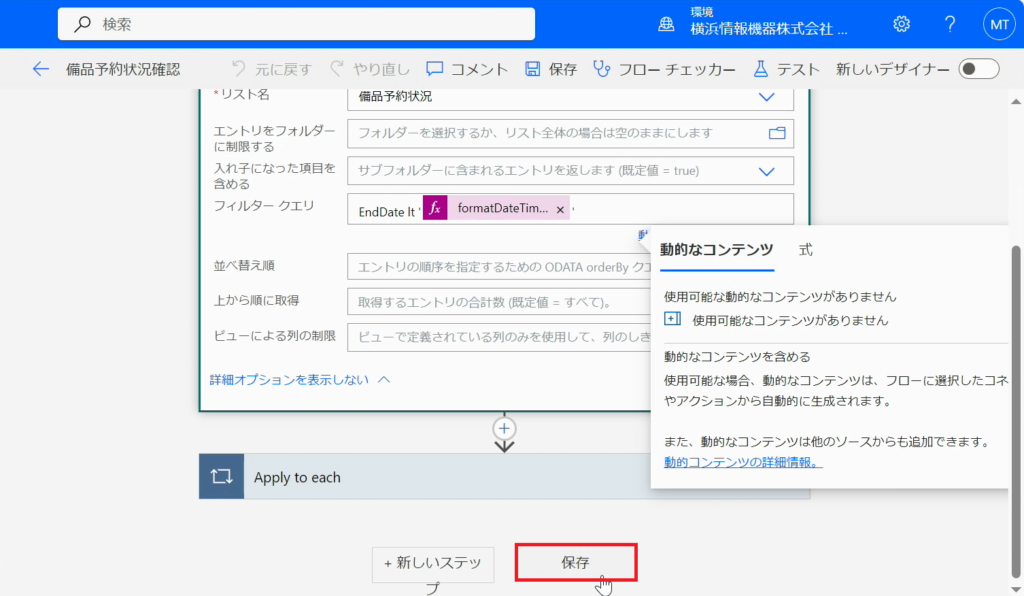
20.「詳細オプションを表示する」をクリックします。
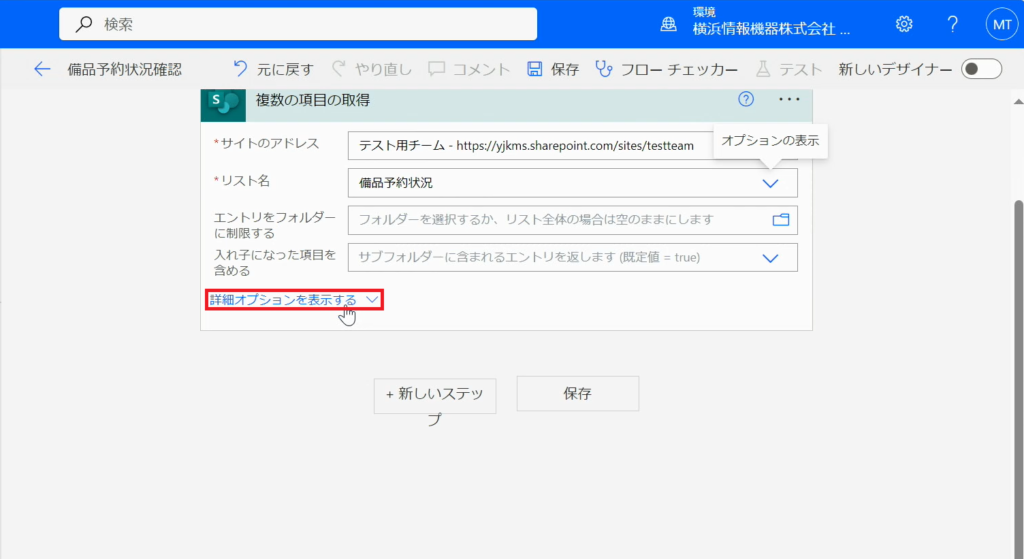
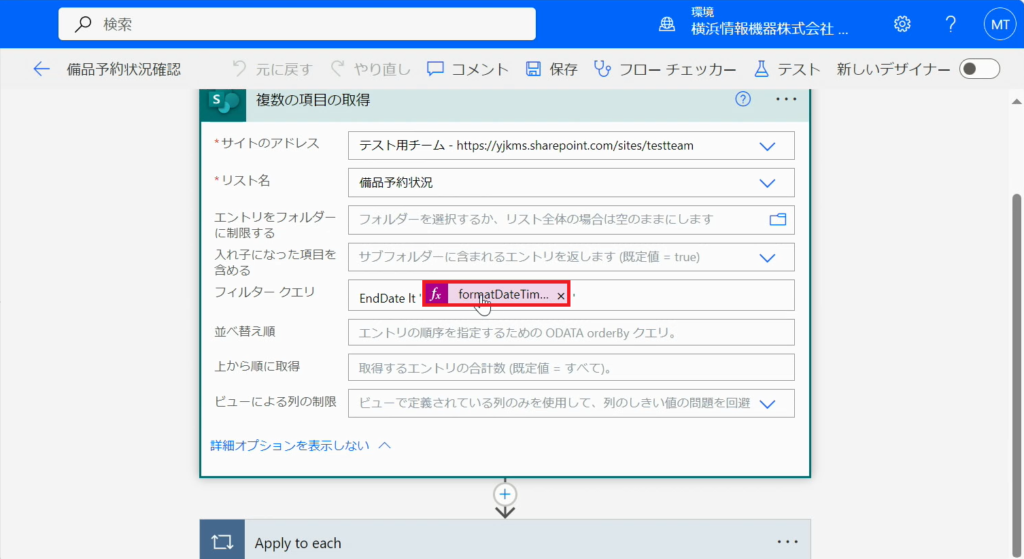
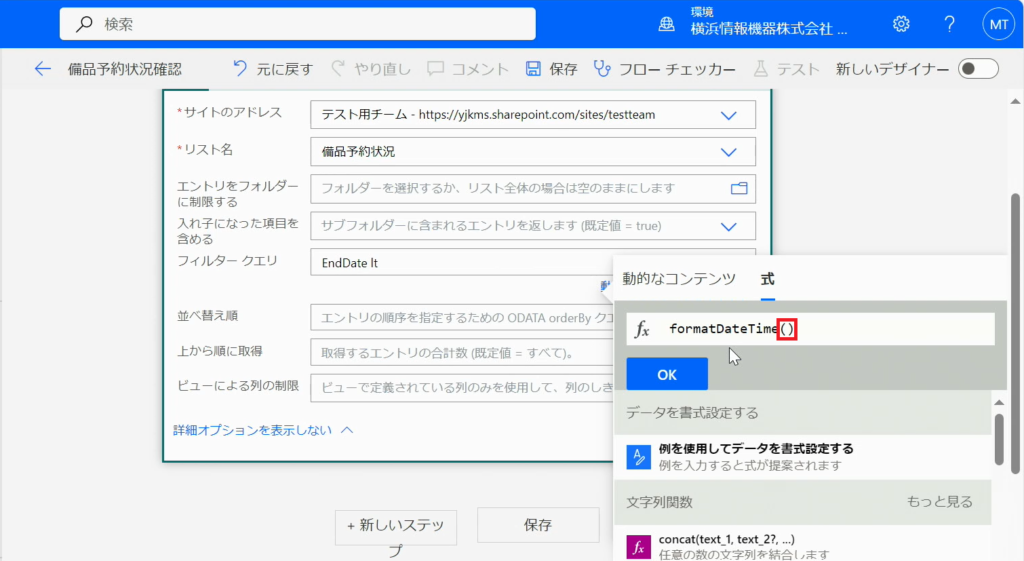
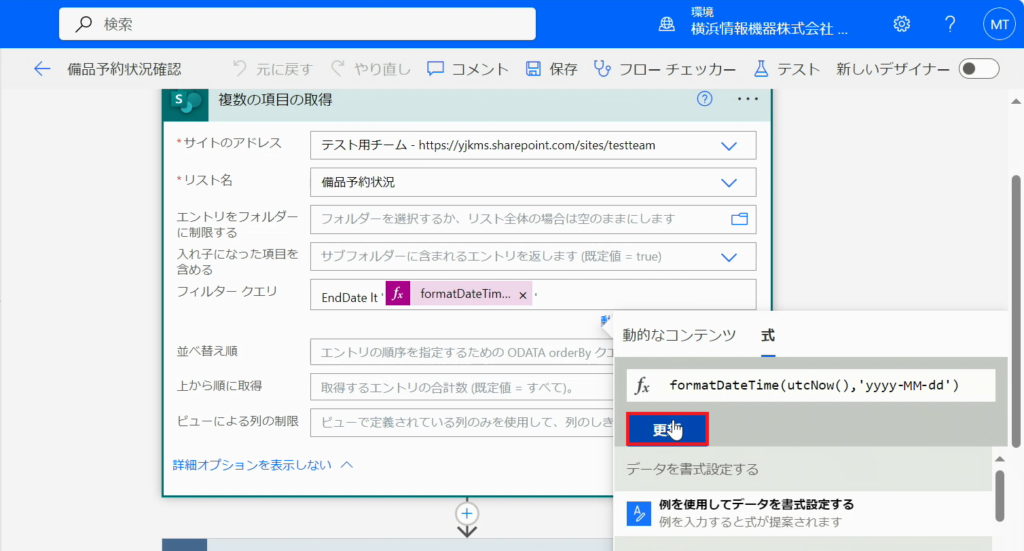
21.「フィルター クエリ」に下記を入力してください。
EndDate lt
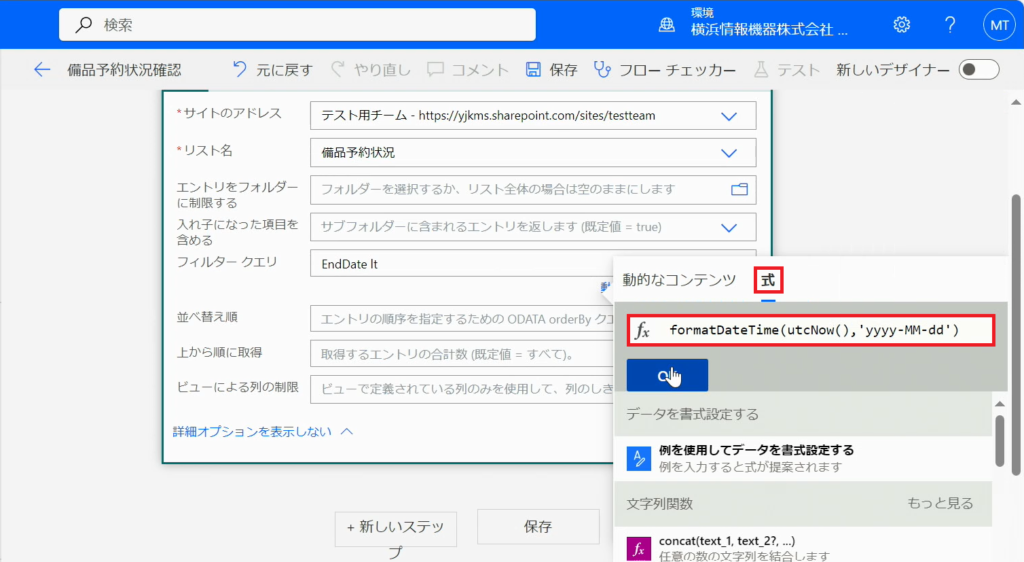
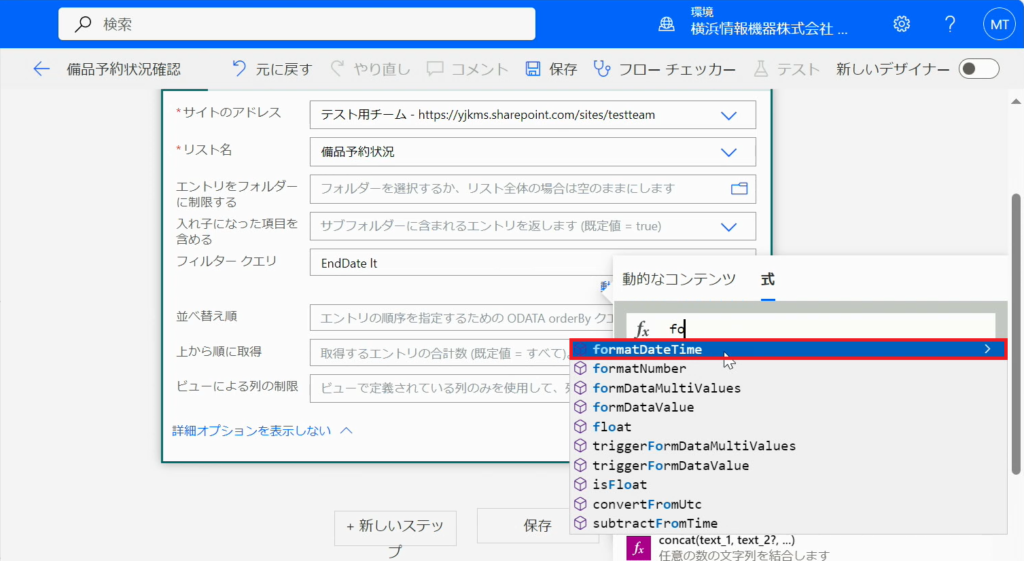
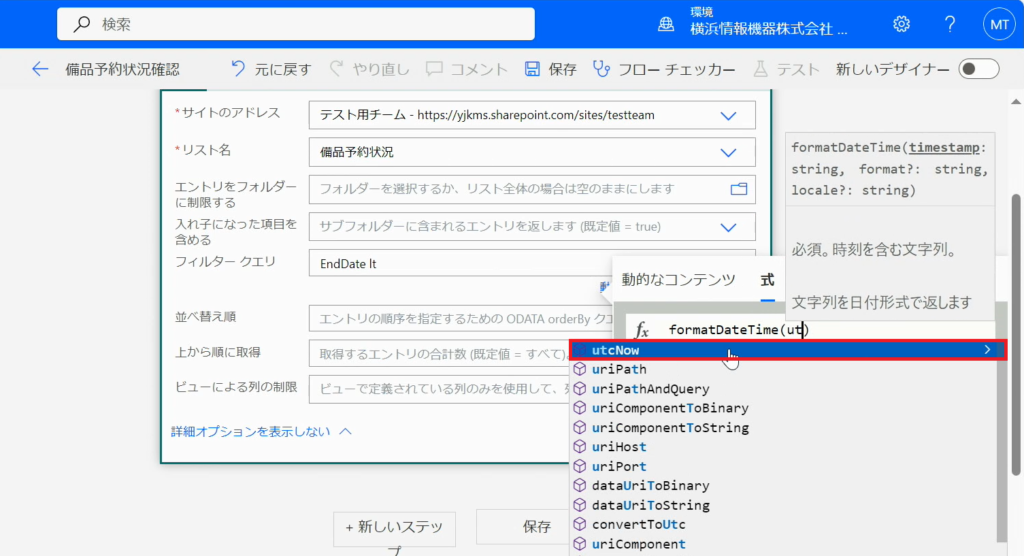
22.「式」をクリックし、下記を入力してください。
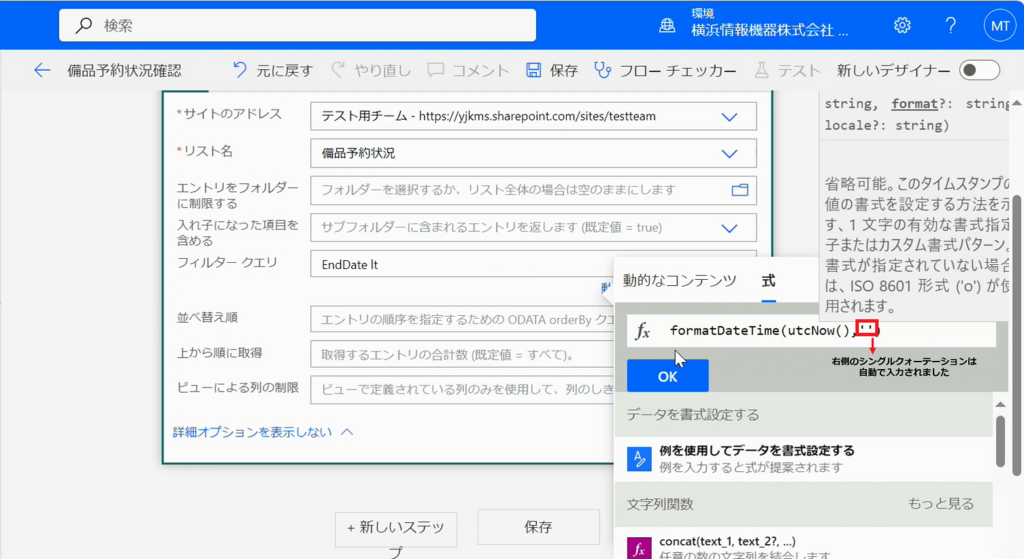
formatDateTime(utcNow(),'yyyy-MM-dd')
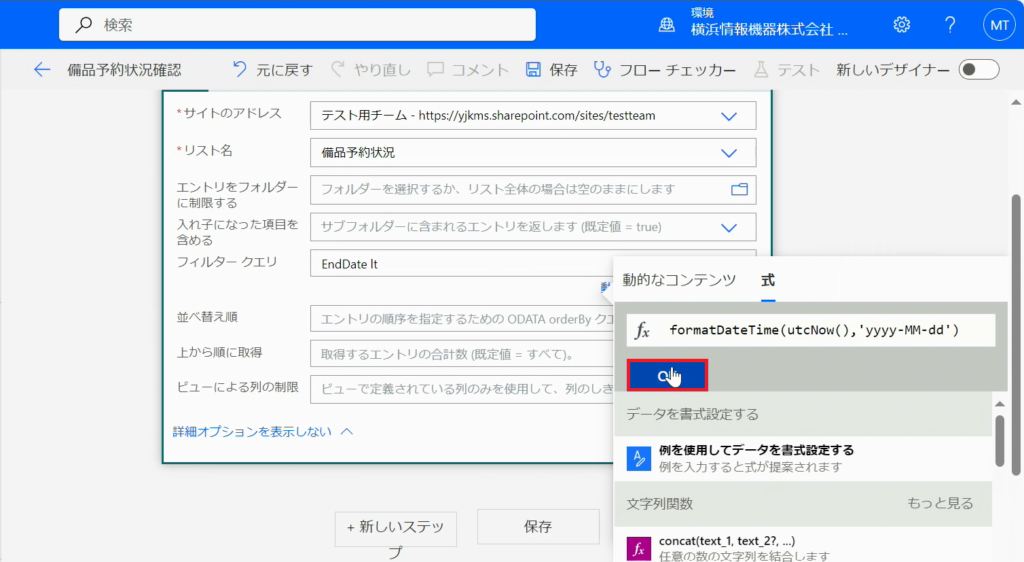
23.「OK」をクリックします。
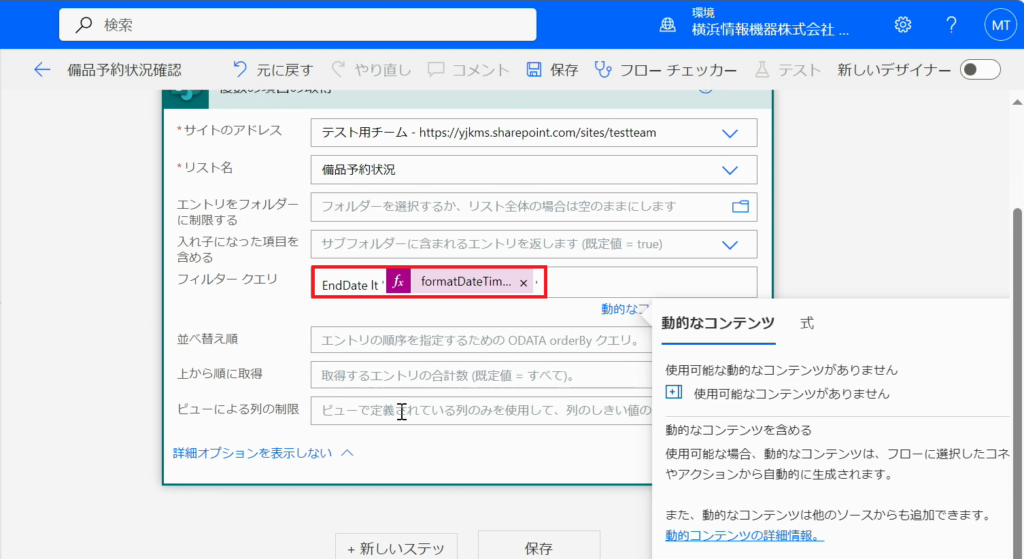
Point!関数の解説
EndDate(返却日) lt(より小さい、よりも前)formatDateTime(utcNow(),’yyyy-MM-dd'(今日の日付)ということになります。これで返却日を過ぎたレコードの情報が取得できます。
24.式を「( ‘ )シングルクォーテーション」で囲みます。
25.「新しいステップ」をクリックします。
26.「操作:予約済みのチェックを外す」の部分を作成していきます。
27.検索バーに「SharePoint」と入力し、「SharePoint」をクリックします。
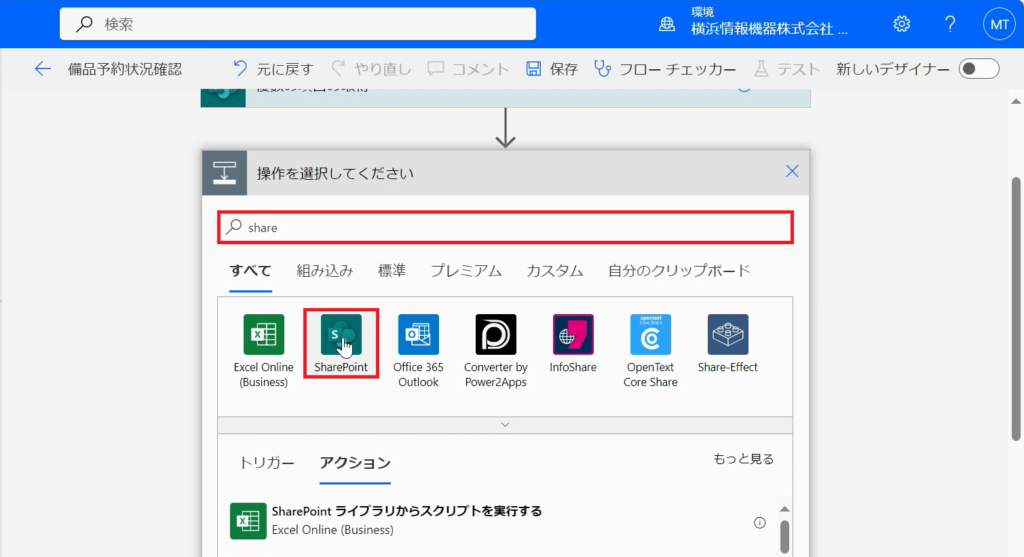
28.「項目の更新」を選択します。
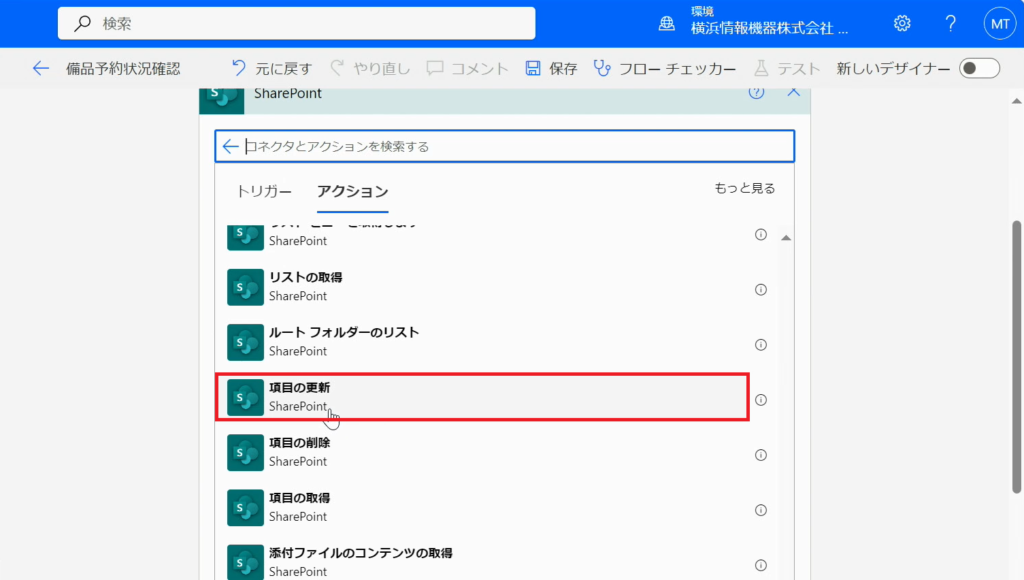
29.「サイトのアドレス」のプルダウンから、リストを作成したサイトを選択します。
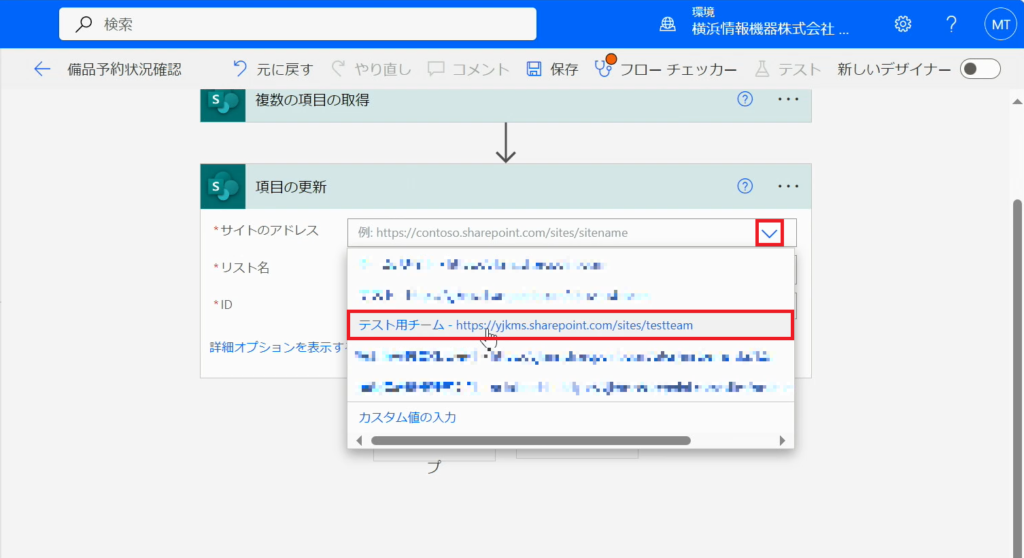
30.「リスト名」から「備品予約状況」を選択します。
※ここでは備品が予約されたときに、実際に予約状況が反映されるリストを選択してください。
31.「ID」の枠内をクリックし、右下の動的なコンテンツの中から「ID」を選択します。
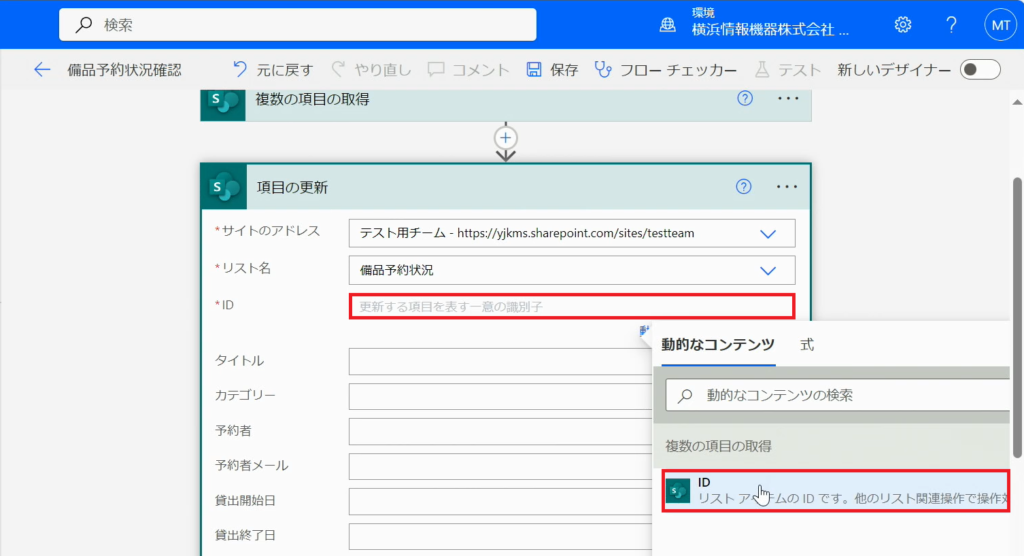
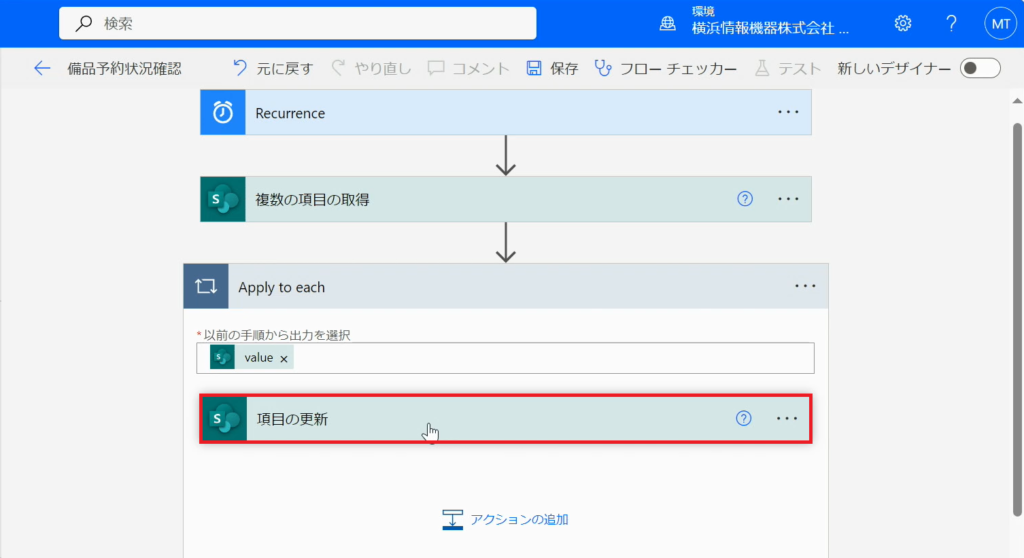
32.「項目の更新」をクリックします。
※「Apply to each」は自動で作成される、処理を繰り返す仕組みです。
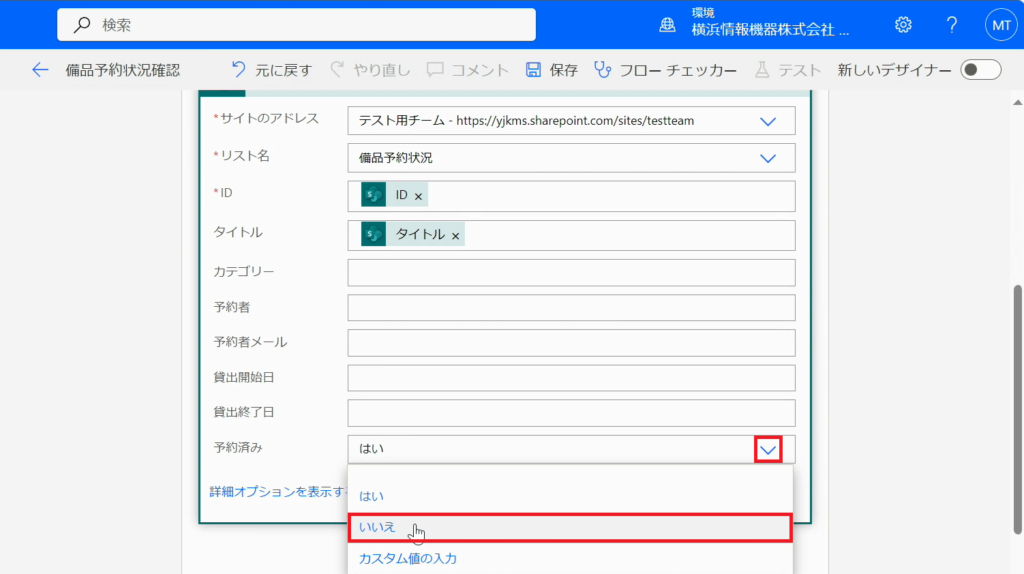
33.「タイトル」の枠内をクリックし、右下の動的なコンテンツの中から「タイトル」を選択します。
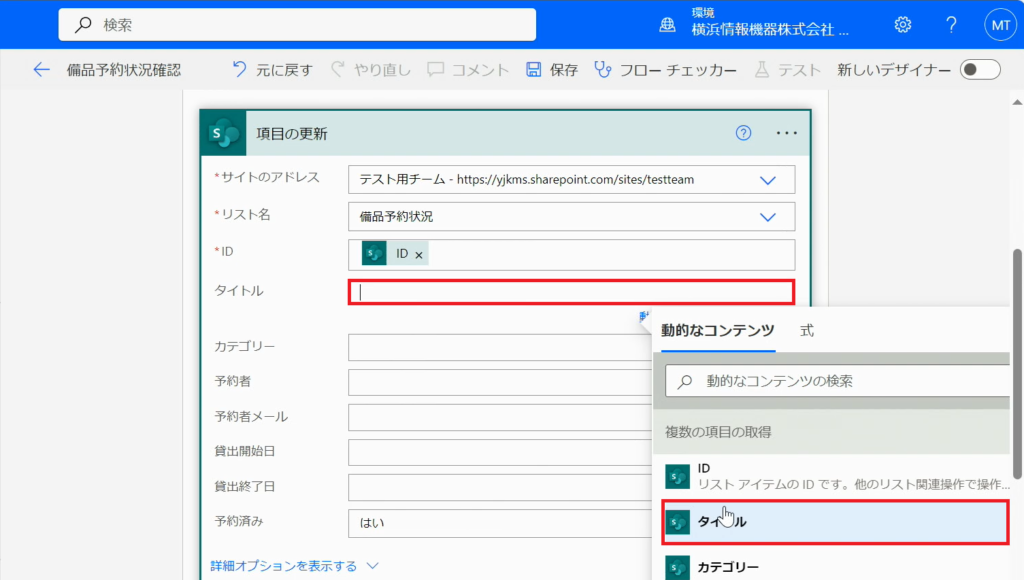
34.「予約済み」のプルダウンを「いいえ」に変更します。
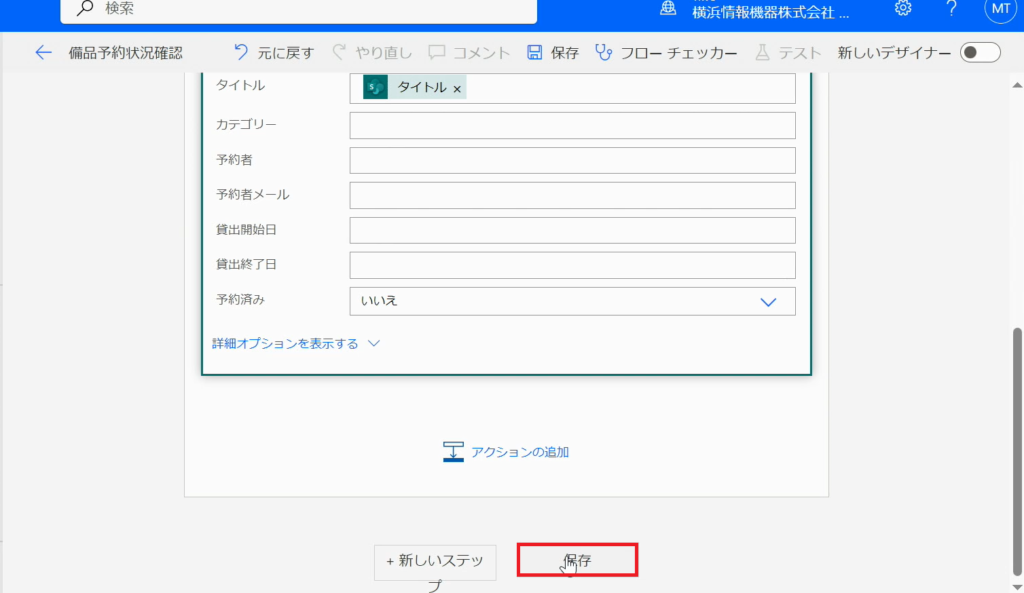
35.「保存」をクリックします。
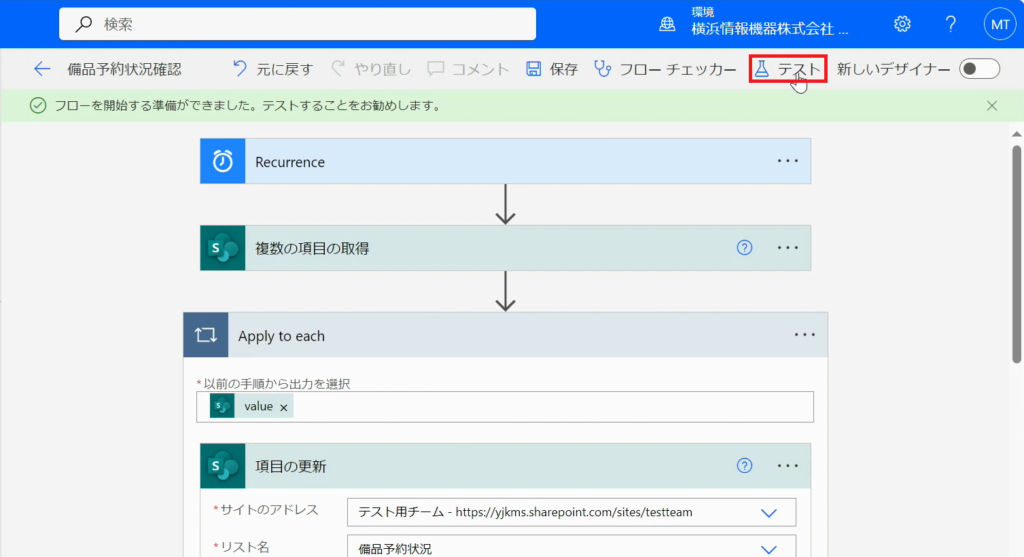
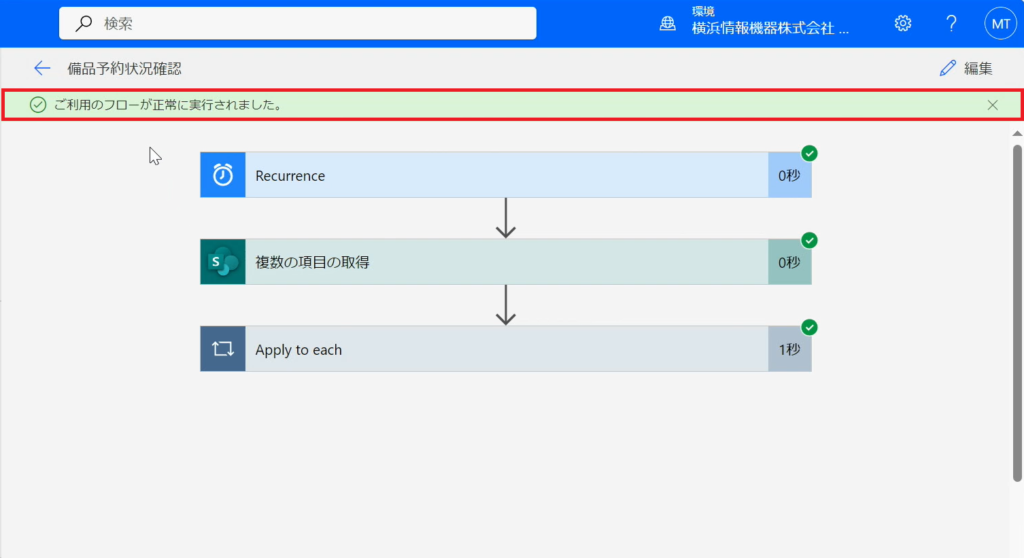
36.「テスト」をクリックします。
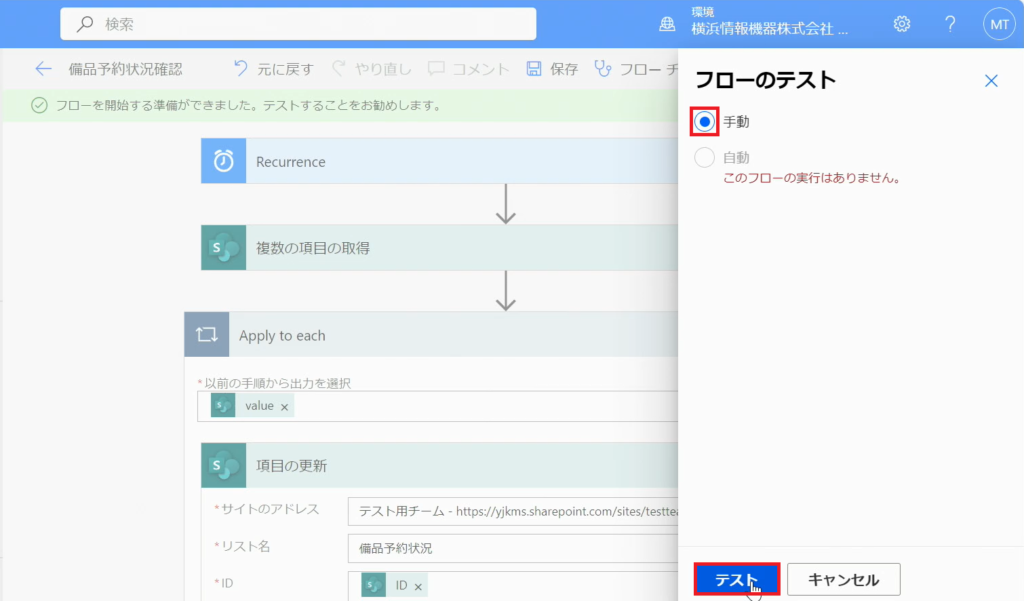
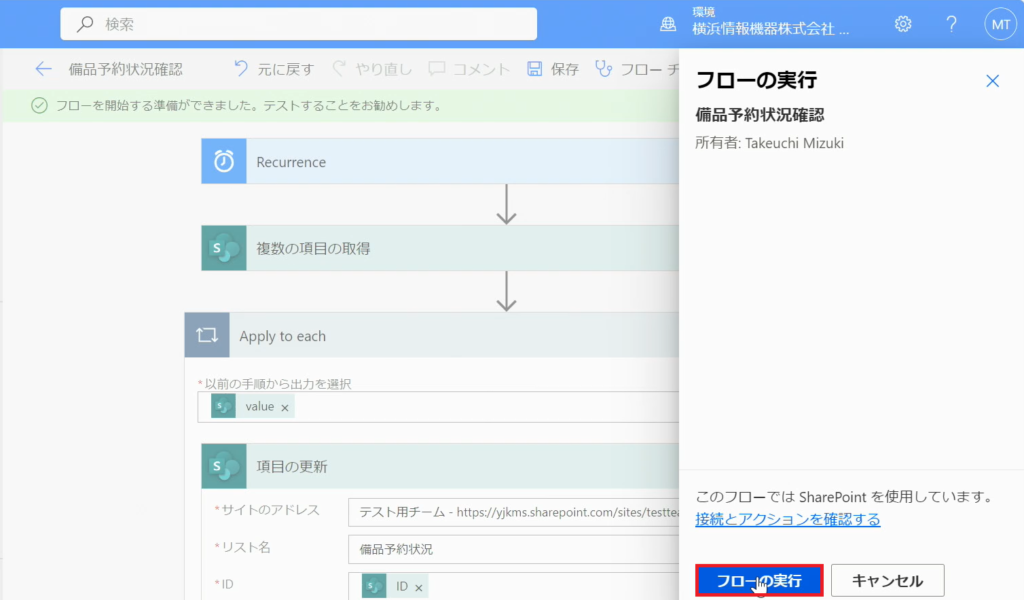
37.「手動」にチェックが入っていることを確認し、「テスト」をクリックします。
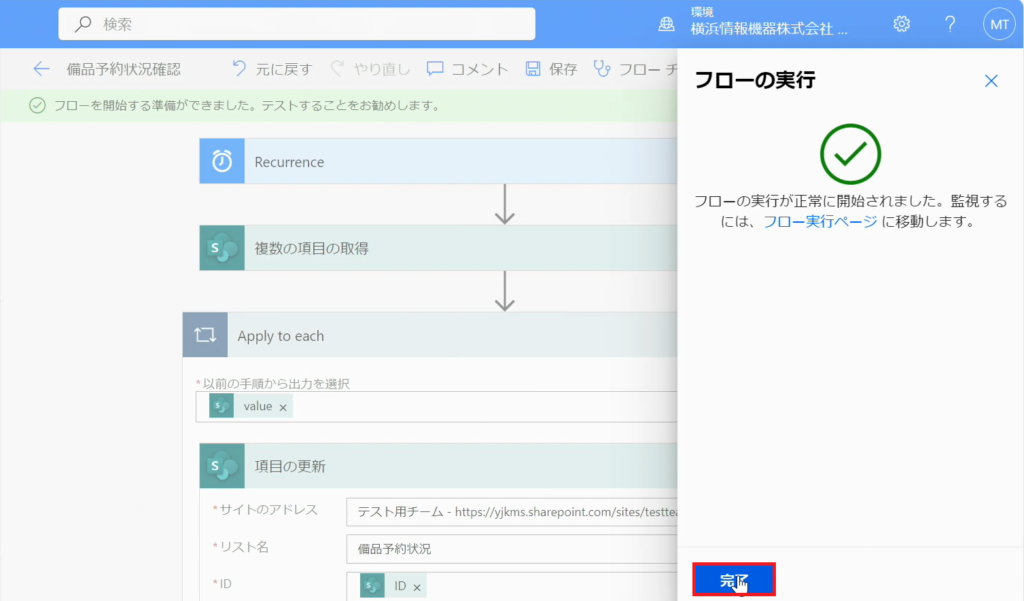
38.「フローの実行」をクリックします。
39.「完了」をクリックすると、画面が切り替わります。
40.フローが正常に実行されました。

手順2.フローの実行結果
1.実際にこのフローを実行していきます。
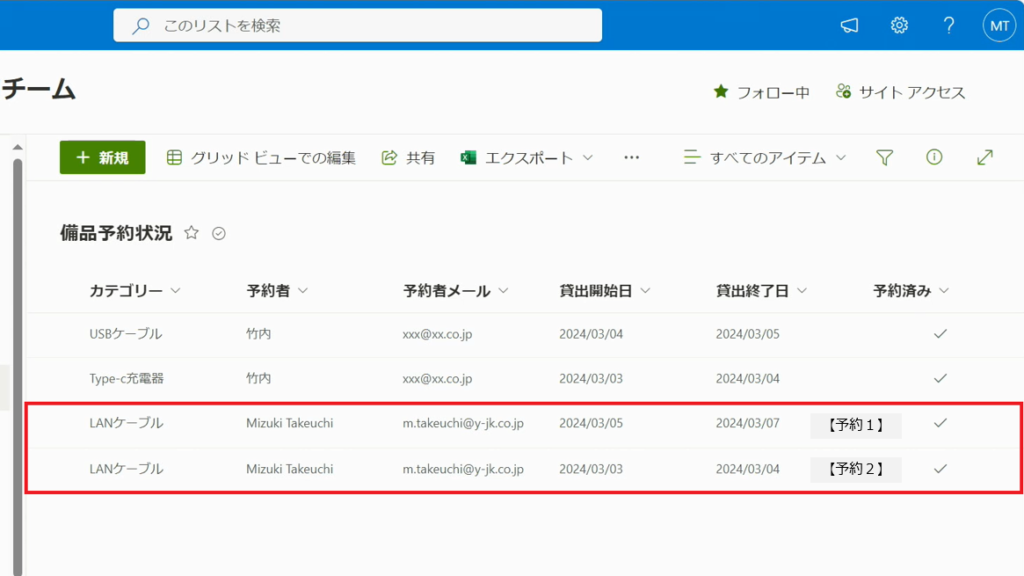
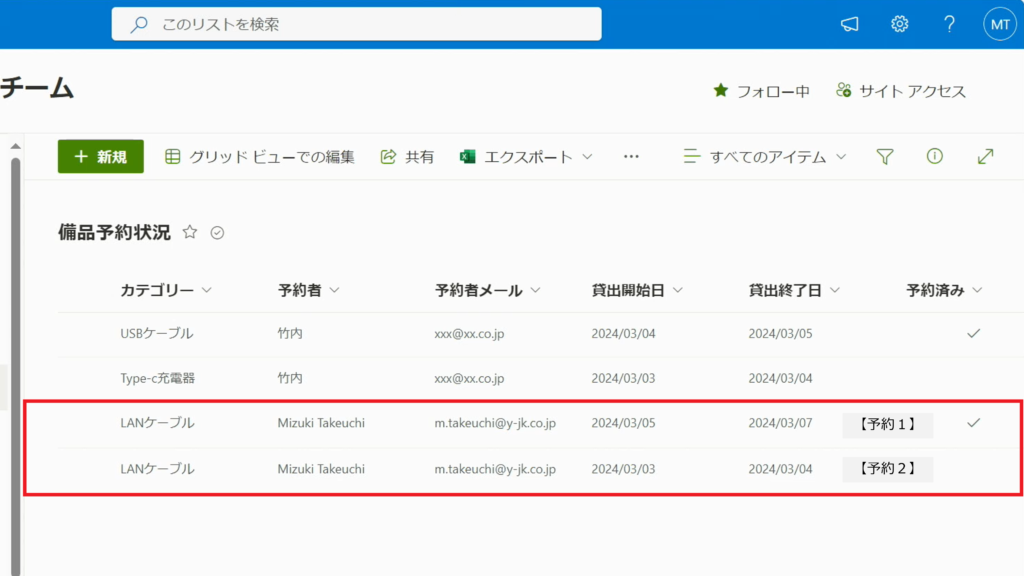
2.下記の画像は、Power Automateのフローを作成する前に予約していた履歴です。
あえて、【予約2】の貸出終了日を過去の日付に設定しています。
—————————————–
※本日は3/5です。
【予約1】 貸出開始日:3/5 / 貸出終了日:3/7
【予約2】 貸出開始日:3/3 / 貸出終了日:3/4
—————————————–
3.Power Appsのアプリにも、予約履歴が反映されていることを確認できました。
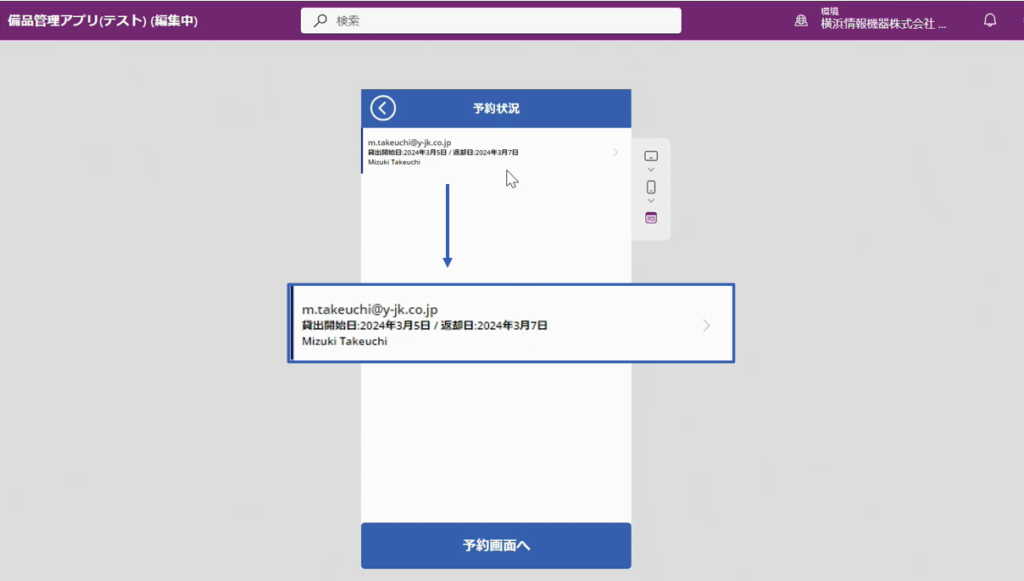
4.フロー実行後の予約履歴が下記のとおりです。過去の日付に設定していた【予約2】のチェックが外れていることが確認できました。
※上手く切り替わらない場合は、SharePointのリストを最新の状態に更新してください。
5. Power Appsのアプリも同様、予約履歴がフロー通り削除されています。
※こちらも、上手く切り替わらない場合はアプリ内のデータを最新の状態に更新してください。

6.Power Automateが正しく実行されていることが確認できました。
手順3.エラーが出た場合
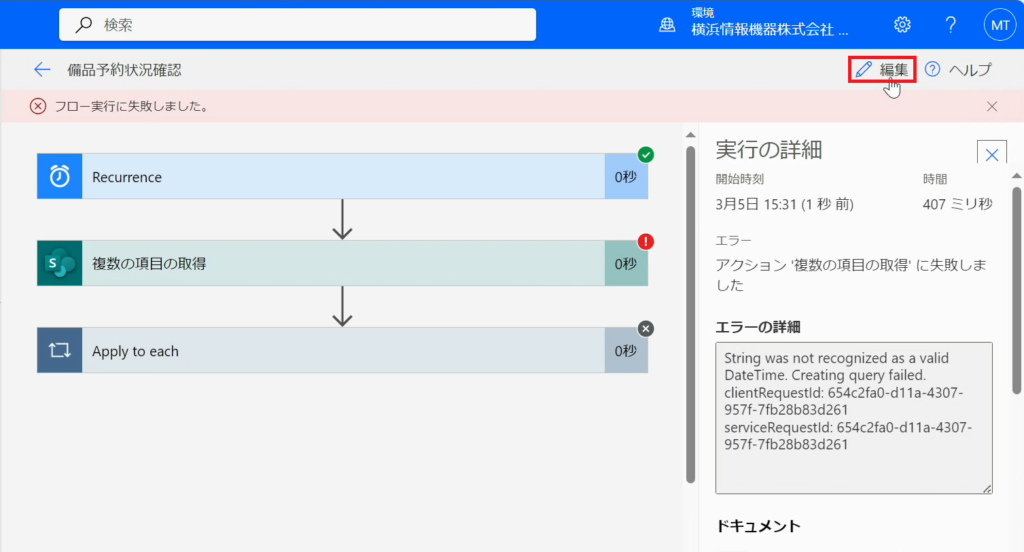
1.フローの実行にエラーが出た際の対処法をご紹介します。
2.エラーが発生すると、「フロー実行に失敗しました。」といポップアップと共に、エラーの出た項目に「エラーマーク」が表示されます。
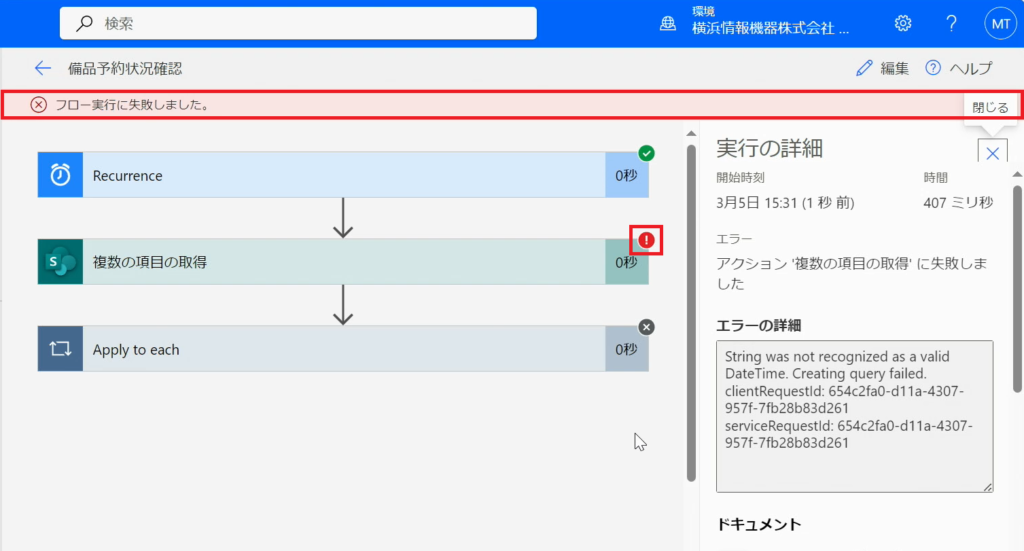
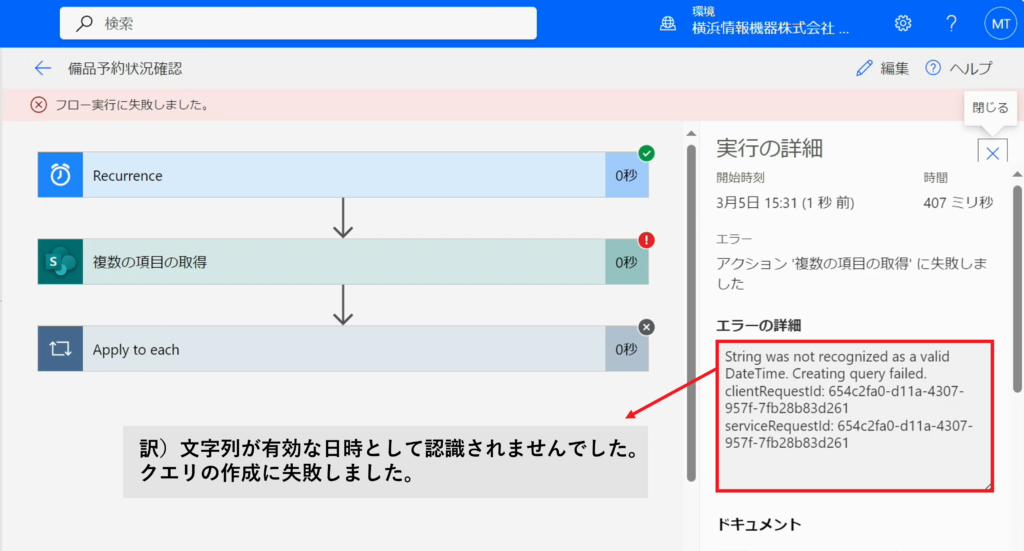
3.今回出たエラーの詳細は、「String was not recognized as valid Date Time.Creating query failed. / 訳)文字列が有効な日時として認識されませんでした。クエリの作成に失敗しました。」という内容でした。
4.「編集」をクリックします。
5.「詳細オプションを表示する」をクリックします。
6.「式」をクリックし、入力しなおします。
7.式「formatDateTime」を入力します。式を入力する際は、自動で出てくる文字列を使用します。
8.「 ( 」を入力します。
下記の画像は、「 ( 」のみ手動で入力しています。右の「 ) 」は、自動で出てきた記号です。
9.このように、式には形式が決まっています。「文字列」や「記号」が自動で出てきた場合は、そちらを使用しないと「有効」と認識されずエラーになる可能性があります。
10.式の入力を終えたら、「更新」をクリックします。
11.「保存」をクリックし、再度テストを行ってください。
12.フローが正常に実行されました。
その他お困りごとも動画で解説!
